Introduction
In this last part of our series on protected processes in Windows 8.1, we’re going to be taking a look at the cryptographic security that protects the system from the creation or promotion of arbitrary processes to protected status, as well as to how the system is extensible to provide options for 3rd party developers to create their own protected processes.
In the course of examining these new cryptographic features, we’ll also be learning about Signing Levels, a concept introduced in Windows 8. Finally, we’ll examine how the Code Integrity Library DLL (Ci.dll) is responsible for approving the creation of a protected process based on its associated signing level and digital certificate.
Signing Levels in Windows 8
Before Windows 8.1 introduced the protection level (which we described in Part 1 and Part 2), Windows 8 instituted the Signing Level, also sometimes referred to as the Signature Level. This undocumented number was a way for the system to differentiate the different types of Windows binaries, something that became a requirement for Windows RT as part of its requirement to prohibit the execution of Windows “desktop” applications. Microsoft counts among these any application that did not come from the Windows Store and/or which was not subjected to the AppContainer sandboxing technology enforced by the Modern/Metro programming model (meanwhile, the kernel often calls these “packaged” applications).
I covered Signing Levels in my Breakpoint 2012 presentation, and clrokr, one of the developers behind the Windows RT jailbreak, blogged about them as well. Understanding signing levels was critical for the RT jailbreak: Windows introduced a new variable, SeILSigningPolicy, which determined the minimum signing level allowed for non-packaged applications. On x86, this was read from the registry, and assumed to be zero, while on ARM, this was hard-coded to “8”, which as you can see from clrokr’s blog, corresponds to “Microsoft” – in effect allowing only Microsoft-signed applications to run on the RT desktop. The jailbreak, then, simply sets this value to “0”.
Another side effect of Signing Levels was that the “ProtectedProcess” bit in EPROCESS was removed — whether or not a Windows 8 process is protected for DRM purposes (such as Audiodg.exe, which handles audio decoding) was now implied from the value in the “SignatureLevel” field instead.
Signing Levels in Windows 8.1
In Windows 8.1, these levels have expanded to cover some of the needs introduced by the expansion of protected processes. The official names Microsoft uses for them are shown in Table 1 below. In addition, the SeILSigningPolicy variable is no longer initialized through the registry. Instead, it is set through the Secure Boot Signing Policy, a signed configurable policy blob which determines which binaries a Windows 8.1 computer is allowed to run. The value on 8.1 RT, however, remains the same – 8 (Microsoft), still prohibiting desktop application development.
Windows 8.1 Signing Levels
| Signing Level | Name |
|---|---|
| 0 | Unchecked |
| 1 | Unsigned |
| 2 | Custom 0 |
| 3 | Custom 1 |
| 4 | Authenticode |
| 5 | Custom 2 |
| 6 | Store |
| 7 | Custom 3 / Antimalware |
| 8 | Microsoft |
| 9 | Custom 4 |
| 10 | Custom 5 |
| 11 | Dynamic Code Generation |
| 12 | Windows |
| 13 | Windows Protected Process Light |
| 14 | Windows TCB |
| 15 | Custom 6 |
Furthermore, unlike the Protection Level that we saw in Parts 1 and 2, which is a process-wide value most often used for determining who can do what to a process, the Signature Level is in fact subdivided into both an EXE signature level (the “SignatureLevel” field in EPROCESS) as well as a DLL signature level (the “SectionSignatureLevel” field in the EPROCESS structure). While the former is used by Code Integrity to validate the signature level of the primary module binary, the latter is used to set the minimum level at which DLLs on disk must be signed with, in order to be allowed to load in the process. Table 2, which follows, describes the internal mapping used by the kernel in order to assign a given Signature Level for each particular Protected Signer.
Protected Signers to Signing Level Mappings
| Protected Signer | EXE Signature Level | DLL Signature Level |
|---|---|---|
| PsProtectedSignerNone | Unchecked | Unchecked |
| PsProtectedSignerAuthenticode | Authenticode | Authenticode |
| PsProtectedSignerCodeGen | Dynamic Code Generation | Store |
| PsProtectedSignerAntimalware | Custom 3 / Antimalware | Custom 3 / Antimalware |
| PsProtectedSignerLsa | Windows | Microsoft |
| PsProtectedSignerWindows | Windows | Windows |
| PsProtectedSignerWinTcb | Windows TCB | Windows TCB |
Scenarios and Signers
When the Code Integrity library receives a request from the kernel to validate an image (i.e.: to perform page hash or image hash signature checks), the kernel sends both the signing level (which it determined based on its internal mapping matching Table 2 from above) as well as a bit mask called the Secure Required. This bit mask explains to Code Integrity why image checking is being done. Table 3, shown below, describes the possible values for Secure Required.
Secure Required Bit Flags
| Bit Value | Description |
|---|---|
| 0x1 | Driver Image. Checks must be done on x64, ARM, or if linked with /INTEGRITYCHECK. |
| 0x2 | Protected Image. Checks must be done in order to allow the process to run protected. |
| 0x4 | Hotpatch Driver Image. Checks must be done to allow driver to hotpatch another driver. |
| 0x08 | Protected Light Image. Checks must be done in order to allow the process to run PPL. |
| 0x10 | Initial Process Image. Check must be done for User Mode Code Signing (UMCI) reasons. |
The system supports a total of 18 scenarios, and their goal is three-fold: determine the minimum hash algorithm that is allowed for the signature check, and determine if only a particular, specific Signer is allowed for this scenario (a Signer is identified by the content hash of the certificate used to sign the image) and which signature level the Signer is allowed to bestow.
Table 4 below describes the standard Scenarios and their associated Security Required, Signing Level, and minimum Hash Algorithm requirements.
Scenario Descriptions and Hash Requirements
| Scenario | Secure Required | Signing Level | Hash Algorithm |
|---|---|---|---|
| 0 | N/A | Windows TCB | CALG_SHA_256 |
| 1 | Hotpatch Image | Windows | CALG_SHA_256 |
| 2 | N/A | Microsoft | CALG_SHA1 |
| 3 | N/A | Store | CALG_SHA1 |
| 4 | Protected Image | Authenticode | CALG_SHA1 |
| 5 | Driver Image | N/A | CALG_SHA1 |
| 6 | N/A | Authenticode | CALG_SHA1 |
| 7 | N/A | Dynamic Code Generation | CALG_SHA_256 |
| 8* | N/A | N/A | CALG_SHA_256 |
| 9 | N/A | Custom 0 | CALG_SHA_256 |
| 10 | N/A | Custom 1 | CALG_SHA_256 |
| 11 | N/A | Custom 2 | CALG_SHA_256 |
| 12 | N/A | Custom 3 | CALG_SHA_256 |
| 13 | N/A | Custom 4 | CALG_SHA_256 |
| 14 | N/A | Custom 5 | CALG_SHA_256 |
| 15 | N/A | Custom 6 | CALG_SHA_256 |
| 16 | N/A | Windows Protected Light | CALG_SHA_256 |
| 17** | N/A | N/A | CALG_SHA_256 |
| 18 | N/A | Unchecked or Invalid | CALG_SHA1 |
* Used for checking the Global Revocation List (GRL)
** Used for checking ELAM drivers
From this table we can see three main types of scenarios:
- Those designed to match to a specific signing level that is being requested (0, 1, 2, 3, 6, 9, 10, 11, 12, 13, 14, 15, 16)
- Those designed to support a specific “legacy” scenario, such as driver loads or DRM protected processes (1, 4, 5)
- Those designed for specific internal requirement checks of the cryptographic engine (8, 17)
As expected, with Microsoft recommending the usage of SHA256 signatures recently, this type of signature is enforced on all their internal scenarios, with SHA1 only being allowed on driver and DRM protected images, Windows Store applications, and other generic Microsoft-signed binaries (presumably for legacy support).
The scenario table described in Table 4 is what normally ships with Code Integrity on x86 and x64 systems. On ARM, SHA256 is a minimum requirement for almost all scenarios, as the linked MSDN page above explained. And finally, like many of the other cryptographic behaviors in Code Integrity that we’ve seen so far, the table is also fully customizable by a Secure Boot Signing Policy.
When such a policy is present, the table above can be rewritten for all but the legacy scenarios, and custom minimum hash algorithms can be enforced for each scenario as needed. Additionally, the level to scenario mappings are also customizable, and the policy can also specify which “Signers”, identified by their certificate content hash, can be used for which Scenario, as well as the maximum Signing Level that a Signer can bestow.
Accepted Root Keys
Let’s say that the Code Integrity library has received a request to validate the page hashes of an image destined to run with a protection level of Windows TCB, and thus presumably with Scenario 0 in the standard configuration. What prevents an unsigned binary from satisfying the scenario, or perhaps a test-signed binary, or even a perfectly validly signed binary, but from a random 3rd party company?
When Code Integrity performs its checks, it always remembers the Security Required bit mask, the Signature Level, and the Scenario. The first two are used early on to decide which Root CA authorities will be allowed to participate in the signature check — different request are subject to different accepted root keys, as per Table 5 below.
Note that in these tables, PRS refers to “Product Release Services”, the internal team within Microsoft that is responsible for managing the PKI process and HSM which ultimately signs every officially released Microsoft product.
Accepted Root Keys
| Secure Required | Signing Level | Accepted Root Keys |
|---|---|---|
| Protected Image | N/A | PRS Only |
| Hotpatch Image | N/A | System and Self Signed Only |
| Driver Image | N/A | PRS Only |
| N/A | Store | Windows and PRS Only |
| N/A | Windows | Windows and PRS Only |
| N/A | Windows TCB | PRS Only |
| N/A | Authenticode | PRS, Windows, Trusted Root |
Additionally, Tabke 6 below describes overrides that can apply based on debug options or other policy settings which can be present in the Secure Boot Signing Policy:
Accepted Root Key Overrides
| Option | Effect on Root Key Acceptance |
|---|---|
| Policy Option 0x80 | Enables DMD Test Root |
| Policy Option 0x10 | Enables Test Root |
| /TESTSIGNING in BCD | Enables Test Root for Store and Windows TCB Signing Levels. ?Also enables System Root, Self Signed Root and allows an Incomplete Signing Chain for other levels. |
Two final important exceptions apply to the root key selection. First, when a custom Secure Boot Signing Policy is installed, and it contains custom signers and scenarios, then absolutely all possible root keys, including incomplete chains, are allowed. This is because it will be the policy that determines which Signer/Hash, Scenario/Level mapping is valid for use, not a hard-coded list of keys.
The second exception is that certain signature levels are “runtime customizable”. We’ll talk more about these near the end of this post, but for now, keep in mind that for any runtime customizable level, all root keys are also accepted. We’ll see that this is because just like with custom signing policies, runtime customizable levels have additional policies based on the signer and other data.
As you can see, this first line of defense prohibits, for example, non PRS-signed image from ever being loaded as a driver or as a DRM-protected process. It also prevents any kind of image from ever reaching a signing level of Windows TCB (thus prohibiting the underlying protection level from ever being granted).
Of course, just looking at root keys can’t be enough — the Windows Root Key is used to sign everything from a 3rd party WHQL driver to an ELAM anti-malware process to a DRM-protected 3rd party Audio Processing Object. Additional restrictions exist in place to ensure the proper usage of keys for the appropriately matching signature level.
Modern PKI enables this through the presence of Enhanced Key Usage (EKU) extensions in a digital signature certificate, which are simply described by their unique OID (Object Identifier, a common format for X.509 certificates that describes object types).
Enhanced Key Usages (EKUs)
After validating that an image is signed with an appropriate certificate that belongs to one of the allowed root keys, the next step is to decide the signing level that the image is allowed to receive, once again keeping in mind the security required bit mask.
First of all, a few checks are made to see which root authority ultimately signed the image, and whether or not any failures are present, keeping account of debug or developer policy options that may have been enabled. These checks will always result in the Unsigned (1), Authenticode (4) or Microsoft (8) signature level to be returned, regardless of other factors.
In the success cases, the following EKUs, shown in Table 7, are used in making the first-stage determination:
EKU to Signing Level Mapping
| EKU OID Value | EKU OID Name | Granted Signing Level |
|---|---|---|
| 1.3.6.1.4.311.76.3.1 | Windows Store | Store * |
| 1.3.6.1.4.311.76.5.1 | Dynamic Code Generator | Dynamic Code Generation |
| 1.3.6.1.4.311.76.8.1 | Microsoft Publisher | Microsoft |
| 1.3.6.1.4.311.10.3.5 | Windows Hardware Driver Verification | Microsoft |
| 1.3.6.1.4.311.10.3.6 | Windows System Component Verification | Windows |
| 1.3.6.1.4.311.10.3.20 | Windows Kits Component | Microsoft ** |
| 1.3.6.1.4.311.10.3.23 | Windows TCB Component | Windows TCB |
| 1.3.6.1.4.311.10.3.25 | Windows Third Party Application Component | Authenticode |
| 1.3.6.1.4.311.10.3.26 | Windows Software Extension Verification | Microsoft |
* Configurable by Secure Boot Signing Policy
** Only if Secure Boot Signing Policy Issued by Windows Kits Publisher
Next, the resulting signature level is compared with the initial desired signature level. If the level fails to dominate the desired level, a final check is made to see if the signing level is runtime customizable, and if so, this case is handled separately as we’ll see near the end of this post.
Finally, if the resulting signature level is appropriate given the requested level, a check is made to see if the Security Required includes bits 2 (Protected Image) and/or 8 (Protected Light Image). If the latter is present, and if the Windows signature level (12) is requested, two additional EKUs are checked for their presence — at least one must be in the certificate:
- 1.3.6.1.4.1.311.10.3.22, Protected Process Light Verification
- 1.3.6.1.4.1.311.10.3.22, Protected Process Verification
In the former case, i.e.: a Security Required bit mask indicating a Protected Image, then if the Windows TCB signature level (14) was requested, only the latter EKU is checked.
System Components
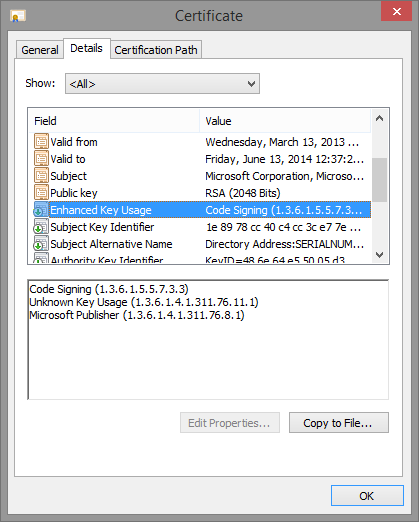
You can right-click on any PE file in Windows Explorer which has an embedded certificate and click on the “Digital Signatures” tab in the “Properties” window that you select from the context menu. By double-clicking on the certificate entry, and then clicking on “View Certificate”, you can scroll down to the “Enhanced Key Usages” line and see which EKUs are present in the certificate.
Here’s some screenshots of a few system binaries, which should now reveal familiar EKUs based on what we’ve seen so far.
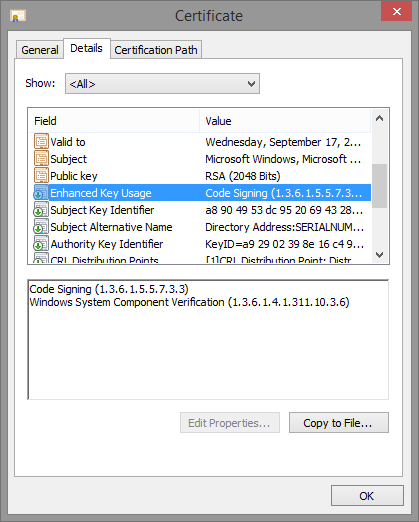
First of all, here’s Audiodg.exe. All it has is the “Windows” EKU.
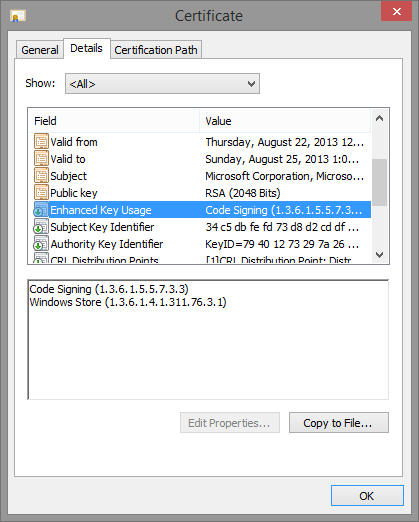
Next up, here’s Maps.exe, which has the “Store” EKU:
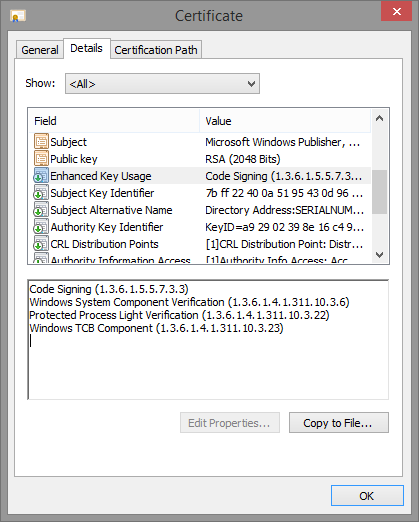
And finally, Smss.exe, which has both the “Windows” and “Windows TCB” EKU, as well as the “Windows Process Light Verification” EKU.
Runtime Signers
We’ve mentioned a few cases where the system checks if a signature level is runtime customizable, and if so, proceeds to additional checks. As of Windows 8.1, in the absence of a Secure Boot Signing Policy, only level 7 fits this bill, which corresponds to “Custom 3 / Antimalware” from our first table. If a policy is present, then all the signature levels that have “Custom” in them unsurprisingly also become customizable, as well as the “Windows Protected Process Light” (13) level.
Once a level is determined to be customizable, the Code Integrity library checks if the signing level matches that of any of the registered runtime signers. If there’s a match, the next step is to authenticate the certificate information chain with the policy specified in the runtime signer registration data. This information can include an array of EKUs, which must be present in order to pass the test, as well as the contents hash of at least one signer, of the appropriate hash length and hashing algorithm.
If all policy elements pass the test, then the requested signature level will be granted, bypassing any other default system EKU or root key checks.
How does the system register such runtime signers? The Code Integrity library contains two API calls, SeRegisterSigningInformation and SeUnregisterSigningInformation through which runtime signers can be registered and deregistered. These calls are made by the kernel by SeRegisterElamCertResources which is done either when an Early-Launch Anti Malware (ELAM) driver has loaded (subject to the rules surrounding obtaining an ELAM certificate), or, more interestingly, at runtime when instructed so by a user-mode caller.
That’s right — it is indeed possible through calling the NtSetSystemInformation API, if using the SystemRegisterElamCertificateInformation information class, to pass the full path to a non-loaded ELAM driver binary. By using SeValidateFileAsImageType, the kernel will call into the Code Integrity library to check if the image is signed, using Scenario 17, which you’ll recall from Table 3 above is the ELAM scenario. If user-mode did not pass in a a valid ELAM driver, the request will simply fail.
Once SeRegisterElamCertResources is called in either of these cases, it calls SepParseElamCertResources on the MICROSOFTELAMCERTIFICATEINFO section in order to parse an MSELAMCERTINFOID resource. Here is, for example, a screenshot of the resource data matching this name in Microsoft’s Windows Defender ELAM driver (Wdboot.sys):
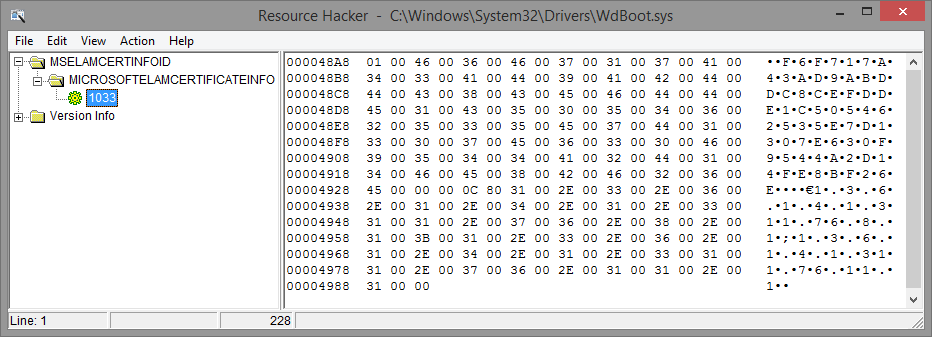
This data is formatted according to the following rules below, which can be used in an .rc file when building your own ELAM driver. The sample data from the Windows Defender ELAM driver is also shown alongside in bold for easier comprehension.
MicrosoftElamCertificateInfo  MSElamCertInfoID
{
    <# of Entries, Max 3>,  -> 1
    L”Content Hash n\0”,    -> f6f717a43ad9abddc8cefdde1c505462535e7d1307e630f9544a2d14fe8bf26e
    <Hash Algorithm n>,     -> 0x800C (CALG_SHA_256)
    L”EKU1n;EKU2n;EKU3n\0”, -> 1.3.6.1.4.1.311.76.8.1;1.3.6.1.4.1.311.76.11.1
    … up to 2 more blocks …
}
This data is then packaged up into the runtime signer blob that is created by CiRegisterSigningInformation API and will be used for comparisons when the signing level matches — note that the kernel always passes in “7” as the signature level for the signer, since the kernel API is explicitly designed for ELAM purposes.
On the other hand, the internal CiRegisterSigningInformation API can be used for arbitrary signing levels, as long as the current policy allows it and the levels are runtime customizable. Also note that the limitation on up to 3 EKUs and 3 Signers is also enforced by the kernel and not by the Code Integrity library.
Running as Anti-Malware Protected Process Light
In the previous posts we explained some of the protections offered to PPLs and the different signers and levels available. In this post, we started by seeing how the presence of EKUs and particular root authority keys causes the system to allow or deny a certain binary from loading with the requested signature level (and thus protection level), as well as to how DLLs can be prohibited to load in such processes unless they too match a minimum signing level.
This should explain why a process like Smss or Csrss is allowed to run with a given protection level, but it didn’t quite explain why MsMpEng.exe or NisSrv.exe were allowed to run as PPLs, because their certificate EKUs, shown below, don’t match any specially handled level:
However, by taking a look at last section on runtime signers, as well as using the CertUtil utility to dump the content hash of the certificate used to sign the Windows Defender binaries you’ll note a distinct match between the information present in the resource section of the driver, and the information in the certificate. See below for both the signature hash and the EKU presence:
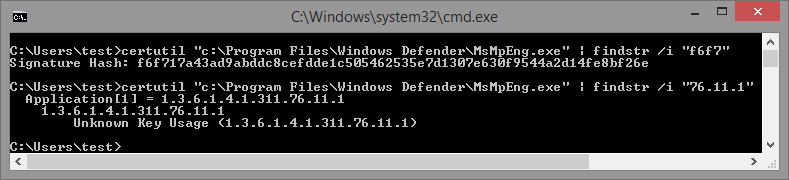
Because of the ELAM driver, this specific hash and EKU are registered as a runtime signer, and when the service launches, recall that by using the Protected Service functionality we saw in the previous post, the Windefend service requests a Win32 protection level of 3 — or an NT protection level of 0x31. In turn, this translates to Signing Level 7 — because this level is runtime customizable, a the runtime signer check is then performed, and the hash and EKU is matched.
As we mentioned above, the SystemRegisterElamCertificateInformation information class can be used to request parsing of an ELAM driver’s resource section in order to register a runtime signer. It turns out that this undocumented information class is exposed through the new InstallELAMCertificateInfo API in Windows 8.1, which any 3rd party can legitimately call in order to tap into this behavior, as long as the driver is ELAM signed.
You don’t actually need to have any code in the ELAM driver, just enough of a valid PE image such that the kernel-mode loader can parse the .rsrc section and recover the MicrosoftElamCertificateInfo resource section.
Furthermore, recall that for runtime signers, all the usual root key and EKU checks are gone, instead relying on the policy that was registered. In other words, the system allows you to function as your own 3rd party CA, and issue certificates with custom content hashes for different signers. Or better yet, it is possible to attach custom EKUs to one’s binaries, in order to separate other binaries your organization may be signing.
Analysis
We have covered the details of these new cryptographic features in great detail. Now I’d like to point out a few observations about the shortcomings and potential issues inherent to these new features.
As great and extensible as the new PPL system (and its accompanying PKI infrastructure) is, it is not without its own risks. For one thing, any company with an ELAM certificate can now create buggy user-mode processes (remember folks, these are AV companies we’re talking about…) that not only you can’t debug, but you also can’t terminate from user-mode. Although yes, on platforms without SecureBoot, this would be possible by simply using a kernel debugger or custom drivers, imagine less tech-savvy users stuck without being able to use Task Manager.
Additionally, a great deal of reliance seems to have been put on EKUs, which were relatively unknown in the past and mostly only used to define a certificate as being for “SSL” vs “Code Signing”. One can only hope that the major CAs are smart enough to have filters in place to avoid arbitrary EKUs being associated with 3rd party Authenticode certificates. Otherwise, as long as a signature level accepts a non-PRS root key, the infrastructure could easilyy be fooled by an EKU that a CA has allowed into a certificate.
Finally, as with all PKI implementations, this one is not without its own share of bugs. I have independently discovered means to bypass some of the guarantees being made around PPLs, and to illegitimately create an Antimalware process, as I posted in this picture. I obviously don’t have an ELAM certificate (and the system is not in test-signing mode), so this is potentially a problem. I’ve reported the issue to Microsoft and am waiting more information/feedback before talking about this issue further, in case it is a legitimate bug that needs to be fixed.
Conclusion and Future Work
In this final post on protected processes, we delved deeply into the PKI that is located within the Code Integrity library in Windows 8.1, and we saw how it provides cryptographic boundaries around protected processes, PPLs, and signature levels reserved for particular usages.
At the same time, we talked about how custom signing policies, delivered through Secure Boot, can customize this functionality, and saw up to 6 “Custom” signing levels that can be defined through such a policy. Finally, we looked at how some of these signing levels, namely the Antimalware level by default, can be extended through runtime signers that can be registered either pre- or post-boot through special resource sections in ELAM drivers, thus leading to custom 3rd party PPLs.
In the near future, I intend to contribute patches to Process Hacker in order to add a new column to the process tree view which would show the process protection level in its native NT form, as this data is available through the NtQueryInformationProcess API call in Windows 8.1. The tooltip for this data would then show the underlying Signer and Level, based on the kernel headers I pasted in the earlier blog posts.
Last but not least, the term “Secure Boot Signing Policy” appears numerous times without a full explanation as to what this is, how to register one, and what policies such a construct can contain. It only seems fair to dedicate the next post to this topic – stay tuned!
Credits
The contents of this blog series could not have been made possible without the help and contributions of:
- lilhoser
- myriachan
- msuiche
Hello Alex,
Is it possible to use PPL for Windows & .net UI applications ?