Writing a Hyper-V “Bridge” for Fuzzing — Part 2 : Hypercalls & MDLs

Introduction

Previously, in Part 1, we were able to see how the Windows Driver Foundation (WDF) can significantly simplify the development of drivers, including even “research-type” non-PnP drivers. In this part, we will now enter the guts of Hyper-V and talk about how hypercalls work (a portmanteau of syscall (system call) as applied when talking about an OS->Hypervisor transition instead of an App->OS transition).

First, it’s important to learn that there are two kinds of hypercalls that Hyper-V supports, which are described in the Top Level Functional Specification (TLFS). The first, called regular or slow hypercalls, use physical addresses of RAM in order to send and receive input and output parameters, which are aligned to natural boundaries. We’ll have to learn about the Windows concept of Memory Descriptor Lists (MDLs) to explain how we can pass such data to Hyper-V, and this will be the topic of this part.

The second kind of hypercall is called an extended fast hypercall and uses registers, including XMM non-integer registers in order to pass in up to 112 bytes of data, aligned on and padded to 8 byte boundaries. This is much faster as memory allocations and mappings are not involved, but requires some more complex understanding of memory alignments, and we’ll leave this for the next part.

Hypercall Basics

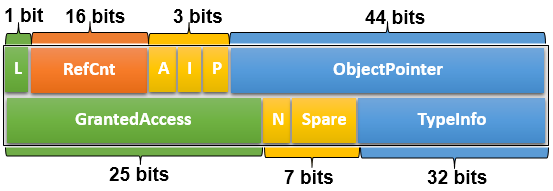
Regardless of the type of hypercall being initiated, a hypercall input value and a hypercall result value are always used and returned. This data is used to both inform the hypervisor as to the calling convention and type of hypercall being attempted, as well as to provide any errors, intermediate state, or final result back to the caller. To begin with, here’s what the input value looks like:

typedef union _HV_X64_HYPERCALL_INPUT
{
    struct
    {
        UINT32 CallCode : 16;
        UINT32 IsFast : 1;
        UINT32 Reserved1 : 15;
        UINT32 CountOfElements : 12;
        UINT32 Reserved2 : 4;
        UINT32 RepStartIndex : 12;
        UINT32 Reserved3 : 4;
    };
    UINT64 AsUINT64;
} HV_X64_HYPERCALL_INPUT, *PHV_X64_HYPERCALL_INPUT;

While the first members should be self-evident (specifying the hypercall index and the calling convention used, the count and start index fields related to a concept not yet introduced — the repeated hypercall. You see, because processing a hypercall essentially results in the OS losing control of the processor (no interrupts and no scheduling), it’s important for the hypervisor to minimize this time.

Hyper-V employs an innovative idea of allowing more complex requests to be split up as “chunks of work” (i.e.: repetitions), and for the hypervisor to perform enough repetitions to fill up a timeslice (say, 50 microseconds), return back the current index where it left off, and allowing the OS some time to handle interrupts and scheduling needs, before re-issuing the hypercall at the updated start index. This works, by the way, both for input and output parameters.

Now let’s see what the result value has in store:

typedef union _HV_X64_HYPERCALL_OUTPUT
{
    struct
    {
        HV_STATUS CallStatus;
        UINT16 Reserved1;
        UINT32 ElementsProcessed : 12;
        UINT32 Reserved2 : 20;
    };
    UINT64 AsUINT64;
} HV_X64_HYPERCALL_OUTPUT, *PHV_X64_HYPERCALL_OUTPUT;

Once again, we can see both the obvious return value itself (similar to an NTSTATUS or HRESULT) as well as a specific repeated hypercall field, which allows the caller, as explained above, to correctly restart the hypercall with the start index pointing after the number of elements processed (or, in the case of an error, determine which element caused the error).

Memory Descriptor Lists

Memory Descriptor Lists are an extremely useful construct in the Windows kernel which allows driver writers to either take existing user-mode memory or kernel-mode memory (such as a nonpaged pool buffer) and lock it down in memory (pinning it so that it can not be reused nor freed), guaranteeing its access rights, and returning an array of corresponding Page Frame Numbers (PFNs) that map to the virtual buffers.

Obviously, this type of data structure is extremely useful when doing Direct Memory Access (DMA) with a Network Interface Card (NIC) and its driver, but it also has software-specific uses such as re-mapping an existing buffer with different permissions (by creating a new, secondary mapping, of the initial buffer whose pages are now locked down) — this specific use case being seen in certain rootkits, for example. Windows also provides APIs for directly requesting empty physical memory and attaching an MDL to it, followed by APIs which allow mapping the physical pages into a virtual buffer based on the requested mapping flags.

In our use case, the hypervisor expects a page aligned contiguous set of input physical pages that match the data (potentially repeated) specified by the hypercall input value and a similar set of pages for the output buffer. In the code snippet below, a helper function is used to take a user-mode buffer and convert it into an appropriate MDL for use with Hyper-V hypercalls, returning the underlying physical address.

Note that, as mentioned above, it is technically possible to directly construct an MDL around the initial user buffer without requiring a kernel-copy to be made, but this would assume that the user-buffer is on physically contiguous pages (or page-aligned within a single page). A safer approach is taken here, where the MDL is allocated and a copy of the user buffer is made. On output, this means that the caller must copy the MDL buffer back into the user buffer.

Also take note that the virtual buffer is not zeroed out for performance reasons, which means that the output buffer copied back into user-mode should only copy the exact number of bytes that the hypervisor returned back, in order to avoid leaking arbitrary kernel memory back to the user (in this particular implementation, this is a moot point, as the hypercalls used in the fuzzing interface regularly accept/return kernel pointers and assume a Ring 0 attacker to begin with).

NTSTATUS
MapUserBufferToMdl (
    _In_ PVOID UserBuffer,
    _In_ ULONG BufferSize,
    _In_ BOOLEAN IsInput,
    _Out_ PULONGLONG MappedPa,
    _Out_ PMDL* MdlToFree
    )
{
    PMDL hvMdl;
    PHYSICAL_ADDRESS low, high;
    PVOID mapBuffer;
    ULONG pageCount;
    ULONG idealNode;
    ULONG flags;
    NTSTATUS status;

    //
    // Allocate an MDL for the number of pages needed, in the
    // current NUMA node, and allow the processor to cache them.
    // In case more than a page of data is needed, make sure to
    // require contiguous pages, as the hypervisor only receives
    // the starting PFN, not an array. We also allow the memory
    // manager to look at other non local nodes if the current
    // one is unavailable, and we speed it up by not requesting
    // zeroed memory.
    //
    *MdlToFree = NULL;
    *MappedPa = 0;
    low.QuadPart = 0;
    high.QuadPart = ~0ULL;
    pageCount = ROUND_TO_PAGES(BufferSize);
    idealNode = KeGetCurrentNodeNumber();
    flags = MM_ALLOCATE_REQUIRE_CONTIGUOUS_CHUNKS |
            MM_ALLOCATE_FULLY_REQUIRED |
            MM_DONT_ZERO_ALLOCATION;

    //
    // Use the very latest 1809 API which also allows us to
    // pass in the Memory Partition from which to grab the
    // pages from -- in our case we pass NULL meaning use the
    // System Partition (0).
    //
    hvMdl = MmAllocatePartitionNodePagesForMdlEx(low,
                                                 high,
                                                 low,
                                                 pageCount,
                                                 MmCached,
                                                 idealNode,
                                                 flags,
                                                 NULL);
    if (hvMdl == NULL)
    {
        //
        // There is not enough free contiguous physical memory,
        // bail out
        //
        DbgPrintEx(DPFLTR_IHVDRIVER_ID,
                   DPFLTR_ERROR_LEVEL,
                   "Failed to allocate MDL\n");
        status = STATUS_INSUFFICIENT_RESOURCES;
        goto Cleanup;
    }

    //
    // Map the MDL pages in kernel-mode, with RWNX permissions
    //
    mapBuffer = MmGetSystemAddressForMdlSafe(hvMdl,
                                            MdlMappingNoExecute);
    if (mapBuffer == NULL)
    {
        DbgPrintEx(DPFLTR_IHVDRIVER_ID,
                   DPFLTR_ERROR_LEVEL,
                   "Failed to map buffer\n");
        status = STATUS_INSUFFICIENT_RESOURCES;
        goto Cleanup;
    }

    //
    // Use SEH in case the user-mode buffer is invalid
    //
    __try
    {
        if (IsInput != FALSE)
        {
            //
            // Make sure the input buffer is aligned user-mode
            // memory, then copy it into the mapped kernel buffer
            //
            ProbeForRead(UserBuffer,
                         BufferSize,
                         __alignof(UCHAR));
            RtlCopyMemory(mapBuffer,
                          UserBuffer,
                          BufferSize);
        }
        else
        {
            //
            // Make sure the output buffer is aligned user-mode
            // memory and that it is writeable. The copy will be
            // done after the hypercall completes.
            //
            ProbeForWrite(UserBuffer,
                          BufferSize,
                          __alignof(UCHAR));
        }
    }
    __except(EXCEPTION_EXECUTE_HANDLER)
    {
        //
        // An exception was raised, bail out
        //
        status = GetExceptionCode();
        DbgPrintEx(DPFLTR_IHVDRIVER_ID,
                   DPFLTR_ERROR_LEVEL,
                   "Exception copying buffer : %lx\n",
                   status);
        goto Cleanup;
    }

    //
    // Hyper-V will want to know the starting physical address
    // for the buffer, so grab it
    //
    *MappedPa = *MmGetMdlPfnArray(hvMdl) << PAGE_SHIFT;
    *MdlToFree = hvMdl;
    status = STATUS_SUCCESS;

Cleanup:
    //
    // On failure, clean up the MDL if one was created/mapped
    //
    if (!(NT_SUCCESS(status)) && (hvMdl != NULL))
    {
        //
        // This also cleans up the mapping buffer if one exists
        //
        MmFreePagesFromMdlEx(hvMdl, 0);
        ExFreePool(hvMdl);
    }
    return status;
}

As a small addendum related to Windows Internals, however, it should be noted that Windows does not typically go through this heavy handed approach each time it wishes to issue a hypercall. Instead, two helper functions: HvlpAcquireHypercallPage and HvlpReleaseHypercallPage, are used to grab an appropriate physical page from one of the following possible locations:

  • An SLIST (Lock-Free Stack List) is used, which is used to cache a number of pre-configured cached hypercall pages stored in the KPRCB (HypercallPageList). 4 such pages are stored in the KPRCB HypercallCachedPages array, starting at index 2.
  • If no cached pages are available, and the stack buffer can be used, it is page aligned and its physical address is used for the hypercall. The Interrupt Request Level (IRQL) is raised to DISPATCH_LEVEL to avoid the kernel stack from being marked as non-resident.
  • If the stack buffer cannot be used, two hardcoded pages are used from the KPRCB HypercallCachedPages array — index 0 for the input page, index 1 for the output page.

For processor 0 (the bootstrap processor or BSP) the default and cached pages are allocated by the HvlpSetupBootProcessorEarlyHypercallPages function by using the HAL (Hardware Abstraction Layer) early allocation code (HalAllocateEarlyPages from the HAL Private Dispatch Table), which ends up grabbing memory from the so-called HAL Heap (advanced readers are advised that this is interesting), while for the Application Processors (APs), MmAllocateIndependentPages, the HvlInitializeProcessor function uses MmAllocateIndependentPages to grab per-NUMA-node local physical pages.

Issuing the Hypercall

Now that we know how to take the input and output buffer and convert them into appropriate physical addresses, we need to talk about how to actually talk to Hyper-V to issue this call. First, it’s important to note that the goal of this series is not to go into Hyper-V specifics as much as it is to talk about interfacing with Hyper-V on a Windows system, for security/fuzzing purposes — therefore, the details of how the actual VMCALL instruction works and how Hyper-V maps its “hypercall page” through the Hypercall Interface MSR will be left to readers curious enough to read the TLFS.

Our approach, instead, will be to re-use Windows’ existing capabilities, and avoid handcrafing assembly code (and conflicting with the memory manager, VSM, and Patchguard). In order to assist us, Windows 10 has a helpful exported kernel call which lets us do just that:

NTKERNELAPI
HV_X64_HYPERCALL_OUTPUT
NTAPI
HvlInvokeHypercall (
    _In_ HV_X64_HYPERCALL_INPUT InputValue,
    _In_ ULONGLONG InputPa,
    _In_opt_ ULONGLONG OutputPa
    );

As you may have expected, this API simply takes in the hypercall input value, comes back with the hypercall result value, and accepts the physical addresses of the input and output buffers (if any). Therefore, all we have to do is plug in a call to this export from our IOCTL handler (seen in Part 1), and correctly construct the MDLs with the copy of the input and output buffer.

Sample Code — Bridging User and Kernel

All the building blocks are now ready and we begin by first defining the IOCTL value itself as well as the data structure that will be used to communicate between the two worlds. Then, we add some code to the IOCTL event callback to execute our handler, which will build the MDLs and then issue the call. Afterwise, we copy any output data back to the caller, and the user-mode client displays the result.

Defining the IOCTL Value and Buffer

In this approach, we’ve decided to simply use the standard of beginning our IOCTL functions at 0x100, and picking the FILE_DEVICE_UNKNOWN device type instead of defining our own. The input data structure contains the actual pointers to the input and output buffers (and their size), as well as the hypercall input value and the hypercall result value.

#define IOCTL_ISSUE_HYPER_CALL   \
    CTL_CODE(FILE_DEVICE_UNKNOWN, 0x100, METHOD_BUFFERED, FILE_WRITE_ACCESS)

typedef struct _VTL_BRIDGE_ISSUE_HYPER_CALL
{
    HV_X64_HYPERCALL_INPUT InputDescriptor;
    _Field_size_(InputSize) _User_always_
        PVOID InputBuffer;
    ULONG InputSize;

    HV_X64_HYPERCALL_OUTPUT OutputDescriptor;
    _Field_size_opt_(OutputSize) _User_always_
        PVOID OutputBuffer;
    ULONG OutputSize;
} VTL_BRIDGE_ISSUE_HYPER_CALL, *PVTL_BRIDGE_ISSUE_HYPER_CALL;

Extending the IOCTL Event Callback

We take the stub code seen in Part 1 and we add the following block of code to the IOCTL switch statement, which now calls the handler itself.

    case IOCTL_ISSUE_HYPER_CALL:
    {
        //
        // The input and output buffer sizes are identical
        //
        if (InputLength != OutputLength)
        {
            DbgPrintEx(DPFLTR_IHVDRIVER_ID,
                       DPFLTR_ERROR_LEVEL,
                       "Size mismatch: %llx %llx\n",
                       InputLength,
                       OutputLength);
            status = STATUS_INVALID_PARAMETER;
            goto Exit;
        }

        //
        // Handle a regular hypercall request
        //
        status = HandleRegularHvCall(inBuffer,
                                     InputLength,
                                     &resultLength);
        break;
    }

Implementing the Handler

The handler needs to take our request buffer, make sure it’s the expected size, and then construct MDLs for the input and output buffers that are referenced. Once they are constructed, the HVL interface can be used to communicate to Hyper-V, after which the result value can be written back in the buffer.

Recall that WDF takes care of probing and copying the request buffer, but the deep pointers to the input and output buffers are user-mode data for us to correctly handle.

NTSTATUS
HandleRegularHvCall (
    _In_ PVOID RequestBuffer,
    _In_ SIZE_T RequestBufferSize,
    _Out_ PULONG_PTR ResultLength
    )
{
    NTSTATUS status;
    PVTL_BRIDGE_ISSUE_HYPER_CALL hcCall;
    HV_X64_HYPERCALL_OUTPUT output;
    ULONGLONG inputPa, outputPa;
    PMDL inputMdl, outputMdl;

    //
    // Grab the hypercall buffer from the caller
    //
    hcCall = (PVTL_BRIDGE_ISSUE_HYPER_CALL)RequestBuffer;
    inputMdl = NULL;
    outputMdl = NULL;
    inputPa = 0;
    outputPa = 0;

    //
    // The request buffer must match the size we expect
    //
    *ResultLength = 0;
    if (RequestBufferSize != sizeof(*hcCall))
    {
        DbgPrintEx(DPFLTR_IHVDRIVER_ID,
                   DPFLTR_ERROR_LEVEL,
                   "Buffer size mismatch: %lx\n",
                   RequestBuffer);
        status = STATUS_INVALID_BUFFER_SIZE;
        goto Cleanup;
    }

    //
    // Check if the hypercall has any input data
    //
    if (hcCall->InputSize != 0)
    {
        //
        // Make an MDL for it
        //
        status = MapUserBufferToMdl(hcCall->InputBuffer,
                                    hcCall->InputSize,
                                    TRUE,
                                    &inputPa,
                                    &inputMdl);
        if (!NT_SUCCESS(status))
        {
            DbgPrintEx(DPFLTR_IHVDRIVER_ID,
                       DPFLTR_ERROR_LEVEL,
                       "Failed to create input MDL: %lx\n",
                       status);
            goto Cleanup;
        }
    }

    //
    // Check if the hypercall has output data
    //
    if (hcCall->OutputSize != 0)
    {
        //
        // Make an MDL for it too
        //
        status = MapUserBufferToMdl(hcCall->OutputBuffer,
                                    hcCall->OutputSize,
                                    FALSE,
                                    &outputPa,
                                    &outputMdl);
        if (!NT_SUCCESS(status))
        {
            DbgPrintEx(DPFLTR_IHVDRIVER_ID,
                       DPFLTR_ERROR_LEVEL,
                       "Failed to create output MDL: %lx\n",
                       status);
            goto Cleanup;
        }
    }

    //
    // Issue the hyper call, providing the physical addresses
    //
    output = HvlInvokeHypercall(hcCall->InputDescriptor,
                                inputPa,
                                outputPa);
    hcCall->OutputDescriptor = output;

    //
    // Check if the caller expected an output buffer
    //
    if (hcCall->OutputSize != 0)
    {
        //
        // The user buffer may have become invalid,
        // guard against this with an exception handler
        //
        __try
        {
            NT_ASSERT(outputMdl != NULL);
            RtlCopyMemory(hcCall->OutputBuffer,
                          MmGetMdlVirtualAddress(outputMdl),
                          MmGetMdlByteCount(outputMdl));
        }
        __except (EXCEPTION_EXECUTE_HANDLER)
        {
            status = GetExceptionCode();
            goto Cleanup;
        }
    }

    //
    // Return the data back to the user, who will deal with it
    //
    *ResultLength = sizeof(*hcCall);
    status = STATUS_SUCCESS;

Cleanup:
    //
    // If there was an input MDL, free it
    //
    if (inputMdl != NULL)
    {
        NT_ASSERT(hcCall->InputSize != 0);
        MmFreePagesFromMdlEx(inputMdl, 0);
        ExFreePool(inputMdl);
    }

    //
    // To the same for the output MDL
    //
    if (outputMdl != NULL)
    {
        NT_ASSERT(hcCall->OutputSize != 0);
        MmFreePagesFromMdlEx(outputMdl, 0);
        ExFreePool(outputMdl);
    }
    return status;
}

Issuing the IOCTL from User-Mode

Now let’s try an actual hypercall and see if the bridge works. For this example, we’ll use HvCallGetVpIndexFromApicId, which is a very simple call that returns the Virtual Processor (VP) index based on the physical Advanced Programmable Interrupt Controller (APIC) ID of the processor. From the host, this call should be allowed, and should return the identical number back — as on the root partition, there is a 1:1 mapping between VPs and APIC IDs.

You might note that this is actually a repeated call as is visible by the setting of the CountOfElements field. This is because an array of APIC IDs can be provided, which will result in an array of VPs. In this sample, though, we are only specifying a single element, so we don’t have the restarting logic that a repeated call normally requires.

DWORD
HcBridgeTest (
    _In_ HANDLE hFuzzer
    )
{
    HV_INPUT_GET_VP_INDEX_FROM_APIC_ID Input;
    HV_VP_INDEX Output;
    VTL_BRIDGE_ISSUE_HYPER_CALL hcCall;
    BOOL bRes;
    DWORD dwError;
    HV_STATUS hvStatus;

    //
    // Clear buffers
    //
    RtlZeroMemory(&Input, sizeof(Input));
    RtlZeroMemory(&Output, sizeof(Output));

    //
    // Issue a slow call with a single element
    //
    hcCall.InputDescriptor.AsUINT64 = HvCallGetVpIndexFromApicId;
    hcCall.InputDescriptor.CountOfElements = 1;
    hcCall.InputDescriptor.IsFast = 0;

    //
    // Request the VP Index for APIC ID 1
    //
    Input.PartitionId = HV_PARTITION_ID_SELF;
    Input.TargetVtl = 0;
    Input.ProcHwIds[0] = 1;

    //
    // Construct the request buffer
    //
    hcCall.InputSize = sizeof(Input);
    hcCall.OutputSize = sizeof(Output);
    hcCall.InputBuffer = &Input;
    hcCall.OutputBuffer = &Output;

    //
    // Issue the IOCTL to our bridge
    //
    bRes = DeviceIoControl(hFuzzer,
                           IOCTL_ISSUE_HYPER_CALL,
                           &hcCall,
                           sizeof(hcCall),
                           &hcCall,
                           sizeof(hcCall),
                           NULL,
                           NULL);
    if (bRes == FALSE)
    {
        //
        // The bridge failed in some way
        //
        dwError = GetLastError();
        printf("Bridge failed to issue call: %lx\n", dwError);
        goto Exit;
    }

    //
    // Bridge worked -- see what the hypervisor returned
    //
    hvStatus = hcCall.OutputDescriptor.CallStatus;
    if (hvStatus != HV_STATUS_SUCCESS)
    {
        //
        // The hypercall made it, but it failed for some reason
        //
        printf("Hypercall failure: %lx\n", hvStatus);
        dwError = RtlNtStatusToDosError(0xC0350000 | hvStatus);
        goto Exit;
    }

    //
    // Print the processor index and return 
    //
    printf("VP Index: %lx\n", Output);
    dwError = ERROR_SUCCESS;
Exit:
    return dwError;
}

Conclusion

By now, you have hopefully gained an insight into how the elementary hypercall interface works in Windows, for regular (slow) calls that are either simple or repeated, and additional clarity on how to interface with kernel-mode drivers from user-mode through an IOCTL-based interface on top of WDF (although a WDM driver would behave identically in this particular case).

In part 3, we will continue this series by looking at extended fast hypercalls, which will require some careful understanding of stack layouts and memory alignments due to the use of XMM registers. I’ve asked Azeria to help me with one or two diagrams which should hopefully make things easier to visualize, thanks to her amazing graphic skills.

Writing a Hyper-V “Bridge” for Fuzzing — Part 1: WDF

Introduction

After spending the better part of a weekend writing a specialized Windows driver for the purposes of allowing me to communicate with the Hyper-V hypervisor, as well as the Secure Kernel, from user-mode, I realized that there was a dearth of concise technical content on non-PnP driver development, and especially on how the Windows Driver Foundation (WDF) fundamentally changes how such drivers can be developed.

While I’ll eventually release my full tool, once better polished, on GitHub, I figured I’d share some of the steps I took in getting there. Unlike my more usual low-level super-technical posts, this one is meant more as an introduction and tutorial, so if you already consider yourself experienced in WDF driver development, feel free to wait for Part 2.

Writing a Traditional Non-PnP Driver

Having written non-PnP Windows Driver Model (WDM) style drivers for almost two decades, it’s almost become a mechanized skill that allows me to churn out a basic driver (and associated user-mode client application) in less than 15 minutes, where I always find myself following the same basic recipe:

  • Write the DriverEntry and DriverUnload function, including creating a device object, naming it, ACL’ing it correctly, and then creating a Win32 symbolic link under \DosDevices
  • Stub out an IRP_MJ_CREATE, IRP_MJ_CLOSE and IRP_MJ_DEVICE_CONTROL handler
  • Define some IOCTLs as METHOD_BUFFERED, to be safe
  • Implement the IRP_MJ_CREATE/IRP_MJ_CLOSE handlers to always return success and complete the IRP
  • Do the right IO_STACK_LOCATION manipulation in the IOCTL handler and use the appropriate WDM macros to read, parse, and complete the request(s)
  • Write a user-mode tool that calls CreateFile and then DeviceIoControl to communicate to the driver
  • Either use Sc.exe on the command-line to create a kernel-mode service entry and then start/stop the driver as needed, or write the equivalent C Code using CreateService, StartService and StopService

Countless online tutorials and updated samples on GitHub from Microsoft (such as those part of the Windows Driver Kit) explain these steps in detail for the curious minded — but this post isn’t about rehashing that, it’s about looking at the new.

I had long heard how the Windows Driver Foundation (WDF) is meant to provide a much easier model for writing true hardware device drivers — including, in Windows 10, allowing mostly cross-compilable user-mode drivers (vs. the older framework which required writing the driver in C++/COM).

But I had wrongly assumed that for writing Non-PnP research/academic drivers (or even for production), WDM was still the better, and easier choice. For example, I don’t know of a single anti-malware tool whose filter drivers are WDF based — and in fact, the framework is poorly suited for such use (or NDIS Light-Weight Filters (LWF), or Windows Filtering Platform (WFP) callout drivers, or etc…).

The truth is that, unless you’re truly plugging into some OS filtering stack still focused on WDM, a simple “process some IOCTLs” driver can be much more easily written in WDF, and the installation/uninstallation process can also be made more robust by following certain principles.

Writing a Modern “Non-PnP” Driver

With WDF — and more specifically, its kernel counterpart, the Kernel Mode Driver Framework (KMDF) — you’ll have two options at your disposal for writing a simple non-hardware driver that communicates with a user-space client (and note that KMDF was back-ported all the way back to Windows 2000, so this isn’t some sort of new Windows 10 functionality):

  1. You can write a true non-PnP driver by setting the correct flag on your WDF Driver Object, manually creating your WDF Device as a “Control Device”, naming it, creating the Win32 symbolic link, and securing it with an ACL. You don’t need an IRP_MJ_CREATE or IRP_MJ_CLOSE handler, and can immediately write your IOCTL handler. You must still provide a DriverUnload routine.
  2. Or you can develop a “root bus-enumerated” PnP driver by providing a simple .INF file, provide an AddDevice routine, and have WDF automatically call that when your ‘device’ is detected. In your AddDevice routine, construct an unnamed WDF Device, register an interface with a custom GUID (you can also do this in the INF and avoid a few extra lines of code), and provide your IOCTL handler. You do not need an IRP_MJ_CREATE, IRP_MJ_CLOSE, or IRP_MJ_PNP/IRP_MJ_POWER handler, and must still provide a DriverUnload routine.

While these two options appear similar, there is one crucial difference — in the first implementation, you must manually register, load, and unload this driver every time you wish to talk with it from user-mode. If you leave it loaded, the user’s only choice is to manually run command-line tools like Sc.exe or Net.exe to unload it. Without using forensic tools, the debugger, or power tools, the user does not know your driver is loaded. You must pick a static name for your device, and hope it does not collide with anyone else’s device name.

In the second implementation, your driver is registered with the system as a PnP driver that is automatically detected by virtue of being on the “root bus”. This means users see it in Device Manager, and can easily interrogate it for information, disable it, and even uninstall it. To communicate with your driver, your application uses a custom GUID that you’ve defined, and enumerates an interface associated with it — a much stricter and unique protocol than relying on a string. Such a driver can also be more easily signed by Microsoft’s Windows Hardware Quality Lab (WHQL) infrastructure, and can attest to its security better than a raw non-PnP driver without an .INF or .CAT file.

Clearly, for a pure “proof-of-concept” driver, the benefits of the second implementation may not seem worth writing an extra INF file and learning some new SetupAPI functions instead of CreateService. But for something a little more polished, more generally usable, a root bus-enumerated driver, is in my opinion, the way to go.

It’s worth noting that WDF doesn’t invent this concept, but what finally makes it (in my opinion) reachable to the researcher masses, is that unlike in WDM, where this option required 1500-4000 lines of boiler-plate PnP code to be correctly enumerated, installed, uninstalled, disabled, interrogated, and more, there is literally zero additional work required when using WDF — again, no IRP_MJ_PNP handler, no WMI, no Power Management, and none of the things you may have seen if you have ever attempted this in your past.

In fact, strictly speaking, it’s actually less line of code to write a root-bus enumerated PnP driver than a non-PnP driver, with the caveat that the latter needs an INF file. But let’s be honest, once you’ve written one, you can largely copy-paste it — and if you ever wanted to have your driver signed by Microsoft, you’ll need an INF anyway.

Interacting with a Root-Enumerated PnP Driver

Because you are not statically naming your device driver, and because it must be PnP enumerated, the user-mode code looks a bit different than the traditional way to install and talk to a non-PnP driver. There are 2 steps that might be new to you:

  1. Installing the driver is done by first creating a “fake” device node under the root bus. Typically, true hardware device drivers are installed when the PnP manager discovers a physical device on the machine, interrogates it and builds a unique device instance path for it (containing, among other things, information such as Device ID and/or Vendor ID), and finds a matching driver that is registered with some combination/part of that device instance path (through its INF file). In our case, we will manually create a device node pretending that PnP detected such a “device” on the root bus, and we will manually name this node in the exact same way our INF file indicates, while claiming that this “device” is of the same device class our INF file indicates.
  2. After we’ve created this fake device node, we’ll point Windows at our INF file, and tell it to do an update/refresh of the PnP device tree — which will make it discover our fake device node, see that there’s a perfectly matching INF that describes it, and load the indicated driver!

If this sounds scary and a lot of code — let me re-assure you: we are talking about 3 APIs and less than 20 lines of code, as you’ll shortly see in the sample code below!

Now that the driver has been installed, unless your code (or the user/some other code) uninstalls it, it will remain persistent on the system, and automatically reloaded every boot. In fact, if you repeat the steps above even in the face of an already-installed copy of the driver, you will simply be creating yet another fake device node, and load another copy of your driver.

Therefore, we must solve our last hurdle — figuring out if our driver is already loaded — both so that we can avoid multiple re-installations, as well as so we can figure out how to communicate with it from user-mode. This is achieved by using that device interface GUID that we mentioned a driver should register:

  1. First, begin by checking if there are any devices that expose our custom device interface GUID. If not, then our driver is not loaded, which means we must perform the installation steps described.
  2. If so, this will return a device interface data structure, which we can then query to obtain a device instance path name. This name can then directly be passed to CreateFile in order to obtain a handle to the device object and send IOCTLs.

Behind the scenes, what really happens is that the “unnamed” WDF/PnP device object that was created does actually have a name — say, for example \Device\0000005c (if you’ve seen such devices in your WinObj or WinDbg before, now you know what they are). In turn, under the \DosDevices namespace (aka \GLOBAL??), the I/O manager did create a symbolic link — but based on a string representation of the unique device instance path. The API that queries the device interface data mentioned in step #2 above essentially does this lookup, and returns that symbolic link.

Once again, while this may also sound like a lot of complex code, it’s actually achieved by a single API call and less than a dozen lines of code (and that includes error handling), as you’re about to see below!

Finally, you may also want to provide the option (or automatically do this every time your user-mode tool exits) to uninstall the driver. In this situation, we use the SetupAPI calls to enumerate for our device class GUID (instead of our interface GUID), and once found, we pass that information to the same installer API, but a different parameter that handles uninstallation in this situation.

With only 3 APIs and another 20 lines of code, the driver is automatically unloaded assuming there’s no longer any handles (otherwise, it will be unloaded when the handles are closed and/or when the machine reboots), and uninstalled from Device Manager so that the device node is not found and matched again at the next boot.

Sample Code

Enough theory — let’s take a look at a very simple root-bus enumerated driver to see the code in practice, including how the INF file should look like. Then, we’ll see how the associated user-mode client application looks like, and how it can install, uninstall, and communicate with our device by finding its interface and opening a handle to it.

DriverEntry and DriverUnload Routines

First, our DriverEntry function looks a bit different than in WDM, as we are not touching the DRIVER_OBJECT in any way. Instead, we use a WDF_DRIVER_CONFIG structure to initialize our AddDevice routine and our Unload routine, then use WdfDriverCreate to initialize a WDF Driver Object on top of the WDM/NT DRIVER_OBJECT.

NTSTATUS
DriverEntry (
    _Inout_ PDRIVER_OBJECT DriverObject,
    _In_ PUNICODE_STRING RegistryPath
    )
{
    NTSTATUS status;
    WDF_DRIVER_CONFIG config;

    //
    // Initialize our Driver Configuration, specifying an unload
    // routine and an AddDevice routine (making us a PnP driver)
    //
    WDF_DRIVER_CONFIG_INIT(&config, DeviceAdd);
    config.EvtDriverUnload = DriverUnload;

    //
    // Create the WDF Driver Object
    //
    status = WdfDriverCreate(DriverObject,
                             RegistryPath,
                             WDF_NO_OBJECT_ATTRIBUTES,
                             &config,
                             WDF_NO_HANDLE);
    if (!NT_SUCCESS(status))
    {
        DbgPrintEx(DPFLTR_IHVDRIVER_ID,
                   DPFLTR_ERROR_LEVEL,
                   "WdfDriverCreate fail: %lx\n",
                   status);
    }

    //
    // Return back to OS
    //
    return status;
}

The DriverUnload function works just like in the WDM world, except that from now on, all routines (except the DriverEntry) will be receiving a WDFDRIVER, not a DRIVER_OBJECT.

VOID
DriverUnload (
    _In_ WDFDRIVER Driver
    )
{
    UNREFERENCED_PARAMETER(Driver);
    PAGED_CODE();

    //
    // Nothing to do for now
    //
    NOTHING;
}

AddDevice Routine

This is where, traditional PnP WDM drivers would create their DEVICE_OBJECT and do PCI/bus scanning and/or identification to confirm this is a device they can handle. Additional initialization would then usually happen in the driver’s IRP_MN_START_DEVICE handler as part of their IRP_MJ_PNP handler. But as we are not a true hardware driver, these concerns do not affect us.

Instead, in the WDF world, the only things we have to worry about are creating a WDF Device Object, register a custom device interface GUID so that we can talk to our device from user mode, and initialize a WDF Queue Object, which is how we’ll be able to receive IRPs — in our case, we register an IOCTL handler for IRP_MJ_DEVICE_CONTROL.

A WDF queue can either be serialized or parallelized, and we don’t have any specific restrictions that prevent multiple client apps from talking with us concurrently (but if we wanted to prevent that, we could).

DEFINE_GUID(HyprFuzzGuid,
            0x4056adb2,
            0x8e4e,
            0x4b6a,
            0x88, 0x2e, 0xff, 0x1, 0xc, 0x3a, 0x1c, 0x63);

NTSTATUS
AddDevice (
    _In_ WDFDRIVER Driver,
    _In_ PWDFDEVICE_INIT DeviceInit
    )
{
    NTSTATUS status;
    WDFDEVICE device;
    WDF_IO_QUEUE_CONFIG queueConfig;
    WDFQUEUE queue;
    UNREFERENCED_PARAMETER(Driver);

    //
    // Create a WDF Device 
    //
    status = WdfDeviceCreate(&DeviceInit,
                             WDF_NO_OBJECT_ATTRIBUTES,
                             &device);
    if (!NT_SUCCESS(status))
    {
        DbgPrintEx(DPFLTR_IHVDRIVER_ID,
                   DPFLTR_ERROR_LEVEL,
                   "WdfDeviceCreate fail: %lx\n",
                   status);
        goto Exit;
    }

    //
    // Create a device interface so that UM can talk with us
    //
    status = WdfDeviceCreateDeviceInterface(device,
                                            &HyprFuzzGuid,
                                            NULL);
    if (!NT_SUCCESS(status))
    {
        DbgPrintEx(DPFLTR_IHVDRIVER_ID,
                   DPFLTR_ERROR_LEVEL,
                   "WdfDeviceCreateDeviceInterface fail: %lx\n",
                   status);
        goto Exit;
    }

    //
    // Create a queue that handles IOCTLs
    //
    WDF_IO_QUEUE_CONFIG_INIT_DEFAULT_QUEUE(&queueConfig,
                                    WdfIoQueueDispatchParallel);
    queueConfig.EvtIoDeviceControl = IoDeviceControl;
    status = WdfIoQueueCreate(device,
                              &queueConfig,
                              WDF_NO_OBJECT_ATTRIBUTES,
                              &queue);
    if (!NT_SUCCESS(status))
    {
        DbgPrintEx(DPFLTR_IHVDRIVER_ID,
                   DPFLTR_ERROR_LEVEL,
                   "WdfIoQueueCreate fail: %lx\n",
                   status);
        goto Exit;
    }

Exit:
    return status;
}

Device I/O Control (IOCTL) Routine

Well, that’s almost it! At this point, the only missing piece is the IOCTL handler which will consume request from user-mode.

With WDF, you do not need to worry about I/O Stack Locations, and the various macros to copy, skip, switch these locations. In addition, instead of having a generic IRP handler which requires you to manually read the appropriate arguments in the I/O Stack Location, each WDF event callback contains specifically the data associated with this request, making development easier.

An additional benefit of WDF is that regardless of the IOCTL mechanism, APIs exist to grab the input buffer and length, so that you do not have to remember which field in the IRP contains the input and output buffers.

VOID
IoDeviceControl (
    _In_ WDFQUEUE Queue,
    _In_ WDFREQUEST Request,
    _In_ SIZE_T OutputLength,
    _In_ SIZE_T InputLength,
    _In_ ULONG IoControlCode
    )
{
    NTSTATUS status;
    PVOID inBuffer;
    PVOID outBuffer;
    ULONG_PTR resultLength;
    PAGED_CODE();
    UNREFERENCED_PARAMETER(Queue);

    //
    // Assume we won't return anything
    //
    resultLength = 0;
    inBuffer = NULL;
    outBuffer = NULL;

    //
    // Grab the input buffer (this will fail if it's 0 bytes)
    //
    status = WdfRequestRetrieveInputBuffer(Request,
                                           InputLength,
                                           &inBuffer,
                                           NULL);
    if (!NT_SUCCESS(status))
    {
        DbgPrintEx(DPFLTR_IHVDRIVER_ID,
                   DPFLTR_ERROR_LEVEL,
                   "WdfRequestRetrieveInputBuffer fail: %lx\n",
                   status);
        goto Exit;
    }

    //
    // Grab the output buffer (this will fail if it's 0 bytes)
    //
    status = WdfRequestRetrieveOutputBuffer(Request,
                                            OutputLength,
                                            &outBuffer,
                                            NULL);
    if (!NT_SUCCESS(status))
    {
        DbgPrintEx(DPFLTR_IHVDRIVER_ID,
                   DPFLTR_ERROR_LEVEL,
                   "WdfRequestRetrieveOutputBuffer fail: %lx\n",
                   status);
        goto Exit;
    }

    //
    // Handle the possible IOCTLs
    //
    switch (IoControlCode)
    {
        case IOCTL_ISSUE_HYPER_CALL:
        {
            //
            // Implement this
            //
            status = STATUS_SUCCESS;
            break;
        }

        default:
        {
            DbgPrintEx(DPFLTR_IHVDRIVER_ID,
                       DPFLTR_ERROR_LEVEL,
                       "Invalid IOCTL: %lx\n",
                       IoControlCode);
            status = STATUS_INVALID_DEVICE_REQUEST;
            break;
        }
    }

Exit:
    //
    // Return back to caller
    //
    WdfRequestCompleteWithInformation(Request,
                                      status,
                                      resultLength);
}

The INF File

The last step in a proper WDF driver is having an INF file that marks us as a root-enumerated driver, sets a strong security descriptor, and populates some strings and icons for the user to see in their Device Manager.

The key part is the Device Class GUID, which we’ll need to remember for the installation of our driver, and the device node name, which here is Root\VtlBrdge. Everything else you see is mostly boilerplate, or done for readability and UI purposes.

[Version]
DriverVer = 01/15/2019,10.30.45.805
signature="$WINDOWS NT$"
Class=FuzzerClass
CatalogFile=vtlbrdge.cat
ClassGuid={0D833DAE-8619-11D3-C19B-B60B0E0FD4AB}
Provider=%Mfg%

[SourceDisksNames]
1=%DiskId%

[SourceDisksFiles]
vtlbrdge.sys = 1

[ClassInstall32]
AddReg=FuzzerClass

[FuzzerClass]
HKR,,,,%ClassName%
HKR,,Icon,,-8
HKR,,Security,,"D:P(A;;GA;;;SY)(A;;GA;;;BA)"

[DestinationDirs]
SYS.CopyList=10,system32\drivers

[Manufacturer]
%Mfg%=AlexIonescu,NTAMD64

[AlexIonescu.NTAMD64]
%DeviceDesc% = VtlBrdgeInstall, Root\VtlBrdge

[VtlBrdgeInstall]
CopyFiles=SYS.CopyList

[SYS.CopyList]
vtlbrdge.sys

[VtlBrdgeInstall.Services]
AddService = VtlBrdge,2,VtlBrdgeInstall_Service_Inst

[VtlBrdgeInstall_Service_Inst]
ServiceType   = 1
StartType     = 3
ErrorControl  = 1
LoadOrderGroup = "Base"
ServiceBinary = %12%\vtlbrdge.sys 

[Strings]
Mfg = "Alex Ionescu (@aionescu)"
DeviceDesc = "VTL Bridge and Hyper Call Connector"
DiskId = "Install disk (1 of 1)"
ClassName = "Fuzzer Devices"

So now we have a fully working driver that we are ready to talk to from user-mode, let’s look at how we can install our driver, obtain a handle to communicate with it, and finally, uninstall it.

Installing the Driver

First, installing the driver is a simple matter of creating the fake root device node, then pointing Windows at the INF to bind with it and load our driver. The trick is referencing the same device class GUID as in the INF, as well as the same root device instance path, as we mentioned above.

Note that there are more complex APIs that you can use to automatically parse the INF and extract this information if you’re dealing with someone else’s driver, but you ought to know (and hardcode) your own GUID and instance path for your own driver, in my opinion.

DEFINE_GUID(FuzzerClassGuid,
            0xd833dae,
            0x8619,
            0x11d3,
            0xc1, 0x9b, 0xb6, 0xb, 0xe, 0xf, 0xd4, 0xab);

LPWSTR g_DevPath = L"Root\\VtlBrdge\0\0";

LPWSTR g_InfPath = L"C:\\vtlbrdge\\vtlbrdge.inf";

DWORD
HvFuzzInstallDevice (
    VOID
    )
{
    HDEVINFO hDevInfo;
    SP_DEVINFO_DATA devInfo;
    BOOL bReboot, bRes;
    DWORD dwError;
    DWORD dwPathLen;

    //
    // Create a device info list for our class GUID
    //
    hDevInfo = SetupDiCreateDeviceInfoList(&FuzzerClassGuid,
                                           NULL);
    if (hDevInfo == INVALID_HANDLE_VALUE)
    {
        dwError = GetLastError();
        printf("SetupDiCreateDeviceInfoList fail: %lx\n",
               dwError);
        goto Exit;
    }

    //
    // Construct a device information structure for this device
    //
    ZeroMemory(&devInfo, sizeof(devInfo));
    devInfo.cbSize = sizeof(devInfo);
    bRes = SetupDiCreateDeviceInfo(hDevInfo,
                                   L"FuzzerClass",
                                   &FuzzerClassGuid,
                                   L"Fuzzer Class Devices",
                                   NULL,
                                   DICD_GENERATE_ID,
                                   &devInfo);
    if (bRes == FALSE)
    {
        dwError = GetLastError();
        printf("SetupDiCreateDeviceInfo fail: %lx\n",
               dwError);
        goto Exit;
    }

    //
    // Add the hardware ID for this specific fuzzing device
    //
    dwPathLen = ((DWORD)wcslen(g_DevPath) + 3) * sizeof(WCHAR);
    bRes = SetupDiSetDeviceRegistryProperty(hDevInfo,
                                            &devInfo,
                                            SPDRP_HARDWAREID,
                                            (LPBYTE)g_DevPath,
                                            dwPathLen);
    if (bRes == FALSE)
    {
        dwError = GetLastError();
        printf("SetupDiSetDeviceRegistryProperty fail: %lx\n",
               dwError);
        goto Exit;
    }

    //
    // Create the "fake" root device node for the device
    //
    bRes = SetupDiCallClassInstaller(DIF_REGISTERDEVICE,
                                     hDevInfo,
                                     &devInfo);
    if (bRes == FALSE)
    {
        dwError = GetLastError();
        printf("SetupDiCallClassInstaller fail: %lx\n",
               dwError);
        goto Exit;
    }

    //
    // Now install the INF file for the fuzzing device.
    //
    // It will be root enumerated because of the device node
    // that we created above, resulting in the driver loading.
    //
    bRes = UpdateDriverForPlugAndPlayDevices(NULL,
                                             g_DevPath,
                                             g_InfPath,
                                             INSTALLFLAG_FORCE,
                                             &bReboot);
    if (bRes == FALSE)
    {
        dwError = GetLastError();
        printf("UpdateDriverForPlugAndPlayDevices fail: %lx\n",
               dwError);
        goto Exit;
    }

    dwError = ERROR_SUCCESS;
Exit:
    return dwError;
}

Opening a Handle to the Driver

Next, or rather, typically, even before attempting installation, we must obtain a handle to our device, checking if anyone exposes our device interface GUID on this system, and if so, obtaining the symbolic link name of the interface and creating a file handle to it. Here, we must use the GUID of our device interface, not that of the device class.

DEFINE_GUID(HyprFuzzGuid,
            0x4056adb2,
            0x8e4e,
            0x4b6a,
            0x88, 0x2e, 0xff, 0x1, 0xc, 0x3a, 0x1c, 0x63);

DWORD
HvFuzzGetHandle (
    _Outptr_ PHANDLE phFuzzer
    )
{
    CONFIGRET cr;
    DWORD dwError;
    WCHAR pwszDeviceName[MAX_DEVICE_ID_LEN];
    HANDLE hFuzzer;

    //
    // Assume failure
    //
    *phFuzzer = NULL;

    //
    // Get the device interface -- we only expose one
    //
    pwszDeviceName[0] = UNICODE_NULL;
    cr = CM_Get_Device_Interface_List((LPGUID)&HyprFuzzGuid,
                                      NULL,
                                      pwszDeviceName,
                                      _countof(pwszDeviceName),
                                      CM_GET_DEVICE_INTERFACE_
                                      LIST_PRESENT);
    if (cr != CR_SUCCESS)
    {
        dwError = GetLastError();
        printf("CM_Get_Device_Interface_List fail: %lx\n",
               dwError);
        goto Exit;
    }

    //
    // Make sure there's an actual name there
    //
    if (pwszDeviceName[0] == UNICODE_NULL)
    {
        dwError = ERROR_NOT_FOUND;
        goto Exit;
    }

    //
    // Open the device
    //
    hFuzzer = CreateFile(pwszDeviceName,
                         GENERIC_WRITE | GENERIC_READ,
                         FILE_SHARE_READ | FILE_SHARE_WRITE,
                         NULL,
                         OPEN_EXISTING,
                         FILE_ATTRIBUTE_NORMAL,
                         NULL);
    if (hFuzzer == INVALID_HANDLE_VALUE)
    {
        dwError = GetLastError();
        printf("CreateFile fail: %lx\n",
               dwError);
        goto Exit;
    }

    //
    // Return a handle to the device
    //
    *phFuzzer = hFuzzer;
    dwError = ERROR_SUCCESS;
Exit:
    return dwError;
}

Uninstalling the Driver

Either by offering it up as a user action in a command-line tool, or doing it every single time your user-mode application exists, you may want to uninstall the driver without prompting the user to use Device Manager to do so. This is a simple matter of enumerating our driver to find it (this time using the device class GUID) and calling the same SetupAPI function as for installation, but with the DIF_REMOVE parameter instead.

DWORD
HvFuzzUninstallDevice (
    VOID
    )
{
    BOOL bRes;
    DWORD dwError;
    HDEVINFO hDevInfo;
    SP_DEVINFO_DATA devData;

    //
    // Open the device info list for our class GUID
    //
    hDevInfo = SetupDiGetClassDevs(&FuzzerClassGuid,
                                   NULL,
                                   NULL,
                                   0);
    if (hDevInfo == INVALID_HANDLE_VALUE)
    {
        dwError = GetLastError();
        printf("SetupDiGetClassDevs fail: %lx\n",
               dwError);
        goto Exit;
    }

    //
    // Locate our class device
    //
    ZeroMemory(&devData, sizeof(devData));
    devData.cbSize = sizeof(devData);
    bRes = SetupDiEnumDeviceInfo(hDevInfo, 0, &devData);
    if (bRes == FALSE)
    {
        dwError = GetLastError();
        printf("SetupDiEnumDeviceInfo fail: %lx\n",
               dwError);
        goto Exit;
    }

    //
    // Uninstall it
    //
    bRes = SetupDiCallClassInstaller(DIF_REMOVE,
                                     hDevInfo,
                                     &devData);
    if (bRes == FALSE)
    {
        dwError = GetLastError();
        printf("SetupDiCallClassInstaller fail: %lx\n",
               dwError);
        goto Exit;
    }

    dwError = ERROR_SUCCESS;
Exit:
    return dwError;
}

Conclusion

Now that you’ve written up both the driver code and application code, checking if everything works is fairly simple. Once the installation path executes, a nicely visible entry in Device Manager will show up as per below, with the various strings we specified in our INF file.

Furthermore, due to the negative Icon ID (-8) we specified in our INF file, this instructs Device Manager to look up Icon Group 8 in the resource section of SetupApi.dll, which I thought matched quite well with the “VTL Bridge and Hyper Call Connector” device we are trying to represent. I used Resource Hacker to go over the resources, since the icons are not formally documented anywhere. Note that using a positive Icon ID results in Device Manager looking up the resource in your driver binary (or DLL co-installer).

Our visible device in the Device Manager, under our custom device class (“Fuzzer Devices”)

And, once your application is talking to the driver, you’ll see a handle to some “unnamed”, or rather, as we’ve seen, a numbered device object, thanks to the instance path symbolic link exposed by our interface. By using hfiref0x’s great WinObjEx64 tool, you can easily see it, as in the screenshot below.

The device instance path symbolic link to the numbered device object

The astute reader may notice that this instance path is a simple combination of the root bus name, the device class name, an instance identifier for the device (0000), followed by the GUID of the HyprFuzz device interface we defined in our code above. As such, while not recommended, you can theoretically directly try to open a handle to your driver by hard-coding this information, but going through the appropriate API is certainly nicer.

This concludes Part 1 — while I apologize that no meaty technical details about Hyper-V were present, I still do hope that this content/tutorial was useful to some of the more junior readers, and check back next week for Part 2, where we’ll go over in detail into some hypervisor internals!

Dynamic Tracing in Windows 10 19H1

Windows 10 introduces an exciting new feature with potential security implications – dynamic tracing which finally enables long awaited-for features in the operating system.

At boot, the OS now calls KiInitDynamicTraceSupport, which only if kernel debugging is enabled, will call into the TraceInitSystem export provided by the ext-win-ms-ntos-trace-L-1-1-0 API Set, which is not currently shipping in the public OS schemas. This export receives a callback table with the following 4 functions:

  • KeSetSystemServiceCallback
  • KeSetTracepoint
  • EtwRegisterEventCallback
  • MmDbgCopyMemory

If the function returns successfully, KiDynamicTraceEnabled is now set.

The last routine is not terribly interesting, as it is already used by the debugger when accessing physical memory through commands such as !dd or dd /p. But the other three routines, well, Christmas came early this year.

Kernel Mode ETW Event Callbacks

EtwRegisterEventCallback is a new internal function, accessible only by the dynamic trace system, which allows associating a custom ETW event callback routine, and associated context, with any ETW Logger ID. The function validates that the callback function is valid by calling KeIsValidTraceCallbackTarget, which does two things:

  1. Is Dynamic Tracing Enabled? (i.e.: KiDynamicTraceEnabled == 1)
  2. Is this a valid callback (same requirements as Ps and Ob callbacks, i.e.: was the driver containing the callback linked with /INTEGRITYCHECK)

Once the check succeeds, the matching logger context structure (WMI_LOGGER_CONTEXT) is looked up, and an appropriate ETW_EVENT_CALLBACK_CONTEXT structure is allocated from the pool (tag EtwC), and inserted into the CallbackContext field of the logger context.

At this point, any time an ETW event is thrown by this logger, this kernel-mode callback is also called, introducing, for the first time, support for kernel-mode consumption of ETW events, one of the biggest asks of the security industry in the last decade. This call is done by EtwpInvokeEventCallback, which calls the registered ETW callback with the raw ETW buffer data at the correct offset where this event starts, and the size of the event in the buffer. This new callback is called from:

  • EtwTraceEvent and EtwTraceRaw
  • EtwpLogKernelEvent and EtwpWriteUserEvent
  • EtwpEventWriteFull
  • EtwpTraceMessageVa
  • EtwpLogSystemEventUnsafe

This essentially gives access to the callback to any and all ETW event data, including even WPP and TraceLog debug messages.

System Call Hooks

KeSetSystemServiceCallback, on the other hand, fulfills the second Christmas wish of every Windows security researcher: officially implemented system call hooks. The API allows the dynamic trace system to register a system call hook by name and pass an associated callback function and context. It introduces a new table, called the KiSystemServiceTraceCallbackTable, which copies the contents of the KiServicesTab (a new, more comprehensive system call table) into a Red-Black tree which contains an entry for each system call with its absolute location, number of arguments, and a pre and post callback (and context).

Before continuing, it’s worth talking about the format of the new KiServicesTab structure, as it introduces some valuable information for reverse engineering:

  • The first 32-bit value is the hash of the system call function’s name
  • The second 32-bit value is the argument count of the function
  • The last 64-bit value, is the absolute pointer to the function

The hash function, implemented in a sane language as C looks as follows:

for (nameHash = 0; *CallName != ANSI_NULL; CallName++
{     
    nameHash = (1025 * (nameHash + *CallName) >> 6) ^
                1025 * (nameHash + *CallName);
}

With some cringy JavaScript, we can write a simple WinDbg imperative script:

"use strict";
function hashName(callName)
{
    var hash = 0;
    [...callName].forEach(
       c => hash = 1025*(hash + c.charCodeAt(0)) >>> 6 ^
                   1025*(hash + c.charCodeAt(0))
       );
    return hash >>> 0;
}

The trick, of course, is that the function name must be passed in without its Nt prefix – countless hours having been wasted trying to debug the hash algorithm by yours truly. Let’s take a look at some debugger output:

lkd> dps nt!KiServicesTab L2
fffff803`0e102e50  00000004`b74a2d8f
fffff803`0e102e58  fffff803`0dfe2ac0 nt!NtOpenKeyTransacted
lkd> dx @$scriptContents.hashName("OpenKeyTransacted")
@$scriptContents.hashName("OpenKeyTransacted") : 0xb74a2d8f

Back to KeSetSystemServiceCallback, if a system call callback is being registered, the KiSystemServiceTraceCallbackCount variable is incremented, and the KiDynamicTraceMask has its lowest bit set (the operations are reversed in the case of a system call callback unregistration). Unregistration is done by looping while KiSystemServiceTraceCallbacksActive is set, acting as a barrier to avoid unregistration in the middle of a call. All of these operations are further done under a lock (KiSystemServiceTraceCallbackLock).

Once the callback is registered (which must also satisfy the checks done by KeIsValidTraceCallbackTarget), it will interact with the system call handler as follows: inside of KiSystemServiceCopyEnd, a check is made with KiDynamicTraceMask to verify if the lowest bit is set, if so, system call execution goes through a path where KiTrackSystemCallEntry is called, passing in all of the register-based arguments in a single stack-based structure.  This uses the KiSystemServiceTraceCallbackTable Red-Black Tree to locate any matching callbacks, and if one is present, and KiDynamicTraceEnabled is set, KiSystemServiceTraceCallbacksActive is incremented, the callback is made, and then the KiSystemServiceTraceCallbacksActive is decremented.

When this function returns, the return value is captured, and the actual system call handler is called. Then, KiTrackSystemCallExit is called, passing in both the capture result from earlier, as well as the return value of the system call handler. It performs the same operations as the entry routine, but calling the exit callback instead. Note that callbacks cannot override input parameters nor the return value, at the moment.

Trace Points

KeSetTracepoint is the last of the new capabilities, and introduces an ability to register dynamic trace points, enable and disable them, and finally unregister them. The idea of a ‘trace point’ should be familiar with anyone that has used Linux-based kprobes before.

A trace point is registered by passing in an address and which is then looked up against any currently loaded kernel modules. As long as the address is not part of the INIT (which is discarded by now, or soon will be) or KVASCODE section (which is the KVA Shadow space used to mitigate Meltdown), a trace point structure is allocated in non-paged pool (with the Ftrp tag). Next, the KiTpHashTable is used to scan for existing trace points on the same address. If one is found, an error is returned, as only a single trace point is supported per function. Note that trace point callbacks are also validated by calling KeIsValidTraceCallbackTarget just like in the case of the previous callbacks.

KiTpSetupCompletion is used to finalize registration of a trace point, which first calls KiTpReadImageData based on the instruction size that was specified. An instruction parser (KiTpParseInstructionPrefix, KiTpFetchInstructionBytes) is used, followed by an emulator (KiTpEmulateInstruction, KiTpEmulateMovzx, and many more) are used to determine the instruction size that is required. Once the information is known, the original instructions are copied. For what it’s worth, KiTpReadImageData is a simple function which attaches to the input process and basically does a memcpy of the address and specified bytes.

Once registered, the KiTpRegisteredCount variable is incremented, and the trace point can now be enabled. The first time this happens, KiTpEnabledCount is incremented, and the KiDynamicTraceMask is modified, this time setting the next lowest bit. Then, KiTpWriteMemory is called, which follows a similar code path as when using the debugger to set breakpoints (attaching to the process, if any, calling MmDbgCopyMemory to probe the address, and then using MmDbgCopyMemory wrapped inside of KdEnterDebugger and KdExitDebugger to make the patch.

Disabling a trace point follows the same pattern, but in the opposite direction. Just like system call callback unregistration, a variable, this time called KiTpActiveTrapsCount, is used to avoid removing a trace point while it is still active, and all operations are done by holding a lock (KiTpStateLock).

So how are trace points actually triggered? Simple (again, no surprise to kprobe users) – an “INT 3” instruction is what ends up getting patched on top of the existing code at the target address, which will result in an eventual exception to be handled by KiDispatchException. If the status code is STATUS_BREAKPOINT, and KiDynamicTraceMask has Bit 1 set, KiTpHandleTrap is called.

This increments KiTpActiveTrapsCount to protect against racing unregistration, and looks up the address in KiTpHashTable. If there’s a match, it then makes sure that an INT 3 is actually present at the address. In case of a match, the handler checks if this is a first chance exception and if dynamic tracing is enabled. If so, the callback is executed, and its return value is used to determine if the exception should be raised or not. If the function returns FALSE, then KiTpEmulateInstruction is called to emulate the original instruction stream and resume execution. Otherwise, if dynamic tracing is not enabled, or if this is a second chance exception, KiTpWriteMemory is used to restore the original code to avoid any further traps on that address.

Conclusion

Well, there you have it – the latest 19H1 release of Windows should introduce some exciting new functionality for tracing and debugging. Realistically, it’s unlikely that this will ever be exposed for 3rd security product party use (or even to internal competing security tools), but the addition of these capabilities may one day lead to that functionality being exposed in some way (especially the ETW tracing capability). Since there is no publicly shipping host module for the Tracing API Set, it may be that this functionality will only ever internally be used by Microsoft for their own testing, but it would be great to one day see it for 3rd party debugging and tracing as well.

Finally, it’s worth noting that the KiDynamicTraceEnabled variable is protected by the PsKernelRangeList, which is PatchGuard’s internal way of monitoring specific variables and tables outside of its regular set of behaviors, so attackers that try to manipulate this behavior illicitly will likely incur its wrath. Still, since this functionality is meant to be used when a kernel debugger is attached (which disables PatchGuard), it’s certainly possible to build a custom hand-crafted driver that enables and uses this functionality for legitimate purposes inside of say, a sandbox product.

Bringing Call Gates Back

Introduction

A few months ago, as part of looking through the changes in Windows 10 Anniversary Update for the Windows Internals 7th Edition book, I noticed that the kernel began enforcing usage of the CR4[FSGSBASE] feature (introduced in Intel Ivy Bridge processors, see Section 4.5.3 in the AMD Manuals) in order to allow usage of User Mode Scheduling (UMS).

This led me to further analyze how UMS worked before this processor feature was added – something which I knew a little bit about, but not enough to write on.

What I discovered completely changed my understanding of 64-bit Long Mode semantics and challenged many assumptions I was making – pinging a few other experts, it seems they were as equally surprised as I was (even Mateusz”j00ru” Jurczyk wasn’t aware!).

Throughout this blog post, you’ll see how x64 processors, even when operating in 64-bit long mode:

  • Still support the usage of a Local Descriptor Table (LDT)
  • Still support the usage of Call Gates, using a new descriptor format
  • Still support descriptor-table-based (GDT/LDT) segmentation using the fs/gs segment – ignoring the new MSR-based mechanism that was intended to “replace” it

Plus, we’ll see how x64 Windows still allows user-mode applications to create an LDT (with specific limitations).

At the end of the day, we’ll show that j00ru’s and Gynvael Coldwind’s amazing paper on abusing Descriptor Tables is still relevant, even on x64 systems, on systems up to Windows 10 Anniversary Update. As such, reading that paper should be considered a prerequisite to this post.

Please, take into consideration that all these techniques no longer work on Anniversary Update systems or later, nor will they work on Intel Ivy Bridge processors or later, which is why I am presenting them now. Additionally, there is no “vulnerability” or “zero-day” presented here, so there is no cause for alarm. This is simply an interesting combination of CPU, System, and OS Internals, which on older systems, could’ve been used as a way to gain code execution in Ring 0, in the presence of an already existing vulnerability.

A brief primer on User Mode Scheduling

UMS efficiently allows user-mode processes to switch between multiple “user” threads without involving the kernel – an extension and large improvement of the older “fiber” mechanism. A number of videos on Channel 9 explain how this is done, as does the patent.

One of the key issues that arises, when trying to switch between threads without involving the kernel, is the per-thread register that’s used on x86 systems and x64 systems to point to the TEB. On x86 systems, the FS segment is used, leveraging an entry in the GDT (KGDT_R3_TEB), and on x64, the GS segment is used, leveraging the two Model Specific Registers (MSRs) that AMD implemented: MSR_GS_BASE and MSR_KERNEL_GS_SWAP.

Because UMS would now need to allow switching the base address of this per-thread register from user-mode (as involving a kernel transition would defy the whole point), two problems exist:

  1. On x86 systems, this could be implemented through segmentation, allowing a process to have additional FS segments. But doing so in the GDT would limit the number of UMS threads available on the system (plus cause performance degradation if multiple processes use UMS), while doing so in the LDT would clash with the existing usage of the LDT in the system (such as NTVDM).
  2. On x64 systems, modifying the base address of the GS segment requires modifying the aforementioned MSRs — which is a Ring 0 operation.

It is worth bringing up the fact that fibers never solved this problem –instead having all fibers share a single thread (and TEB). But the whole point of UMS is to provide true thread isolation. So, what can Windows do?

Well, it turns out that close reading of the AMD Manuals (Section 4.8.2) indicate the following:

  • “Segmentation is disabled in 64-bit mode”
  • “Data segments referenced by the FS and GS segment registers receive special treatment in 64-bit mode.”
  • “For these segments, the base address field is not ignored, and a non-zero value can be used in virtual-address calculations.

I can’t begin to count how many times I’ve heard, seen, and myself repeated the first bullet. But that FS/GS can still be used with a data segment, even in 64-bit long mode? This literally brought back memories of Unreal Mode.

Clearly, though, Microsoft was paying attention (did they request this?). As you can probably now guess, UMS leverages this particular feature (which is why it is only available on x64 versions of Windows). As a matter of fact, the kernel creates a Local Descriptor Table as soon as one UMS thread is present in the process.

This was my second surprise, as I had no idea LDTs were still something supported when executing native 64-bit code (i.e.: ‘long mode’). But they still are, and so adding in the TABLE_INDICATOR (TI) bit (0x4) in a segment will result in the processor reading the LDTR to recover the LDT base address and dereference the segment indicated by the other bits.

Let’s see how we can get our own LDT for a process.

Local Descriptor Table on x64

Unlike the x86 NtSetLdtEntries API and the ProcessLdtInformation information class, the x64 Windows kernel does not provide a mechanism for arbitrary user-mode applications to create an LDT. In fact, these APIs all return STATUS_NOT_SUPPORTED.

That being said, by calling the user-mode API EnterUmsSchedulingMode, which basically calls NtSetInformationThread with the ThreadUmsInformation class, the kernel will go through the creation of an LDT (KeInitializeProcessLdt).

This, in turn, will populate the following fields in KPROCESS:

  1. LdtFreeSelectorHint which indicates the first free selector index in the LDT
  2. LdtTableLength which stores the total number of LDT entries – this is hardcoded to 8192, revealing the fact that a static 64K LDT is allocated
  3. LdtSystemDescriptor which stores the LDT entry that will be stored in the GDT
  4. LdtBaseAddress which stores a pointer to the LDT of this process
  5. LdtProcessLock which is a FAST_MUTEX used to synchronize changes to the LDT

Finally, a DPC is sent to all processors which loads the LDT into all the processors.

This is done by reading the KPROCESS->LdtSystemDescriptor and writing into the GDT at offset 0x60 on Windows 10, or offset 0x70 on Windows 8.1 (bonus round: we’ll see why there’s a difference a bit later).

Then, the LLDT instruction is used, and the selector is stored in the KPRCB->LdtSelector field. At this point, the process has an LDT. The next step is to fill it out.

The function now reads the address of the TEB. If the TEB happens to fall in the 32-bit portion of the address space (i.e.: than 0xFFFFFF000), it is set as the base address of a new segment in the LDT (using LdtFreeSelectorHint to choose which selector – in this case, 0x00), and the TebMappedLowVa field in KTHREAD replicates the real TEB address.

On the other hand, if the TEB address is above 4GB, Windows 8.1 and earlier will transform the private allocation holding the TEB into a shared mapping (using a prototype PTE) and re-allocate a second copy at the first available top-down address available (which would usually be 0xFFFFE000). Then, TebMappedLowVa will have this re-mapped address below 4GB.

Additionally, the VAD, which remains “private” (and this will not show up as a truly shared allocation) will be marked as NoChange, and further will have the VadFlags.Teb field set to indicate it is a special allocation. This prevents any changes to be made to this address through calls such as VirtualProtect.

Why this 4GB limitation and re-mapping? How does an LDT help here? Well, it turns out that the AMD64 manuals are pretty clear about the fact that the mov gs, XXX and pop gs instructions:

  • Wipe the upper 32-bit address of the GS base address shadow register
  • Load the lower 32-bit address of the GS base address shadow register with the contents of the descriptor table entry at the given selector

Therefore, x86-style segmentation is still fully supported when it comes to FS and GS, even when operating in long mode, and overrides the 64-bit base address stored in MSR_GS_BASE. However, because there is no 64-bit data segment descriptor table entry, only a 32-bit base address can be used, requiring this complex remapping done by the kernel.

On Windows 10, however, this functionality is not present, and instead, the kernel checks for presence of the FSGSBASE CPU feature. If the feature is present, an LDT is not created at all, and instead the fact that user-mode applications can use the WRGSBASE and RDGSBASE instructions is leveraged to avoid having to re-map a < 4GB TEB.  On the other hand, if the CPU feature is not available, as long as the real TEB ends up below 4GB, an LDT will still be used.

A further, and final change, occurs in Anniversary Update, where the LDT functionality is completely removed – even if the TEB is below 4GB, FSGSBASE is enforced for UMS availability.

Lastly, during every context switch, if the KPROCESS of the newly scheduled thread contains an LDT base address that’s different than the one currently loaded in the GDT, the new LDT base address is loaded in the GDT, and the LDT selector is loaded against (hardcoded from 0x60 or 0x70 again).

Note that if the new KPROCESS does not have an LDT, the LDT entry in the GDT is not deleted – therefore the GDT will always have an LDT entry now that at least one UMS thread in a process has been created, as can be seen in this debugger output:

lkd> $$>a< c:\class\dumpgdt.wds 70 70
                                                    P Si Gr Pr Lo
Sel        Base              Limit          Type    l ze an es ng
---- ----------------- ----------------- ---------- - -- -- -- --
0070 ffffe000`2037d000 00000000`0000ffff LDT        0 Nb By P  Nl

You can see how this matches the LDT descriptor of “UMS Test” application:

lkd> dt nt!_KPROCESS ffffe0002143e080 Ldt*
+0x26c LdtFreeSelectorHint : 1
+0x26e LdtTableLength : 0x2000
+0x270 LdtSystemDescriptor : _KGDTENTRY64
+0x280 LdtBaseAddress : 0xffffe000`2037d000 Void
lkd> dx ((nt!_KGDTENTRY64 *)0xffffe0002143e2f0)
[+0x000] LimitLow : 0xffff [Type: unsigned short]
[+0x002] BaseLow : 0xd000 [Type: unsigned short]
[+0x004] Bytes [Type: ]
[+0x004] Bits [Type: ]
[+0x008] BaseUpper : 0xffffe000 [Type: unsigned long]
[+0x00c] MustBeZero : 0x0 [Type: unsigned long]

Call Gates on x64

Call gates are a mechanism which allows 16-bit and 32-bit legacy applications to go from a lower privilege level to a higher privilege level. Although Windows NT never used such call gates internally, a number of poorly written AV software did, a few emulators, as well as exploits, both on 9x and NT systems, because of the easy way they allowed someone with access to physical memory (or with a Write-What-Where vulnerability in virtual memory) to create a backdoor way to elevate privileges.

With the advent of Supervisor Mode Execution Prevention (SMEP), however, this technique seems to have fallen out of fashion. Additionally, on x64 systems, since Call Gates are expected to be inserted into the Global Descriptor Table (GDT), which PatchGuard is known to protect, the technique is even further degraded. On top of that, most people (myself included) assumed that AMD had simply removed this oft-unused feature completely from the x64 architecture.

Yet, interestingly, AMD did go through the trouble of re-defining a new x64 long mode call gate descriptor format, removing the legacy “parameter count”, and extending it to a 16-byte format to make room for a 64-bit offset, as shown below:

That means that if a call gate were to find itself into a descriptor table, the processor would still support the usage of a far call or far jmp in order to reference a call gate descriptor and change CS:RIP to a new location!

Exploit Technique: Finding the LDT

First, although SMEP makes a Ring 3 RIP unusable for the purposes of getting Ring 0 execution, setting the Target Offset of a 64-bit Call Gate to a stack pivot instruction, then RET’ing into a disable-SMEP gadget will allow Ring 0 code execution to continue.

Obviously, HyperGuard now prevents this behavior, but HyperGuard was only added in Anniversary Update, which disables usage of the LDT anyway.

This means that the ability to install a 64-bit Call Gate is still a viable technique for getting controlled execution with Ring 0 privileges.

That being said, if the GDT is protected by PatchGuard, then it means that inserting a call gate is not really viable – there’s a chance that it may be detected as soon as its inserted, and even an attempt to clean-up the call gate after using it might come too late. When trying to implement a stable, persistent, exploit technique, it’s best to avoid things which PatchGuard will detect.

On the other hand, now we know that x64 processors still support using an LDT, and that Windows leverages this when implementing UMS. Additionally, since arbitrary processes can have arbitrary LDTs, PatchGuard does not guard individual process’ LDT entries, unlike the GDT.

That still leaves the question of how do we find the LDT of the current process, once we’ve enabled UMS? Well, given that the LDT is a static, 64KB allocation, from non-paged pool, this does still leave us with an option. As explained a few years ago on my post about the Big Pool, such a large allocation will be easily enumerable from user-mode as long as its tag is known:

lkd> !pool ffffe000`22f3b000
Pool page ffffe00022f3b000 region is Nonpaged pool
*ffffe00022f3b000 : large allocation, tag kLDT, size 0x10000 bytes

While this is a nice information leak even on Windows 10, a mitigation comes into play unfortunately in Windows 8.1: Low IL processes can no longer use the API I described, meaning that the LDT address can only be leaked (without an existing Ring 0 arbitrary read/infoleak vulnerability) at Medium IL or higher.

Given that this is a fairly large size allocation, however, it means that if a controlled 64KB allocation can be made in non-paged pool and its address leaked from Low IL, one can still guess the LDT address. Ways for doing so are left as an exercise to the reader 🙂

Alternatively, if an arbitrary read vulnerability is available to the attacker, the LDT address is easily retrievable from the KPROCESS structure by reading the LdtBaseAddress field or by computing it from the LdtSystemDescriptor field. Getting the KPROCESS is easy through a variety of undocumented APIs, although these are now also blocked on Windows 8.1 from Low IL.

Therefore, another common technique is to use a GDI or User object which has an owner such a tagTHREADINFO, which then points to ETHREAD (which then points to EPROCESS). Alternatively, one could retrieve the GDT base address from the KPCR’s GdtBase field, if a way of leaking the KPCR is available, and then read the segment base address at offset 0x60 or 0x70. The myriad ways of leaking pointers and bypassing KASLR, even from Low IL, is beyond (beneath?) the content of this post.

Exploit Technique: Building a Call Gate

The next step is to now write a call gate in one of the selectors present in the LDT. By default, if this is the initial scheduler thread, we expect to find its TEB. Indeed, on this sample Windows 8.1 VM, we can see the re-mapped TEB at 0xFFFFE000:

lkd> dq 0xffffe000`2037d000
ffffe000`2037d000 fffff3ff`e0001820
lkd> dt nt!_KGDTENTRY64 ffffe000`2037d000 -b
+0x000 LimitLow : 0x1820
+0x002 BaseLow : 0xe000
+0x004 Bytes :
+0x000 BaseMiddle : 0xff ''
+0x001 Flags1 : 0xf3 ''
+0x002 Flags2 : 0xff ''
+0x003 BaseHigh : 0xff ''
+0x004 Bits :
+0x000 BaseMiddle : 0y11111111 (0xff)
+0x000 Type : 0y10011 (0x13)
+0x000 Dpl : 0y11
+0x000 Present : 0y1
+0x000 LimitHigh : 0y1111
+0x000 System : 0y1
+0x000 LongMode : 0y1
+0x000 DefaultBig : 0y1
+0x000 Granularity : 0y1
+0x000 BaseHigh : 0y11111111
+0x008 BaseUpper : 0
+0x00c MustBeZero : 0

Converting this data segment into a call gate can be achieved by merely converting the type from 0x13 (User Data Segment, R/W, Accessed) to 0x0C (System Segment, Call Gate).

However, doing so will now create a call gate with the following CS:[RIP] => E000:00000000FFFF1820

We have thus two problems:

  1. 0xE000 is not a valid segment
  2. 0xFFFF1820 is a user-mode address, which will cause a SMEP violation on most modern systems.

The first problem is not easy to solve – while we could create thousands of UMS threads, causing 0xE000 to become a valid segment (which we’d then convert into a Ring 0 Code Segment), this would be segment 0xE004. And if one can change 0xE000, might as well avoid the trouble, and set it to its correct value – (KGDT64_R0_CODE) 0x10, from the get go.

The second problem can be fixed in a few ways.

  1. An arbitrary write can be used to set BaseUpper, BaseHigh, LimitHigh, Flags2, and LimitLow (which make up the 64-bits of Code Offset) to the desired Ring 0 RIP that contains a stack pivot or some other interesting instruction or gadget.
  2. Or, an arbitrary write to modify the PTE to make it Ring 0, since the PTE base address is not randomized on the Windows versions vulnerable to an LDT-based attack.
  3. Lastly, if one is only interested in SYSTEM->Ring 0 escalation, systems prior to Windows 10 can be attacked through the AWE-based attack I described at Infiltrate 2015, which will allow the creation of an executable Ring 0 page.

It is also worth mentioning that since Windows 7 has all of non-paged pool marked as executable, and the LDT is itself a 64KB non-paged pool allocation, it is made up of entirely executable pages, so an arbitrary write could be used to set the Call Gate offset to somewhere within the LDT allocation itself.

Exploit Technique: Writing the Ring 0 Payload

Writing x64 Ring 0 payload code is a lot harder than x86.

For starters, the GS segment must be immediately set to its correct value, else a triple fault could occur. This is done through the swapgs instruction.

Next, it’s important to realize that a call gate sets the stack segment selector (SS) to 0. While x64 natively operates in this fashion, Windows expects SS to be KGDT64_R0_DATA, or 0x18, and it may be a good idea to respect that.

Additionally, note that the value to which RSP will be set to is equal to the TSS’s Rsp0, normally used for interrupts, while a typical system call would use the KPRCB’s RspBase field. These ought to be in sync, but keep in mind that a call gate does not disable interrupts automatically, unlike an interrupt gate.

A reliable exploit must take note of all these details to avoid crashing the machine.

Further, exiting from a call gate must be done with the ‘far return’ instruction. Once again, another caveat applies: some assemblers may not generate a true 64-bit far return (i.e.: lacking a rex.w prefix), which will incorrectly pop 32-bit data from the stack. Make sure that a ‘retfq’ or ‘retfl’ or ‘rex.w retf’ is generated instead.

Exploit Techniques Bonus: Corrupting the LDT Address, Hidden Segment, Lazy GDT Clear

Note that we’ve gone through some difficulty in obtaining the address of the LDT, and describing the ways in which the UMS TEB entries could be corrupted in a way to convert them to Call Gate entries, it’s useful to mention that perhaps a much easier (depending on the attack parameters and vulnerability) technique is to just overwrite the LdtSystemDescriptor field in EPROCESS (something which j00ru’s x86-based paper also pointed out).

That’s because, at the next context switch, the GDT will automatically be updated a copy of this descriptor, which could be set to a user-mode base address (due to a lack of SMAP in the OS), avoiding the need to either patch the GDT (and locating it — which is hard when Hyper-V’s NPIEP feature is enabled) or modifying the true kernel LDT (and leaking its address).

Indeed, for this to work, a single 32-bit (in fact, even less) arbitrary write is required, which must, at minimum, set the fields:

  • P to 1 (Making the segment present)
  • Type to 2 (Setting the segment as an LDT entry)
  • BaseMid to 1 (Setting the base to 0x10000, as an example, as addresses below this are no longer allowed)

Therefore, a write of 0x00008201, for example, is sufficient to achieve the desired result of setting this process’ LDT to 0x10000.

As soon as a context switch occurs back to the process, the GDT will have this LDT segment descriptor loaded:

lkd> $$>a< c:\class\dumpgdt.wds 70 70
                                                    P Si Gr Pr Lo
Sel        Base              Limit          Type    l ze an es ng
---- ----------------- ----------------- ---------- - -- -- -- --
0070 00000000`00010000 00000000`00000000 LDT        0 Nb By P  Nl

But wait – isn’t setting a limit of 0 creating an empty LDT? Not to worry! In long mode, limits on LDT descriptor entries are completely ignored… unfortunately though, although this is what the AMD64 manual states, I get access violations, at least on Hyper-V x64, if the limit is not large enough to contain the segment. So your mileage my vary.

But that’s all right – we can still limit this to a simple 4-byte overwrite! The trick lies into simply going through the process of creating a real LDT in the first place, then leaking its address (as described). Following that, allocate the user-mode fake LDT at the same lower 32-bit address, keeping the upper 32-bits zeroed. Then, use the 4-byte overwrite to clear the KPROCESS’ LdtSystemDescriptor’s BaseUpper field.

Even if the kernel LDT address cannot be leaked for some reason, one can easily “guess” every possibility (knowing it will be page aligned) and spray the entire 32-bit address space. This sounds like a lot, but is really only about a million allocations.

Finally, an alternate technique is to leverage exception handling: if the wrong LDT is overwritten, the kernel won’t crash when loading the invalid LDT segment (as long as it’s canonical, the PTE isn’t checked for validity). Instead, only when the exploit attempts to use the call gate, will a GPF be generated, and only in the context of the Ring 3 application. As such, one can progressively try each possible lower 32-bit LDT address until a GPF is no longer issued. Voila: we have found the correct lower 32-bits.

As another bonus, why is it that the selector for the LDT is 0x70 on Windows 8.1 and earlier, but 0x60 on Windows 10?

The answer lies in an even lesser known fact: up until the latter, the kernel created a Ring 0 Compatibility Mode Segment at offset 0x60! This means that a sneaky attacker can set CS to 0x60 and enjoy a weird combination of 32-bit legacy code execution with Ring 0 privileges (a number of caveats apply, including what an interrupt would do when returning, and the fact that no kernel API could be used at all).

Finally, note that even once a UMS-leveraging process exists, the GDT entry is not cleared, and points to a freed pool allocation. This means that if a way to allocate 64KB of controlled non-paged pool memory is known (such as some of the ways described in my Big Pool blog post), the GDT entry could be made to point to controlled memory (such as a named pipe buffer) which will re-use the same pointer. Then, some way to make the system continue to trust this address/entry should be achieved (either by causing an LLDT of 0x60/0x70 to be issued or having an EPROCESS’s LdtSystemDescriptor field re-use this address).

This is more of an anti-forensics technique than anything, because it keeps the GDT pointing to a kernel-mode LDT, even though it’s attacker controlled.

PoC||GTFO

While I won’t be releasing sample code leveraging this attack, it could easily be added to the various PowerShell-based “Vulnerable Driver” techniques that @b33f has been creating.

Here’s a sample screenshot of the attack based on a C program, with me using the debugger to perform the 32-bit arbitrary write (vs. sending an IOCTL to a vulnerable driver).

It sits in a loop (after leaking and allocating the data that it needs) and attempts to execute the call gate every second, until the arbitrary write is performed.

Once successful, the Ring 0 payload merely reads SharedUserData->SystemTime (every second).

Conclusion: Windows 10 Anniversary Update Mitigations

In Windows 10 Anniversary Update (“Redstone 1”), a number of changes make these exploit techniques impossible to use:

  • All of the LDT-related fields and code in the kernel is removed. There is now no way of having an LDT through any Windows-supported mechanism.
  • PatchGuard now checks the LDTR register. If it’s non-zero, it crashes the system.

MSRC and the various security teams at Microsoft deserve kudos for thinking about — and plugging — the attack vector that LDTs provided, which is certainly not a coincidence 🙂

Further, the following generic mitigations make classes of such attacks much harder to exploit:

  • Randomization of the PTE base make it harder to bypass SMEP by making Ring 3 memory appear as Ring 0.
  • Technologies such as KCFG make it even harder to exploit control over arbitrary CS:RIP.

Finally, as described earlier, even on Windows 8.1, if the FSGSBASE feature is available in KeFeatureBits, the kernel will not allow the creation of an LDT, nor will it load the LDT during a context switch. You can easily verify this by calling (Ex/Rtl)IsProcessorFeaturePresent(PF_RDWRFSGSBASE_AVAILABLE).

Windows Internals, 7th Edition!

What am I up to?

Long-time readers of this blog are probably aware that updates have been rare in the past few years, although I do try to keep time for some interesting articles from time to time. Most of my public research lately has been done through the Infosec Conference Circuit, so if you were not already aware, you can download slides from all my talks at the following URL:

http://www.alex-ionescu.com/publications

Additionally, I have a number of presentations I am looking forward to giving this year, including:

I also have a number of interesting design flaws I discovered this year in various Windows components —  as these get patched (they are not Tavis-worthy wormable RCEs, not to worry), I have been mulling over a “Windows Design Flaw Garage Sale” talk similar to the famous one that Stefan Esser (i0nic) gave a few years ago about Apple/iOS — covering some past bugs (fixed and unfixed) and more recent ones.

However, this post is not about such small research updates — but rather about a much bigger piece of work that has taken up my time these last 12 months — the release of Windows Internals, 7th Edition (Part 1)!

Windows Internals, 7th Edition

Some history…

After the release of the 6th Edition of the book, which covered Windows 7, it’s fair to say that I was pretty burned out. The book incurred heavy delays due to my juggling of college, internships, and various relationships, while also requiring a massive amount of work due to the ambitious new sections, and coverage of the many, many changes that Windows 7 brought to the table (either fine-tuning many small things from Vista, or completely new kernel modules). Additionally, my co-authors also had new plans: David Solomon went on to retire and sunset his training business (David Solomon Expert Seminars), and Mark Russinovich was fully committed to his new role at Microsoft which eventually took him to Azure, where he is now the Chief Technology Officer (CTO), and kicking some major cloud/fabric butt with his extensive OS experience and security background. All of this to say — there was not much of an appetite to immediately begin writing a new book, with Windows 8 looming on the horizon (at that point still called Windows Blue).

Something else happened at that time: under leadership from Satya Nadella, Microsoft began delivering on its “Windows as a Service (WaaS)” model, furiously releasing a Windows 8.1 Update within a year of Windows 8 having shipped. Given that a single OS update had taken us years to cover, this release cycle was simply too rapid to successfully think about releasing a book in a timely fashion. I stopped thinking that a new edition of the book would ever be released, and I certainly didn’t think I’d be able to do one.

All gaps create opportunities, and two other authors decided that they could take on the 7th Edition and ship a successful update. They re-arranged the book in three parts, instead of two, with the first one focusing on Windows 8 User-Mode Metro (now UWP) Application Development, the second one on the Kernel, and the third one on Driver Development. I was not contacted or involved in these changes, and honestly, was not too happy about them. There are excellent driver programming books, just as there are application development books (even on Metro/UWP). This felt, to me, like an attempt to significantly cut down on the kernel portions of the book, and monetize on the Metro/Driver programming books, which obviously have a  much wider audience.

Additionally, with Windows 8 having shipped, Part 1 was slated for that year, with Part 2 (Windows 8.1 would now be out) the year after, and finally, Part 3, a year after that (Windows 10 would now be in beta). By the time you’d get to the last part, the OS would’ve already moved two releases further — or, each part could cover that OS. Becoming a Windows 8 Metro App Development book, with Windows 8.1 Kernel Internals book, and Windows 10 Driver Development book. These were just my personal thoughts at the time — which I kept to myself, because every author needs a chance to be successful, and others may well have liked this model, and the book may have sold more copies than all previous combined – who was I to judge?

One year passed. Then another… then another. By now, given that my name was still on the cover — regardless of my lack of involvement — many people would come to me and ask me “What’s going on? Why are you taking so long? Do you need help?” on the friendly side… and of course, some not-so-friendly comments, from people that had pre-ordered on Day 1, paying anywhere between $30-90, and receiving nothing 3 years later, with an ever-delayed release date. I strongly considered putting out a statement that I had nothing to do with this book — but chose to simply ask Microsoft Press to remove my name from the cover and all marketing materials. I preferred losing my association with this Bible, rather than be responsible for its contents, and its delays.

A new hope

Around the time that I did that, however, I realized that yet –another– name had been added to the pool! It was that of Pavel Yosifovich, a Microsoft MVP whose blog I had followed a few times, and whom I had heard about doing some Windows Internals training in the past, mostly in Israel. I thought highly of Pavel — and he was an established author of previous books. Additionally, he now had a Microsoft e-mail address — suggesting that once again, the series would have a real “internal” presence, who would communicate with the developer team, read source code comments, and more — while Mark and I had only, and solely, been reverse engineering, we had always had help from David’s connections and insight into the developer team, which the new books would’ve lacked.

So I reached out, and to my pleasure, found out that Pavel had now become the sole co-author, the previous two having completely abandoned the project with no materials to show for it. Pavel was doing a herculean task of updating the entire book to now only cover Windows 8 and 8.1, but of course Windows 10 as well, which had reached its Threshold 2 (1511) Update, with Redstone 1 (1607) currently shipping to the Windows Insider Program (WIP). While having source access helps, this is still a task that I knew a single person would struggle with — and I really wanted the book to succeed for all of those that had placed their faith in it. I had also, over the last few years, had made lots of Windows reverse engineering, as many of you know, covering large parts of new Windows 8 and later components. This meant significantly reduced research time for me — all while having an amazing co-author. It seemed obvious that I should jump into the deep abyss of Windows Internals once again.

Pavel was extremely gracious in accepting an uninvited guest to the party, allowing me to make many changes to chapters that he had already completed (I don’t know if I would’ve done the same!). This started adding delays to the book, and Redstone 1 was about to ship — we decided to update the book to cover Redstone 1 from now on, and to go back to any places we knew there were changes. As we kept writing, I came up with new ideas and changes to the book — moving some things around, adding new kernel components, expanding on experiments, and the scope continued to increase. It was clear that I was once again, going to cause delays, which deeply bothered me.

Yet, Pavel was always there to pick up the slack, go beyond the call of duty, and spend nights on researching components as well as the more mundane parts of a book (screenshots and graphics). I could not have asked for a more humble host inside the world of his book. As we were wrapping up, I realized that Redstone 2 (1703) was nearing its feature complete date (around January of this year). I made yet another potentially delaying decision to go back, once again, and to hurriedly find any places where I knew changes had been made, and to update as much of the book as I could. I saw an opportunity — to release a Windows Internals book within weeks of a Windows release, covering that Windows release. A feat which had not happened in many, many releases.

And so, here we are today, a little over a month since Windows 10 Creators Update — Redstone 2 — 1703 has shipped, with the update slowly rolling out over the month of April to hundreds of millions of users, with Build 2017 right around the corner, and with a Windows Internals book in the midst of it all, covering the very same operating system. While I apologize for the additional six months this has cost your pre-orders, I do believe it was the right call.

What’s new in the book? What’s changed?

One of the first things that Pavel had changed (other than returning the book to its usual two-part focus on the kernel and related system components) is to better organize key Windows concepts into the first part of the book, instead of having them spread out over both parts — this way, people could get what would likely be 80% of the material that is relevant to 90% of people as soon as the first part was released, instead of having to wait for both. This meant making the following changes:

  1. Moving Memory Management and I/O Manager to Part 1
  2. Breaking out Processes, Jobs, and Thread Scheduling in two chapters — Processes & Jobs, and Thread Scheduling
  3. Moving System & Management Mechanisms to Part 2
  4. Removing Networking from Part 1

Once I joined, it made sense, with this new flow, to make a few additional changes:

  1. Processes and Jobs, now being its own chapter, became Processes, Jobs and Silos, which is the internal name for Windows Server Containers as well as Centennial/Desktop Bridge containers.
  2. It made little sense that we were covering the User-Mode Loader (a section I first added in the 5th Edition) as a System Mechanism, instead of an integral part of the Process section (which made constant references to Part 2). I moved this section to be part of the same chapter.

Outside of these broad strokes, a full list of all the changes would obviously be too complex. I would estimate the sheer amount of new pages to be around 150 — with probably 50 other pages that have received heavy modification and/or updating. You can definitely expect coverage of the following new features:

  • Auto Boost [Scheduling]
  • Directed Switch [Scheduling]
  • Memory Partitions [Memory]
  • Priority Donation/Inheritance [Scheduling]
  • Security/Process Mitigations [Security]
  • CPU Sets [Scheduling]
  • Windows Containers [Processes]
  • Store Manager [Memory]
  • API Sets [Processes]
  • AppContainer [Security]
  • Token Attributes & Claims [Security]
  • Protected Process Light [Security / Processes]
  • Windows Subsystem for Linux [Architecture]
  • Memory Compression [Memory]
  • Virtual Trust Levels [Architecture]
  • Device Guard & Credential Guard [Security]
  • Processor Enclaves [Memory]
  • Secure Kernel Mode / Isolated User Mode [Architecture]
  • Pico Processes [Processes]
  • Power Management Framework (PoFx) [I/O Manager]
  • Power Availability Requests [I/O Manager]
  • And a lot more

Thank You!

Finally, I’d like to thank many people, inside and outside of Microsoft, that helped with some of the content, ideas, experiments, etc. Especially Andrea Allievi, who helped with some very hairy parts of the Memory Management section!

I know both Pavel and I hope you’ll enjoy this flow a bit better, and that you’ll have lots of reading to do in this new Edition. Feel free to hit me up at @aionescu as usual.

Owning the Image Object File Format, the Compiler Toolchain, and the Operating System: Solving Intractable Performance Problems Through Vertical Engineering

Closing Down Another Attack Vector

As the Windows kernel continues to pursue in its quest for ever-stronger security features and exploit mitigations, the existence of fixed addresses in memory continues to undermine the advances in this area, as attackers can use data corruption vulnerabilities and combine these with stack and instruction pointer control in order to bypass SMEP, DEP, and countless other architectural defense-in-depth techniques. In some cases, entire mitigations (such as CFG) are undone due to their reliance on a single, well-known static address.

In the latest builds of Windows 10 Redstone 1, aka “Anniversary Update”, the kernel takes a much stronger toward Kernel Address Space Layout Randomization (KASLR), employing an arsenal of tools that can only be available to an operating system developer that also happens to own the world’s most commercially successful compiler, and the world’s most pervasive executable object image format.

The Page Table Entry Array

One of the most unique aspects of the Windows kernel is the reliance on a fixed kernel address to represent the virtual base address of an array of page table entries that describes the entire virtual address space, and the usage of a self-referencing entry which acts as a pivot describing the page directory for the space itself (and, on x64 systems, describing the page directory table itself, and the page map level 4 itself).

This elegant solutions allows instant O(1) translation of any virtual address to its corresponding PTE, and with the correct shifts and base addresses, a conversion into the corresponding PDE (and PPE/PXE on x64 systems). For example, the function MmGetPhysicalAddress only needs to work as follows:

PHYSICAL_ADDRESS
MmGetPhysicalAddress (
    _In_ PVOID Address
    )
{
    MMPTE TempPte;

    /* Check if the PXE/PPE/PDE is valid */
    if (
#if (_MI_PAGING_LEVELS == 4)
       (MiAddressToPxe(Address)->u.Hard.Valid) &&
#endif
#if (_MI_PAGING_LEVELS >= 3)
       (MiAddressToPpe(Address)->u.Hard.Valid) &&
#endif
       (MiAddressToPde(Address)->u.Hard.Valid))
   {
       /* Check if the PTE is valid */
       TempPte = *MiAddressToPte(Address);
       ...
   }

Each iteration of the MMU table walk uses simple MiAddressTo macros such as the one below, which in turn rely on hard-code static addresses.

/* Convert an address to a corresponding PTE */
#define MiAddressToPte(x) \
   ((PMMPTE)(((((ULONG)(x)) >> 12) << 2) + PTE_BASE))

As attackers have figured out, however, this “elegance” has notable security implications. For example, if a write-what-where is mitigated by the existence of a read-only page (which, in Linux, would often imply requiring the WP bit to be disabled in CR0), a Windows attacker can simply direct the write-what-where attack toward the pre-computed PTE address in order to disable the WriteProtect bit, and then follow that by the actual write-what-where on the data.

Similarly, if an exploit is countered by SMEP, which causes an access violation when a Ring 0 Code Segment’s Instruction Pointer (CS:RIP) points to a Ring 3 PTE, the exploit can simply use a write-what-where (if one exists), or ROP (if the stack can be controlled), in order to mark the target user-mode PTE containing malicious code, as a Ring 0 page.

Other PTE-based attacks are also possible, such as by using write-what-where vulnerabilities to redirect a PTE to a different physical address which is controlled by the attacker (undocumented APIs available to Administrators will leak the physical address space of the OS, and some physical addresses are also leaked in the registry or CPU registers).

Ultimately, the list goes on and on, and many excellent papers exist on the topic. It’s clear that Microsoft needed to address this limitation of the operating system (or clever optimization, as some would call it). Unfortunately, a number of obstacles exist:

  • Using virtual-mapped tables based on the EPROCESS structure (as Linux and OS X do) causes significant performance impact, as pointer chasing the different tables now causes cache misses and page translations. This becomes even worse when thinking about multi-processor systems, and the cache waste that this causes (where the TLB may end up getting filled with the various global (locked) pages corresponding to the page tables of various processes, instead of only the current process).
  • Changing the address of the PTE array has a number of compatibility concerns, as PTE_BASE is actually documented in ntddk.h, part of the Windows Driver Kit. Additionally, once the new address is discovered, attackers can simply adjust their exploits to use the appropriate static address based on the version of the operating system.
  • Randomizing the address of the PTE array means that Windows memory manager functions can no longer use a static constant or preprocessor definition for the address, but must instead access a global address which contains it. Forcing every processor to dereference a single global address every single time a virtual memory operation (allocation, protection, page walk, fault, etc…) is performed is a significantly negative performance hit, especially on multi-socket, NUMA systems.
  • Dealing with the global variable problem above by creating cache-aligned copies of the address in a per-processor structure causes a waste of precious kernel storage space (for example, assuming a 64-byte cache line and 640 processors, 40KB of physical memory are used to replicate the variable most efficiently). However, on NUMA systems, one would also want the page containing this data to be local to the node, so we might imagine an overhead of 4KB per socket. In practice, this wouldn’t be quite as bad, as Windows already has a per-NUMA-node-allocated, per-processor, cache-aligned list of critical kernel variables: the Kernel Processor Region Control Block (KPRCB).

In a normal world, the final bullet would probably be the most efficient solution: sacrificing what is today a modest amount of physical memory (or re-using such a structure) for dealing with effects of global access. Yet, locating this per-processor data would still not be cheap: most operating systems access such a structure by relying on a segment register such as FS or GS on x86 and x64 systems, or use special CPU registers such as those located on CP15 inside of ARM processors. At the very least, this causes more pointer dereferences and potentially complex microcode accesses. But if we own the compiler and the output format, can’t we think outside the box?

Dynamic Relocation Generation

When the Portable Executable (PE) file format was created, its designers realized an important issue: if compiled code made absolute references to data or functions, these hardcoded pointer values might become invalid if the operating system loaded the executable binary at a different base address than its preferred address. Originally a corner case, the advent of user-mode ASLR made this a common occurrence and new reality.

In order to deal with such rebasing operations, the PE format includes the definition of a special data directory entry called the Relocation Table Directory (IMAGE_DIRECTORY_ENTRY_BASERELOC). In turn, this directory includes a number of tables, each of which is an array of entries. Each entry ultimately describes the offset of a piece of code that is accessing an absolute virtual address, and the required adjustment that is needed to fixup the address. On a modern x64 binary, the only possible fixup is an absolute delta (increment or decrement), but more exotic architectures such as MIPS and ARM had different adjustments based on how absolute addresses were encoded on such processors).

These relocations work great to adjust hardcoded virtual addresses that correspond to code or data within the image itself – but if there is a hard-coded access to 0xC0000000, an address which the compiler has no understanding of, and which is not part of the image, it can’t possibly emit relocations for it – this is a meaningless data dereference. But what if it could?

In such an implementation, all accesses to a particular magic hardcoded address could be described as such to the compiler, which could then work with the linker to generate a similar relocation table – but instead of describing addresses within the image, it would describe addresses outside of the image, which, if known and understood by the PE parser, could be adjusted to the new location of the hard-coded external data address. By doing so, compiled code would continue to access what appears to be a single literal value, and no global variable would ever be needed, cancelling out any disadvantages associated with the randomization of this address.

Indeed, the new build of the Microsoft C Compiler, which is expected to ship with Visual Studio 15 (now in preview), address a special annotation that can be associated with constant values that correspond to external virtual addresses. Upon usage of such a constant, the compiler will ensure that accesses are done in a way that does not “break up” the address, but rather causes its absolute value to be expressed in code (i.e.: “mov rax, 0xC0000000”). Then, the linker collects the RVAs of such locations and builds structures of type IMAGE_DYNAMIC_RELOCATION_ENTRY, as shown below:

typedef struct _IMAGE_DYNAMIC_RELOCATION_TABLE {
   DWORD Version;
   DWORD Size;
// IMAGE_DYNAMIC_RELOCATION DynamicRelocations[0];
} IMAGE_DYNAMIC_RELOCATION_TABLE, *PIMAGE_DYNAMIC_RELOCATION_TABLE;

When all entries have been written in the image, an IMAGE_DYNAMIC_RELOCATION_TABLE structure is written, with the type below:

typedef struct _IMAGE_DYNAMIC_RELOCATION {
   PVOID Symbol;
   DWORD BaseRelocSize;
// IMAGE_BASE_RELOCATION BaseRelocations[0];
} IMAGE_DYNAMIC_RELOCATION, *PIMAGE_DYNAMIC_RELOCATION;

The RVA of this table is then written into the IMAGE_LOAD_CONFIG_DIRECTORY, which has been extended with the new field DynamicValueRelocTable and whose size has now been increased:

   ULONGLONG DynamicValueRelocTable;         // VA
} IMAGE_LOAD_CONFIG_DIRECTORY64, *PIMAGE_LOAD_CONFIG_DIRECTORY64;

Now that we know how the compiler and linker work together to generate the data, the next question is who processes it?

Runtime Dynamic Relocation Processing

In the Windows boot architecture, as the kernel is a standard PE file loaded by the boot loader, it is therefore the boot loader’s responsibility to process the import table of the kernel, and load other required dependencies, to generate the security cookie, and to process the static (standard) relocation table. However, the boot loader does not have all the information required by the memory manager in order to randomize the address space as Windows 10 Redstone 1 now does – this remains the purview of the memory manager. Therefore, as far as the boot loader is concerned, the static PTE_BASE address is still the one to use, and indeed, early phases of boot still use this address (and associate PDE/PPE/PXE base addresses and self-referencing entry).

This clearly implies that it is not considered part of a PE loader’s job to process the dynamic relocation table, but rather the job of the component that creates the dynamic address space map, which has now been enlightened with this knowledge. In the most recent builds, this is done by MiRebaseDynamicRelocationRegions, which eventually calls MiPerformDynamicFixups. This routine locates the PE file’s Load Configuration Directory, gets the RVA (now a VA, thanks to relocations done by the boot loader) of the Dynamic Relocation Table, and begins parsing it. At this moment, it only supports version 1 of the table. Then, it loops through each entry, adjusting the absolute address with the required delta to point to the new PTE_BASE address.

It is important to note that the memory manager only calls MiPerformDynamicFixups on the binaries that it knows require such fixups due to the use of PTE_BASE: the kernel (ntoskrnl.exe) and the HAL (hal.dll). As such, this is not (yet) intended as a generic mechanism for all PE files to allow dynamic relocations of hard-coded addresses toward ASLRed regions of memory – but rather a highly vertically integrated feature specifically designed for dealing with the randomization of the PTE array, and the components that have hardcoded dependencies on it.

As such, even if one were to discover the undocumented annotation which allows the new version of the compiler to generate such tables, no component would currently parse such a table.

Sneaky Side Effects

A few interesting details are of note in the implementation. The first is that the initial version of the implementation, which shipped in build 14316, contained a static address in the loader block, which corresponded to the PTE base address that the loader had selected, and was then overwritten by a new fixed PTE base address (0xFFFFFA00`00000000 on x64).

The WDK, which contains the PTE_BASE address for developers to see (but apparently not use!) also contained this new address, and the debugger was updated to support it. This was presumably done to gauge the impact of changing the address in any way – and indeed we can see release notes referring to certain AV products breaking around the time this build was released. I personally noticed this change by disassembling MmGetPhysicalAddress to see if the PTE base had been changed (a normal part of my build analysis).

The next build, 14332, seemingly contained no changes: reverse engineering of the function showed usage of the same address once again. However, as I was playing around with the !pte extension in the debugger, I noticed that a new address was now being used – and that on a separate machine, this address was different again. Staring in IDA/Hex-Rays, I could not understand how this was possible, as MmGetPhysicalAddress was clearly using the same new base as 14316!

It is only once I unassembled the function in WinDBG that I noticed something strange – the base address had been modified to a different value. This led me to the hunt for the dynamic relocation table mechanism. But this is an important point about this implementation – it offers a small amount of “security through obscurity” as a side-effect: attackers or developers attempting to ‘dynamically discover’ the value of the PTE base by analyzing the kernel file on disk will hit a roadblock – they must look at the kernel file in memory, once relocations have been made. Spooky!

Conclusion

It is often said that all software engineering decisions and features lie somewhere between the four quadrants of security, performance, compatibility and functionality. As such, as an example, the only way to increase security without affecting functionality is to impact compatibility and performance. Although randomizing the PTE_BASE does indeed cause potential compatibility issues, we’ve seen here how control of the compiler (and the underlying linked object file) can allow implementers to “cheat” and violate the security quadrant, in a similar way that silicon vendors can often work with operating system vendors in order to create overhead-free security solutions (one major advantage that Apple has, for example).

Closing “Heaven’s Gate”

Brief Overview of WoW64

“Heaven’s Gate” refers to a technique first popularized by the infamous “Roy G. Biv” of 29a fame, and later re-published in Valhalla #1. Cited and improved in various new forms, and even seen in the wild used by the Vawtrak banking malware, it centers around the fact that on a 64-bit Windows OS, seeing as how all kernel-mode components always execute in 64-bit mode, the address space, core OS structures (EPROCESS, PEB, etc…), and code segments for processes are all initially setup for 64-bit “long mode” execution, regardless of the process actually being hosted by a 32-bit executable binary.

In fact, on 64-bit Windows, the first piece of code to execute in *any* process, is always the 64-bit NTDLL, which takes care of initializing the process in user-mode (as a 64-bit process!). It’s only later that the Windows-on-Windows (WoW64) interface takes over, loads a 32-bit NTDLL, and execution begins in 32-bit mode through a far jump to a compatibility code segment. The 64-bit world is never entered again, except whenever the 32-bit code attempts to issue a system call. The 32-bit NTDLL that was loaded, instead of containing the expected SYSENTER instruction, actually contains a series of instructions to jump back into 64-bit mode, so that the system call can be issued with the SYSCALL instruction, and so that parameters can be sent using the x64 ABI, sign-extending as needed.

This process is accurately described in many sources, including in the Windows Internals books, so if you’re interested in reading more, you can do so, but I’ll spare additional details here.

Enter Heaven’s Gate

Heaven’s Gate, then, refers to subverting the fact that a 64-bit NTDLL exists (and a 64-bit heap, PEB and TEB), and manually jumping into the long-mode code segment without having to issue a system call and being subjected to the code flow that WoW64 will attempt to enforce. In other words, it gives one the ability to create “naked” 64-bit code, which will be able to run covertly, including issuing system calls, without the majority of products able to intercept and/or introspect its execution:

  • Microsoft’s EMET, as well as a myriad of similar tools and sandboxes, only hook/protect the 32-bit NTDLL for WoW64 processes, under the assumption that the 64-bit NTDLL can’t be reached in any other way. The mitigations can therefore be bypassed using Heaven’s Gate. The same technique has been used by the Phenom malware to bypass AV solutions.
  • When debugging a 32-bit application with a 64-bit debugger (such as WinDBG), you will initially see the 64-bit state (heap, stack, NTDLL, TEB, etc…). Since this state is uninteresting, as it only contains the WoW64 system call layer, manual commands and extensions must be used to investigate the 32-bit state instead — and so in order to avoid this, even Microsoft often recommends using the 32-bit WinDBG instead, which will provide a much more seamless debugging experience and show the 32-bit state of the process. Other 3rd party debuggers, which are 32-bit only, will also behave the same way. The problem, therefore, is that by using Heaven’s Gate, there IS now interesting 64-bit state, that these debuggers will miss.
  • Many emulation/detonation engines will, upon seeing a 32-bit executable, emulate it using x86 instructions. They will either ignore or be unable to handle x64 instructions, as they never expect them to run. In fact, this was recently shown by a blog post over at Hexacorn. Heaven’s Gate allows such x64 instructions to run, rendering the x86 code into “dummy” code for misdirection purposes.

Memory Restrictions

These and other “benefits” make Heaven’s Gate a tool of choice for malicious code.  However, there always existed an interesting limitation in 32-bit applications running under WoW64: even when executing in 64-bit long-mode, addresses above the 4 GB could never be allocated (in fact, addresses above 2 GB could normally never be used for compatibility purposes, unless the image was linked with /LARGEADDRESSAWARE — the switch was originally designed to support /3GB x86 server environments, but outgrew its original intent to allow full 4 GB addresses under WoW64, a fact leveraged by many 32-bit games and browsers even today).

Using a kernel debugger and the !vad command, it’s simple to see why, such as on this Windows 7 system, where I’ve typed the command before the process has any chance of executing even a single instruction — not even NTDLL has loaded here, folks. This is an interesting view of what are the “earliest” memory structures you can find in a WoW64 process (at least on Windows 7).

vad

Note that a giant VAD at the end, highlighted in teal, occupies the entire 64-bit portion of the address space. Let’s see what !vad has to say about it:

vadblock

Seeing as how it’s configured as a “NoChange” and “OneSecured” VAD, it cannot be freed or modified in any way. This is further confirmed by the commit charge of -1.

On Windows 8 and later, however, the output changes, as you can see below. Note that I’ve re-used the same colors as in the Windows 7 output for clarity (and the uncolored VADs correspond to the CFG entries).

vad81

The 64-bit NTDLL is actually loaded in 64-bit address space now! And we have not one, but two teal-colored VADs, which surround it, re-creating the “no man’s land” just as on Windows 7 and earlier. This change was briefly mentioned, I believe, by Matt Miller (of skape fame) at one of Microsoft’s BlackHat presentations: it made it a bit harder to guess the location of the 64-bit NTDLL by simply adding a fixed size to the 32-bit NTDLL. In my screenshot, since this is a CFG-enabled process, the VADs don’t exactly envelop NTDLL — rather they surround the native CFG bitmap + NTDLL, but the point remains.

This change in NTDLL load behavior also had the likely intended side effect of making hooks in 64-bit NTDLL extremely hard, or outright impossible. You see, without consuming an enormous amount of space, it’s simply not possible to overwrite an x64 instruction with a call or jmp to an absolute 64-bit address efficiently. Instead, hooking engines will allocate a “trampoline” that is within the 32-bit address range of the hooked function, and use a much smaller 5 byte 32-bit relative jump, which happens to fit nicely in the “hotpatch aware” region that Microsoft binaries have (or anyone linking with /hotpadmin). The trampoline then uses the full 64-bit absolute jump instruction.

As you’ve figured out by now, if the trampoline needs to be within 2GB, but there are two large VADs blocking off all 64-bit addresses around NTDLL, this hooking technique is dead in the water. Other, more complex and error-prone techniques must (and can) be used instead.

Nevertheless, nothing stops Heaven’s Gate on Windows 8. There some minor WoW64 changes which one must adapt to, and accessing or hooking 64-bit NTDLL becomes harder.

Control Flow Guard and WoW64

In Windows 10, a new exploit mitigation is introduced called Control Flow Guard, or CFG. It too, has been rather well described in multiple sources, so I won’t go into details inside of this post. The important piece to remember about CFG is that all relative function calls are now subject to an additional compiler-generated check, which is implemented by NTDLL: only valid function prologues (within 8 bytes of alignment) can be the target of such a call. Valid function prologues, in turn, are marked by a bit being set in a very large bitmap (bit array) structure, which describes the entire user-mode address space (all 128TB of it!). I previously posted on some interesting changes this required in the memory manager, as this bit array obviously becomes quite large (2 TB, in fact).

What’s not been documented too clearly in most research is that on 64-bit systems, there are in fact not one, but two CFG bitmaps: one for 32-bit code, and one for 64-bit code. The addresses of both of these bitmaps is stored in the per-process working set structure (called MMWSL). This structure is pointed to by the MMSUPPORT structure inside of EPROCESS (i..e.: PsGetCurrentProcess()->Vm.VmWorkingSetList), but a unique thing about it, is that it’s stored in a region of memory called “hyperspace”, which is at a fixed address… much like the per-process page table entry array. On recent 64-bit systems, this hard-coded address is 0xFFFFF58010804000, a fact I pointed out in a previous blog post addressing the 64-bit address space of Windows 8.1 and later.

As one can see in the symbols that WinDBG can dump, the MMWSL structure contains a field:

+0x1f8 UserVaInfo       : _MI_USER_VA_INFO

And inside of MI_USER_VA_INFO, we can find an array:

+0x0c8 CfgBitMap : [2] _MI_CFG_BITMAP_INFO

Whose two entries correspond to the following enumeration:

0:000> dt _MI_CFG_BITMAP_TYPE
 CfgBitMapNative = 0n0
 CfgBitMapWow64 = 0n1
 CfgBitMapMax = 0n2

Clearly, thus, a 64-bit Windows 10 kernel contains not one, but two CFG bitmaps. And indeed, the 32-bit NTDLL will utilize the address of the WoW64 bitmap, while the 64-bit NTDLL will utilize the Native bitmap. But why use two separate bitmaps? What separates a WoW64 bitmap from a native bitmap? One would imagine that 64-bit code is marked as executable in the native bitmap, and 32-bit code is marked as executable in the WoW64 bitmap… but that’s not quite the full story.

At verification time, indeed, it is the version of NTDLL that is being used, which determines which bitmap will be looked at. But how does the OS populate the bits?

In CFG-aware versions of Windows, the CFG bitmap is touched through two paths: MiCommitVadCfgBits, and MiCfgMarkValidEntries. These, in turn, correspond to either intrinsic CFG modifications (side-effects of allocating, protecting and/or mapping executable memory), or explicit CFG modifications (effect of calling SetValidCallTargets). Both of these paths will eventually call MiSelectCfgBitMap, whose pseudo-code is shown below.

cfg

As is quite clear from the code, any private memory allocations below the 64-bit boundary will be marked only in the 32-bit bitmap, while the opposite applies to the 64-bit bitmap. In fact, this is the result of an optimization: instead of having two 2TB bit arrays for each processor execution mode, a single 2TB array is used for 64-bit native code, while a single 32MB array is used for 32-bit native code, greatly reducing address space consumption.

Closing the Gate

Basing the decision of which CFG bitmap to populate on the virtual address of the executable allocation creates an obvious dichotomy: 64-bit code, if running in a 32-bit address range, will instantly trip up CFG, because the NTDLL library that is active in that environment is the 64-bit version, which will check the 64-bit bitmap, which will not have any bits set in the 0-4 GB range. Similarly, any 32-bit code must be running below the 4 GB boundary, else the 32-bit NTDLL’s CFG validation routine will trip up, as the 32-bit bitmap isn’t even large enough to account for addresses above 4 GB.

A naive solution is therefore proposed: simply allocate 64-bit code above the 4GB range, and the problem goes away. There is, of course, a problem with this approach: the NoChange VADs which block the entire > 4 GB region of memory and mark it unusable, leaving only 64-bit NTDLL as the only valid allocation in that address range.

In Windows 10, these two factors combined result in the inability to execute any useful 64-bit code in a 32-application/WoW64 process, because the two restrictions combine, creating an impossible condition. You may be tempted to dismiss the reality by stating that all the 64-bit malicious code has to do is not to have been compiled with CFG. In this case, the compiler should not be emitting calls to the validation routine. However, this misses a critical point: it’s not the process’ own executable code/shellcode which are necessarily performing the 64-bit CFG checks — it’s the 64-bit NTDLL itself, or any other additional 64-bit DLLs you may have injected through the initial 64-bit shellcode, into your own process.

Even worse, even if no other 64-bit DLLs are imported, some core system functionality, implemented by NTDLL, also validates the CFG bitmap: Exceptions, User-Mode Callbacks, and APCs. Any usage of these system mechanisms, because they always initially execute in 64-bit mode, will cause a CFG violation if the target is not in the bitmap — which it cannot possibly be. The same goes for higher level functionality like using the Thread Pool, or any other callback-based mechanism owned by NTDLL in 64-bit mode. For example, because kernel-mode injects user-mode APCs through the 64-bit NTDLL, the user-mode APC routine cannot possibly be a custom, non-DLL function: it would’ve been impossible to allocate it > 4 GB, and the APC dispatcher will validate the CFG bits for any address < 4 GB, and be unable to find it.

Perhaps the best example of these unexpected side-effects is to analyze what Heaven’s Gate-using malware often does to gain some usefulness in the hidden 64-bit context: it will lookup LdrLoadDll inside of NTDLL.DLL and attempt to load additional 64-bit DLLs, such as kernel32.dll. With some coercing (as some of the articles I linked to at the beginning showed), this can be made to work. The problem, in a CFG-aware NTDLL.DLL, is that LdrpCallInitRoutines will perform a CFG bitmap check before calling the DllMain of this DLL. As the DLL will be loaded in 32-bit address space, the WoW64 CFG bitmap will be marked, and not the Native CFG bitmap — causing the 64-bit NTDLL to believe that DllMain is not a valid relative call target, and crash the process.

Suffice it to say, although it still is possible to have a very simple 64-bit piece of code, even possibly performing some system calls, execute in the hidden 64-bit world of a WoW64 process/32-bit application, any attempts to load additional DLLs, use APCs, handle exceptions or user-mode callbacks in 64-bit mode will result in the process crashing, as a CFG violation will be tripped. For most intents and purposes, therefore, CFG has a potentially unintended side-effect: it closes down Heaven’s Gate.

Reopening the gate is left as an exercise to the reader 😉

Final Note

Astute readers may have noticed the following discrepancies, especially if following along on their own systems:

  • Windows 8.1 Update 3 does have support for CFG
  • We saw three, not two VADs, on my Windows 8.1 Update 3 screenshot
  • This post mentions how Windows 10 closes Heaven’s Gate, but not Windows 8.1 Update 3

The key is in  dumping the MI_USER_VA_INFO structure on such a system:

+0x060 CfgBitMap : [3] _MI_CFG_BITMAP_INFO

Three entries? Let’s take a look:

0:000> dt _MI_CFG_BITMAP_TYPE
 CfgBitMapNative = 0n0
 CfgBitMapWow64 = 0n1
 CfgBitMapWow64NativeLow = 0n2
 CfgBitMapMax = 0n3

This explains the three, not two VADs in my dump: in the original CFG implementation on Windows 8.1, 64-bit code could live in the 32-bit address range, as the Native bitmap had a “Wow64Low” portion. In Windows 10, this is now gone (saving 32MB of address space) — Native code is only aware of the 64-bit address ranges.

Sheep Year Kernel Heap Fengshui: Spraying in the Big Kids’ Pool

The State of Kernel Exploitation

The typical write-what-where kernel-mode exploit technique usually relies on either modifying some key kernel-mode data structure, which is easy to do locally on Windows thanks to poor Kernel Address Space Layout Randomization (KASLR), or on redirecting execution to a controlled user-mode address, which will now run with Ring 0 rights.

Relying on a user-mode address is an easy way not to worry about the kernel address space, and to have full control of the code within a process. Editing the tagWND structure or the HAL Dispatch Table are two very common vectors, as are many others.

However, with Supervisor Mode Execution Prevention (SMEP), also called Intel OS Guard, this technique is no longer reliable — a direct user-mode address cannot be used, and other techniques must be employed instead.

One possibility is to disable SMEP Enforcement in the CR4 register through Return-Oriented Programming, or ROP, if stack control is possible. This has been covered in a few papers and presentations.

Another related possibility is to disable SMEP Enforcement on a per-page basis — taking a user-mode page and marking it as a kernel page by making the required changes in the page level translation mapping entries. This has also been talked in at least one presentation, and, if accepted, a future SyScan 2015 talk from a friend of mine will also cover this technique. Additionally, if accepted, an alternate version of the technique will be presented at INFILTRATE 2015, by yours truly.

Finally, a theoretical possibility is being able to transfer execution (through a pointer, callback table, etc) to an existing function that disables SMEP (and thus bypassing KASLR), but then somehow continues to give the attacker control without ROP — nobody has yet found such a function. This would be a type of Jump-Oriented Programming (JOP) attack.

Nonetheless, all of these techniques continue to leverage a user-mode address as the main payload (nothing wrong with that). However, one must also consider the possibility to use a kernel-mode address for the attack, which means that no ROP and/or PTE hacking is needed to disable SMEP in the first place.

Obviously, this means that the function to perform the malicious payload’s work already exists in the kernel, or we have a way of bringing it into the kernel. In the case of a stack/pool overflow, this payload probably already comes with the attack, and the usual tricks have been employed there in order to get code execution. Such attacks are particularly common in true ‘remote-remote’ attacks.

But what of write-what-where bugs, usually the domain of the local (or remote-local) attacker? If we have user-mode code execution available to us, to execute the write-what-where, we can obviously continue using the write-what-where exploit to repeatedly fill an address of our choice with the payload data. This presents a few problems however:

  • The write-what-where may be unreliable, or corrupt adjacent data. This makes it hard to use it to ‘fill’ memory with code.
  • It may not be obvious where to write the code — having to deal with KASLR as well as Kernel NX. On Windows, this is not terribly hard, but it should be recognized as a barrier nonetheless.

This blog post introduces what I believe to be two new techniques, namely a generic kernel-mode heap spraying technique which results in executable memory, followed by a generic kernel-mode heap address discovery technique, bypassing KASLR.

Big Pool

Experts of the Windows heap manager (called the pool) know that there are two different allocators (three, if you’re being pedantic): the regular pool allocator (which can use lookaside lists that work slightly differently than regular pool allocations), and the big/large page pool allocator.

The regular pool is used for any allocations that fit within a page, so either 4080 bytes on x86 (8 bytes for the pool header, and 8 bytes used for the initial free block), or 4064 bytes on x64 (16 bytes for the pool header, 16 bytes used for the initial free block). The tracking, mapping, and accounting of such allocations is handled as part of the regular slush of kernel-mode memory that the pool manager owns, and the pool headers link everything together.

Big pool allocations, on the other hand, take up one or more pages. They’re used for anything over the sizes above, as well as when the CacheAligned type of pool memory is used, regardless of the requested allocation size — there’s no way to easily guarantee cache alignment without dedicating a whole page to an allocation.

Because there’s no room for a header, these pages are tracked in a separate “Big Pool Tracking Table” (nt!PoolBigPageTable), and the pool tags, which are used to identify the owner of an allocation, are also not present in the header (since there isn’t one!), but rather in the table as well. Each entry in this table is represented by a POOL_TRACKER_BIG_PAGES structure, documented in the public symbols:

lkd> dt nt!_POOL_TRACKER_BIG_PAGES
    +0x000 Va : Ptr32 Void
    +0x004 Key : Uint4B
    +0x008 PoolType : Uint4B
    +0x00c NumberOfBytes : Uint4B

One thing to be aware of is that the Virtual Address (Va) is OR’ed with a bit to indicate if the allocation is freed or allocated — in other words, you may have duplicate Va’s, some freed, and at most one allocated. The following simple WinDBG script will dump all the big pool allocations for you:

r? @$t0 = (nt!_POOL_TRACKER_BIG_PAGES*)@@(poi(nt!PoolBigPageTable))
r? @$t1 = *(int*)@@(nt!PoolBigPageTableSize) / sizeof(nt!_POOL_TRACKER_BIG_PAGES)
.for (r @$t2 = 0; @$t2 < @$t1; r? @$t2 = @$t2 + 1)
{
    r? @$t3 = @$t0[@$t2];
    .if (@@(@$t3.Va != 1))
    {
        .printf "VA: 0x%p Size: 0x%lx Tag: %c%c%c%c Freed: %d Paged: %d CacheAligned: %d\n", @@((int)@$t3.Va & ~1), @@(@$t3.NumberOfBytes), @@(@$t3.Key >> 0 & 0xFF), @@(@$t3.Key >> 8 & 0xFF), @@(@$t3.Key >> 16 & 0xFF), @@(@$t3.Key >> 24 & 0xFF), @@((int)@$t3.Va & 1), @@(@$t3.PoolType & 1), @@(@$t3.PoolType & 4) == 4
    }
}

Why are big pool allocations interesting? Unlike small pool allocations, which can share pages, and are hard to track for debugging purposes (without dumping the entire pool slush), big pool allocations are easy to enumerate. So easy, in fact, that the undocumented KASLR-be-damned API NtQuerySystemInformation has an information class specifically designed for dumping big pool allocations. Including not only their size, their tag, and their type (paged or nonpaged), but also their kernel virtual address!

As previously presented, this API requires no privileges, and only in Windows 8.1 has it been locked down against low integrity callers (Metro/Sandboxed applications).

With the little snippet of code below, you can easily enumerate all big pool allocations:

//
// Note: This is poor programming (hardcoding 4MB).
// The correct way would be to issue the system call
// twice, and use the resultLength of the first call
// to dynamically size the buffer to the correct size
//
bigPoolInfo = RtlAllocateHeap(RtlGetProcessHeap(),
                              0,
                              4 * 1024 * 1024);
if (bigPoolInfo == NULL) goto Cleanup;

res = NtQuerySystemInformation(SystemBigPoolInformation,
                               bigPoolInfo,
                               4 * 1024 * 1024,
                               &resultLength);
if (!NT_SUCCESS(res)) goto Cleanup;

printf("TYPE     ADDRESS\tBYTES\tTAG\n");
for (i = 0; i < bigPoolInfo->Count; i++)
{
    printf("%s0x%p\t0x%lx\t%c%c%c%c\n",
            bigPoolInfo->AllocatedInfo[i].NonPaged == 1 ?
            "Nonpaged " : "Paged    ",
            bigPoolInfo->AllocatedInfo[i].VirtualAddress,
            bigPoolInfo->AllocatedInfo[i].SizeInBytes,
            bigPoolInfo->AllocatedInfo[i].Tag[0],
            bigPoolInfo->AllocatedInfo[i].Tag[1],
            bigPoolInfo->AllocatedInfo[i].Tag[2],
            bigPoolInfo->AllocatedInfo[i].Tag[3]);
}

Cleanup:
if (bigPoolInfo != NULL)
{
    RtlFreeHeap(RtlGetProcessHeap(), 0, bigPoolInfo);
}

Pool Control

Obviously, it’s quite useful to have all these handy kernel-mode addresses. But what can we do to control their data, and not only be able to read their address?

You may be aware of previous techniques where a user-mode attacker allocates a kernel-object (say, an APC Reserve Object), which has a few fields that are user-controlled, and which then has an API to get its kernel-mode address. We’re essentially going to do the same here, but rely on more than just a few fields. Our goal, therefore, is to find a user-mode API that can give us full control over the kernel-mode data of a kernel object, and additionally, to result in a big pool allocation.

This isn’t as hard as it sounds: anytime a kernel-mode component allocates over the limits above, a big pool allocation is done instead. Therefore, the exercise reduces itself to finding a user-mode API that can result in a kernel allocation of over 4KB, whose data is controlled. And since Windows XP SP2 and later enforce kernel-mode non-executable memory, the allocation should be executable as well.

Two easy examples may popup in your head:

  1. Creating a local socket, listening to it, connecting from another thread, accepting the connection, and then issuing a write of > 4KB of socket data, but not reading it. This will result in the Ancillary Function Driver for WinSock (AFD.SYS), also affectionally known as “Another F*cking Driver”, allocating the socket data in kernel-mode memory. Because the Windows network stack functions at DISPATCH_LEVEL (IRQL 2), and paging is not available, AFD will use a nonpaged pool buffer for the allocation. This is great, because until Windows 8, nonpaged pool is executable!
  2. Creating a named pipe, and issuing a write of > 4KB of data, but not reading it. This will result in the Named Pipe File System (NPFS.SYS) allocating the pipe data in a nonpaged pool buffer as well (because NPFS performs buffer management at DISPATCH_LEVEL as well).

Ultimately, #2 is a lot easier, requiring only a few lines of code, and being much less inconspicuous than using sockets. The important thing you have to know is that NPFS will prefix our buffer with its own internal header, which is called a DATA_ENTRY. Each version of NPFS has a slightly different size (XP- vs 2003+ vs Windows 8+).

I’ve found that the cleanest way to handle this, and not to worry about offsets in the final kernel payload, is to internally handle this in the user-mode buffer with the right offsets. And finally, remember that the key here is to have a buffer that’s at least the size of a page, so we can force the big pool allocator.

Here’s a little snippet that keeps all this into account and will have the desired effects:

UCHAR payLoad[PAGE_SIZE - 0x1C + 44];

//
// Fill the first page with 0x41414141, and the next page
// with INT3's (simulating our payload). On x86 Windows 7
// the size of a DATA_ENTRY is 28 bytes (0x1C).
//
RtlFillMemory(payLoad,  PAGE_SIZE - 0x1C,     0x41);
RtlFillMemory(payLoad + PAGE_SIZE - 0x1C, 44, 0xCC);

//
// Write the data into the kernel
//
res = CreatePipe(&readPipe,
                 &writePipe,
                 NULL,
                 sizeof(payLoad));
if (res == FALSE) goto Cleanup;
res = WriteFile(writePipe,
                payLoad,
                sizeof(payLoad),
                &resultLength,
                NULL);
if (res == FALSE) goto Cleanup;

//
// extra code goes here...
//

Cleanup:
CloseHandle(writePipe);
CloseHandle(readPipe);

Now all we need to know is that NPFS uses the pool tag ‘NpFr’ for the read data buffers (you can find this out by using the !pool and !poolfind commands in WinDBG). We can then change the earlier KASLR-defeating snippet to hard-code the pool tag and expected allocation size, and we can instantly find the kernel-mode address of our buffer, which will fully match our user-mode buffer.

Keep in mind that the “Paged vs. Nonpaged” flag is OR’ed into the virtual address (this is different from the structure in the kernel, which tracks free vs. allocated), so we’ll mask that out, and also make sure you align the size to the pool header alignment (it’s enforced even for big pool allocations). Here’s that snippet, for x86 Windows:

//
// Based on pooltag.txt, we're looking for the following:
// NpFr - npfs.sys - DATA_ENTRY records (r/w buffers)
//
for (entry = bigPoolInfo->AllocatedInfo;
     entry < (PSYSTEM_BIGPOOL_ENTRY)bigPoolInfo +
                                    bigPoolInfo->Count;
     entry++)
{
    if ((entry->NonPaged == 1) &&
        (entry->TagUlong == 'rFpN') &&
        (entry->SizeInBytes == ALIGN_UP(PAGE_SIZE + 44,
                                        ULONGLONG)))
    {
        printf("Kernel payload @ 0x%p\n",
               (ULONG_PTR)entry->VirtualAddress & ~1 +
               PAGE_SIZE);
        break;
    }
}

And here’s the proof in WinDBG:

Kernel Malloc

Voila! Package this into a simple “kmalloc” helper function, and now you too, can allocate executable, kernel-mode memory, at a known address! How big can these allocations get? I’ve gone up to 128MB without a problem, but this being non-paged pool, make sure you have the RAM to handle it. Here’s a link to some sample code which implements exactly this functionality.

An additional benefit of this technique is that not only can you get the virtual address of your allocation, you can even get the physical address! Indeed, as part of the undocumented Superfetch API that I first discovered and implemented in my meminfo tool, which has now been supplanted by the RAMMap utility from SysInternals, the memory manager will happily return the pool tag, virtual address, and physical address of our allocation.

Here’s a screenshot of RAMMap showing another payload allocation and its corresponding physical address (note that the 0x1000 difference is since the command-line PoC biases the pointer, as you saw in the code).

rammap

Next Steps

Now, for full disclosure, there are a few additional caveats that make this technique a bit less sexy in 2015 — and why I chose to talk about it today, and not 8 years ago when I first stumbled upon it:

1) Starting with Windows 8, nonpaged pool allocations are now non-executable. This means that while this trick still lets you spray the pool, your code will require some sort of NX bypass first. So you’ve gone from bypassing SMEP to bypassing kernel-mode NX.

2) In Windows 8.1, the API to get the big pool entries and their addresses is no longer usable by low-integrity callers. This significantly reduces the usefulness in local-remote attacks, since those are usually launched through sandboxed applications (Flash, IE, Chrome, etc) and/or Metro containers.

Of course, there are some ways around this — a sandbox escape is often used in local-remote attacks anyway, so #2 can become moot. As for #1, some astute researchers have already figured out that NX was not fully deployed — for example, Session Pool allocations, are STILL executable on newer versions of Windows, but only on x86 (32-bit). I leave it as an exercise to readers to figure out how this technique can be extended to leverage that (hint: there’s a ‘Big Session Pool’).

But what about a modern, 64-bit version of Windows, say even Windows 10? Well, this technique appears to be mostly dead on such systems — or does it? Is everything truly NX in the kernel, or are there still some sneaky ways to get some executable memory, and to get its address? I’ll be sure to blog about it once Windows 14 is out the door in 2022.

PE Trick #1: A Codeless PE Binary File That Runs

Introduction

One of the annoying things of my Windows Internals/Security research is when every single component and mechanism I’ve looked at in the last six months has ultimately resulted in me finding very interesting design bugs, which I must now wait on Microsoft to fix before being able to talk further about them. As such, I have to take a smaller break from kernel-specific research (although I hope to lift the veil over at least one issue at the No Such Conference in Paris this year). And so, in the next following few blog posts, probably inspired by having spent too much time talking with my friend Ange Albertini, I’ll be going over some neat PE tricks.

Challenge

Write a portable executable (PE/EXE) file which can be spawned through a standard CreateProcess call and will result in STATUS_SUCCESS being returned as well as a valid Process Handle, but will not

  • Contain any actual x86/x64 assembly code section (i.e.: the whole PE should be read-only, no +X section)
  • Run a single instruction of what could be construed as x86 assembly code, which is part of the file itself (i.e.: random R/O data should not somehow be forced into being executed as machine code)
  • Crash or make any sort of interactive/visible notice to the user, event log entry, or other error condition.

Interesting, this was actually a real-world situation that I was asked to provide a solution for — not a mere mental exercise. The idea was being able to prove, in the court of law, that no “foreign” machine code had executed as a result of this executable file having been launched (i.e.: obviously the kernel ran some code, and the loader ran too, but all this is pre-existing Microsoft OS code). Yet, the PE file had to not only be valid, but to also return a valid process handle to the caller.

Solution

HEADER:00000000 ; IMAGE_DOS_HEADER
HEADER:00000000
HEADER:00000000 .686p
HEADER:00000000 .mmx
HEADER:00000000 .model flat
HEADER:00000000
HEADER:00000000 ; Segment type: Pure data
HEADER:00000000 HEADER segment page public 'DATA' use32
HEADER:00000000 assume cs:HEADER
HEADER:00000000 __ImageBase dw 5A4Dh ; PE magic number
HEADER:00000002 dw 0 ; Bytes on last page of file
HEADER:00000004 ; IMAGE_NT_HEADERS
HEADER:00000004 dd 4550h ; Signature
HEADER:00000008 ; IMAGE_FILE_HEADER
HEADER:00000008 dw 14Ch ; Machine
HEADER:0000000A dw 0 ; Number of sections
HEADER:0000000C dd 0 ; Time stamp
HEADER:00000010 dd 0 ; Pointer to symbol table
HEADER:00000014 dd 0 ; Number of symbols
HEADER:00000018 dw 0 ; Size of optional header
HEADER:0000001A dw 2 ; Characteristics
HEADER:0000001C ; IMAGE_OPTIONAL_HEADER
HEADER:0000001C dw 10Bh ; Magic number
HEADER:0000001E db 0 ; Major linker version
HEADER:0000001F db 0 ; Minor linker version
HEADER:00000020 dd 0 ; Size of code
HEADER:00000024 dd 0 ; Size of initialized data
HEADER:00000028 dd 0 ; Size of uninitialized data
HEADER:0000002C dd 7FBE02F8h ; Address of entry point
HEADER:00000030 dd 0 ; Base of code
HEADER:00000034 dd 0 ; Base of data
HEADER:00000038 dd 400000h ; Image base
HEADER:0000003C dd 4 ; Section alignment
HEADER:00000040 dd 4 ; File alignment
HEADER:00000044 dw 0 ; Major operating system version
HEADER:00000046 dw 0 ; Minor operating system version
HEADER:00000048 dw 0 ; Major image version
HEADER:0000004A dw 0 ; Minor image version
HEADER:0000004C dw 4 ; Major subsystem version
HEADER:0000004E dw 0 ; Minor subsystem version
HEADER:00000050 dd 0 ; Reserved 1
HEADER:00000054 dd 40h ; Size of image
HEADER:00000058 dd 0 ; Size of headers
HEADER:0000005C dd 0 ; Checksum
HEADER:00000060 dw 2 ; Subsystem
HEADER:00000062 dw 0 ; Dll characteristics
HEADER:00000064 dd 0 ; Size of stack reserve
HEADER:00000068 dd 0 ; Size of stack commit
HEADER:0000006C dd 0 ; Size of heap reserve
HEADER:00000070 dd 0 ; Size of heap commit
HEADER:00000074 dd 0 ; Loader flag
HEADER:00000078 dd 0 ; Number of data directories
HEADER:0000007C HEADER ends
HEADER:0000007C end

As per Corkami, in Windows 7 and higher, you’ll want to make sure that the PE is at least 252 bytes on x86, or 268 bytes on x64.

Here’s a 64 byte Base64 representation of a .gz file containing the 64-bit compatible (268 byte) executable:

H4sICPwJKlQCAHguZXhlAPONYmAIcGVg8GFkQANMDNxoYj+Y9tUjeA4MLECSBc5HsB1QTBk6AAB
e6Mo9DAEAAA==

Caveat

There is one non-standard machine configuration in which this code will actually still crash (but still return STATUS_SUCCESS in CreateProcess, however). This is left as an exercise to the reader.

Conclusion

The application executes and exits successfully. But as you can see, no code is present in the binary. How does it work? Do you have any other solutions which satisfy the challenge?

The Case Of The Bloated Reference Count: Handle Table Entry Changes in Windows 8.1

Introduction

As part of my daily reverse engineering and peering into Windows Internals, I started noticing a strange effect in Windows 8.1 whenever looking at the reference counts of various objects with tools such as WinDBG, Process Explorer, and Process Hacker: seemingly gigantic values on x64 Windows, and smaller, yet still incredibly large values on x86.

For the uninitiated, reference counts (internally called pointer counts), and their cousin handle counts, are the Windows kernel’s way of keeping track of open instances to a certain object (such as a file, registry key, or mutex) in order to implement automatic cleanup and garbage collection. Windows system tools such as Process Explorer or Process Hacker often have handy interfaces for looking at the objects to which a process currently has references to, by analyzing the process handle table.

Looking at Opened Handles and their Properties

In the screenshot below, you can see me looking at the first few handles of the Windows shell, Explorer.exe. Particularly, I am interested in the “DBWinMutex” mutex, at handle 0x44.

What this mutex does is gate access to Windows’ debug buffer, used by the OutputDebugString API, so it’s likely that you’ll see it used in many other processes as well. Since Explorer has at least one component using that API, it has a handle opened to it. Let’s go find out how many other components have a handle to it, by double-clicking and looking at its properties.

Pretty striking, isn’t it? While the handle count, which keeps track of actual handles to the object (implying that (Zw)OpenEvent was used to obtain the reference) is 14 and makes sense given the large number of processes that use the debug buffer to print various trace messages, the reference count, which is meant to include those handles plus any other additional internal kernel component references (which can bypass handles altogether and use the ObReferenceObject family of APIs to safely reference an object), is actually 491351! While it’s technically possible for such a large number of kernel references to exist to the object, it’s highly unlikely, and if one checks the reference counts on other objects, similarly large numbers appear. What’s going on?

Using the Windows Debugger to Dump Object Information

First, let’s make sure this isn’t a bug in Process Explorer. Such tools that peer into undocumented structures are often risk prone to subtle changes in the kernel, so I like to use the Windows Kernel Debugger (WinDBG) to validate what user-mode tools are showing. After all, the debugger dumps the raw memory of the object, which is the ground truth. As you can see below, we can use the handy !object extension to go find the object.

32767 Shades of Reference Bias

As you can see, we’re not really getting anywhere here – WinDBG shows an equally large value (458,584) although it’s not quite the same as Process Explorer’s. In fact, it’s exactly:

491351 – 458584 = 32767 (0x7FFF)

This can’t be a coincidence, can it? In fact, looking at other objects in Process Explorer, and comparing the reference count with WinDBG shows a similar pattern – not only are the numbers huge, but Process Explorer is always off by 0x7FFF. I also noticed a second pattern – the more handles that the object had, the bigger the reference count was, and always by a factor of around, or almost, 32767. In this case, dividing 458584 references by 14 handle counts gives us 32756 references-per-handle – close enough. Doing the opposite math on 491351 references gives us 14.995 handles.

Having worked on Process Explorer previously, I knew that as part of the code which handles the properties dialog and queries information on the object, the tool open its own handle to the object, temporarily creating 15 handles. Something became clear: there is now a bias in the reference count of objects, based on the number of handles. However, this bias is not exactly 32767, so something else must be going on.

Globally Searching for Opened Handles with Process Explorer

On a hunch, I decided to take a look at what would happen if I used Process Explorer’s “Find Handle or DLL” functionality, which searches all handles, system-wide, in order to find any which contain the name that the user entered. Because Windows only returns a list of PIDs and Handle Values, Process Explorer then has to attach to the process associated with the PID (since handles are local to each process) and then open the handle so that it can query its name. Let’s see what the search returned:

Fourteen processes have handles open to the DBWinMutex object. Let’s see what happened to the reference count…

The reference count went down to 491337. Which happens to be – wait for it – exactly 14 references less than what we had before. Repeating the exercise a few more times perfectly reproduces this behavior. Each time a new search is done, 14 processes are found (with 1 handle each), and the reference count goes down by 14 again.

The Per-Handle Reference Bias Revealed

At this point, we can infer the following two patterns:

  • Each time a new handle is opened to an object, the reference count goes up by 0x7FFF, or 32767, on x64 Windows. On x86 Windows, the same behavior is seen by the way, but with 0x1F instead.
  • Each time an existing handle to an object is used, the reference count goes down by 1.

The last part in this exercise was trying to understand where this data is coming from. The last bullet point above suggests that there is some sort of per-handle reference count, so I used the !handle extension in WinDBG to locate the handle entry for Explorer’s (PID 4440 as seen earlier) handle to DBWinMutex (handle 44 as seen earlier). I used flag 2 to request the object information as well. As you’ll see below, this gave me the pointer to the handle table entry, which I’ve highlighted in green. We can then use WinDBG’s symbol information to dump the entry using the dt command the _HANDLE_TABLE_ENTRY type inside the nt module.

As someone who has often dumped handle table entries in the debugger, the structure was striking to me, as it was very different from anything I had seen before. In fact, handle table entries only really stored two things before – the pointer to the object, and the granted access mask to the object. Yes, a few flags were used, but definitely nothing like we see above in Windows 8.1.

The New Handle Table Entry Format

Here’s the big changes from previous versions of Windows, on x64:

  • Instead of storing the full 64-bit pointer to the object header, Windows now only stores a 44 bit pointer. The bottom four bits are inferred to be all zeroes as all 64-bit allocations, code, and stack locations are 16-byte aligned, while the top sixteen bits are inferred to be all ones, as architecturally defined by the amd64 achitecture per the rules of canonical addresses (there must now be a dozen algorithms in Windows which rely on these bits having pre-defined, unchanging values!).
  • Three of the assumed bits are re-used to store the three handle attributes (inherited, audited, protected), while a fourth is used to store the lock bit for the handle entry.
  • Finally, the remaining 16-bits are now used to store an inverted reference count which keeps track of the amount of times that a handle has been used by a process. This reference count begins at 0x7FFF and counts down to zero for each additional reference made on the handle. The reference count (i.e.: the pointer count field in the object header) is biased by the number of inverted reference counts in each handle to the process.
  • Because the access mask is only 25 bits if you ignore the generic access rights (which are always translated into specific rights), additional bits can be used for flags. One such bit is used, the others are spare.
  • This leaves an unused 32-bit value that was wasted for alignment purposes on earlier versions of Windows. In Windows 8.1, this is now used to store the TypeInfo field, which is the Object Type Index in the Object Type Index Table (nt!ObTypeIndexTable). Dereferencing this index quickly reveals the object type for this handle, without having to even look at the object header.

On x86 Windows, the structure is different, but the changes semantically similar:

  • No assumptions can be made on the top bits, so the entry continues to store a pointer to the object header, in which the bottom 3 bits are re-used to store the lock bit and 2 of the handle attributes (inherited, audited) as all x86 allocations are 8 byte aligned.
  • Because the granted access mask is only 25 bits, the remaining 7 bits can now be used to store the missing attribute flag (protected), leaving 6 bits to store the reference count. As such, the reference count starts at 0x1F instead, on x86 systems.
  • There is no additional space lost due to alignment, so there is no space to store the TypeInfo field.

Conclusion

As you can see, Windows 8.1 not only introduces a major rewrite to the handle table entry format but also makes these seemingly internal data structure changes to have a visible side effect when using the Windows Debugger or other tools to analyze reference counts on objects, something which driver developers often have to do (and even support professionals when troubleshooting leaks).

Additionally, for forensic analysts, the fact that there is now a per-handle “reference count”, which Microsoft should’ve really called an inverted access count, allows one to get a very detailed understanding of the number of times a handle has been used (and thus perhaps glean insight into unusual uses of the handle).

On a final note, this is a really good example of the type of Windows Internals analysis that one can do without doing any actual “black room” reverse engineering – I didn’t have to open IDA a single time or look at a single line of assembly code to discover and understand this functionality. By merely interacting with the system, deducing logic, and looking at state changes, the behavior became clear. If you ever note any other interesting Windows functionality or behavior that you’ve never been able to explain, feel free to leave a comment!