Sheep Year Kernel Heap Fengshui: Spraying in the Big Kids’ Pool

The State of Kernel Exploitation

The typical write-what-where kernel-mode exploit technique usually relies on either modifying some key kernel-mode data structure, which is easy to do locally on Windows thanks to poor Kernel Address Space Layout Randomization (KASLR), or on redirecting execution to a controlled user-mode address, which will now run with Ring 0 rights.

Relying on a user-mode address is an easy way not to worry about the kernel address space, and to have full control of the code within a process. Editing the tagWND structure or the HAL Dispatch Table are two very common vectors, as are many others.

However, with Supervisor Mode Execution Prevention (SMEP), also called Intel OS Guard, this technique is no longer reliable — a direct user-mode address cannot be used, and other techniques must be employed instead.

One possibility is to disable SMEP Enforcement in the CR4 register through Return-Oriented Programming, or ROP, if stack control is possible. This has been covered in a few papers and presentations.

Another related possibility is to disable SMEP Enforcement on a per-page basis — taking a user-mode page and marking it as a kernel page by making the required changes in the page level translation mapping entries. This has also been talked in at least one presentation, and, if accepted, a future SyScan 2015 talk from a friend of mine will also cover this technique. Additionally, if accepted, an alternate version of the technique will be presented at INFILTRATE 2015, by yours truly.

Finally, a theoretical possibility is being able to transfer execution (through a pointer, callback table, etc) to an existing function that disables SMEP (and thus bypassing KASLR), but then somehow continues to give the attacker control without ROP — nobody has yet found such a function. This would be a type of Jump-Oriented Programming (JOP) attack.

Nonetheless, all of these techniques continue to leverage a user-mode address as the main payload (nothing wrong with that). However, one must also consider the possibility to use a kernel-mode address for the attack, which means that no ROP and/or PTE hacking is needed to disable SMEP in the first place.

Obviously, this means that the function to perform the malicious payload’s work already exists in the kernel, or we have a way of bringing it into the kernel. In the case of a stack/pool overflow, this payload probably already comes with the attack, and the usual tricks have been employed there in order to get code execution. Such attacks are particularly common in true ‘remote-remote’ attacks.

But what of write-what-where bugs, usually the domain of the local (or remote-local) attacker? If we have user-mode code execution available to us, to execute the write-what-where, we can obviously continue using the write-what-where exploit to repeatedly fill an address of our choice with the payload data. This presents a few problems however:

  • The write-what-where may be unreliable, or corrupt adjacent data. This makes it hard to use it to ‘fill’ memory with code.
  • It may not be obvious where to write the code — having to deal with KASLR as well as Kernel NX. On Windows, this is not terribly hard, but it should be recognized as a barrier nonetheless.

This blog post introduces what I believe to be two new techniques, namely a generic kernel-mode heap spraying technique which results in executable memory, followed by a generic kernel-mode heap address discovery technique, bypassing KASLR.

Big Pool

Experts of the Windows heap manager (called the pool) know that there are two different allocators (three, if you’re being pedantic): the regular pool allocator (which can use lookaside lists that work slightly differently than regular pool allocations), and the big/large page pool allocator.

The regular pool is used for any allocations that fit within a page, so either 4080 bytes on x86 (8 bytes for the pool header, and 8 bytes used for the initial free block), or 4064 bytes on x64 (16 bytes for the pool header, 16 bytes used for the initial free block). The tracking, mapping, and accounting of such allocations is handled as part of the regular slush of kernel-mode memory that the pool manager owns, and the pool headers link everything together.

Big pool allocations, on the other hand, take up one or more pages. They’re used for anything over the sizes above, as well as when the CacheAligned type of pool memory is used, regardless of the requested allocation size — there’s no way to easily guarantee cache alignment without dedicating a whole page to an allocation.

Because there’s no room for a header, these pages are tracked in a separate “Big Pool Tracking Table” (nt!PoolBigPageTable), and the pool tags, which are used to identify the owner of an allocation, are also not present in the header (since there isn’t one!), but rather in the table as well. Each entry in this table is represented by a POOL_TRACKER_BIG_PAGES structure, documented in the public symbols:

lkd> dt nt!_POOL_TRACKER_BIG_PAGES
    +0x000 Va : Ptr32 Void
    +0x004 Key : Uint4B
    +0x008 PoolType : Uint4B
    +0x00c NumberOfBytes : Uint4B

One thing to be aware of is that the Virtual Address (Va) is OR’ed with a bit to indicate if the allocation is freed or allocated — in other words, you may have duplicate Va’s, some freed, and at most one allocated. The following simple WinDBG script will dump all the big pool allocations for you:

r? @$t0 = (nt!_POOL_TRACKER_BIG_PAGES*)@@(poi(nt!PoolBigPageTable))
r? @$t1 = *(int*)@@(nt!PoolBigPageTableSize) / sizeof(nt!_POOL_TRACKER_BIG_PAGES)
.for (r @$t2 = 0; @$t2 < @$t1; r? @$t2 = @$t2 + 1)
{
    r? @$t3 = @$t0[@$t2];
    .if (@@(@$t3.Va != 1))
    {
        .printf "VA: 0x%p Size: 0x%lx Tag: %c%c%c%c Freed: %d Paged: %d CacheAligned: %d\n", @@((int)@$t3.Va & ~1), @@(@$t3.NumberOfBytes), @@(@$t3.Key >> 0 & 0xFF), @@(@$t3.Key >> 8 & 0xFF), @@(@$t3.Key >> 16 & 0xFF), @@(@$t3.Key >> 24 & 0xFF), @@((int)@$t3.Va & 1), @@(@$t3.PoolType & 1), @@(@$t3.PoolType & 4) == 4
    }
}

Why are big pool allocations interesting? Unlike small pool allocations, which can share pages, and are hard to track for debugging purposes (without dumping the entire pool slush), big pool allocations are easy to enumerate. So easy, in fact, that the undocumented KASLR-be-damned API NtQuerySystemInformation has an information class specifically designed for dumping big pool allocations. Including not only their size, their tag, and their type (paged or nonpaged), but also their kernel virtual address!

As previously presented, this API requires no privileges, and only in Windows 8.1 has it been locked down against low integrity callers (Metro/Sandboxed applications).

With the little snippet of code below, you can easily enumerate all big pool allocations:

//
// Note: This is poor programming (hardcoding 4MB).
// The correct way would be to issue the system call
// twice, and use the resultLength of the first call
// to dynamically size the buffer to the correct size
//
bigPoolInfo = RtlAllocateHeap(RtlGetProcessHeap(),
                              0,
                              4 * 1024 * 1024);
if (bigPoolInfo == NULL) goto Cleanup;

res = NtQuerySystemInformation(SystemBigPoolInformation,
                               bigPoolInfo,
                               4 * 1024 * 1024,
                               &resultLength);
if (!NT_SUCCESS(res)) goto Cleanup;

printf("TYPE     ADDRESS\tBYTES\tTAG\n");
for (i = 0; i < bigPoolInfo->Count; i++)
{
    printf("%s0x%p\t0x%lx\t%c%c%c%c\n",
            bigPoolInfo->AllocatedInfo[i].NonPaged == 1 ?
            "Nonpaged " : "Paged    ",
            bigPoolInfo->AllocatedInfo[i].VirtualAddress,
            bigPoolInfo->AllocatedInfo[i].SizeInBytes,
            bigPoolInfo->AllocatedInfo[i].Tag[0],
            bigPoolInfo->AllocatedInfo[i].Tag[1],
            bigPoolInfo->AllocatedInfo[i].Tag[2],
            bigPoolInfo->AllocatedInfo[i].Tag[3]);
}

Cleanup:
if (bigPoolInfo != NULL)
{
    RtlFreeHeap(RtlGetProcessHeap(), 0, bigPoolInfo);
}

Pool Control

Obviously, it’s quite useful to have all these handy kernel-mode addresses. But what can we do to control their data, and not only be able to read their address?

You may be aware of previous techniques where a user-mode attacker allocates a kernel-object (say, an APC Reserve Object), which has a few fields that are user-controlled, and which then has an API to get its kernel-mode address. We’re essentially going to do the same here, but rely on more than just a few fields. Our goal, therefore, is to find a user-mode API that can give us full control over the kernel-mode data of a kernel object, and additionally, to result in a big pool allocation.

This isn’t as hard as it sounds: anytime a kernel-mode component allocates over the limits above, a big pool allocation is done instead. Therefore, the exercise reduces itself to finding a user-mode API that can result in a kernel allocation of over 4KB, whose data is controlled. And since Windows XP SP2 and later enforce kernel-mode non-executable memory, the allocation should be executable as well.

Two easy examples may popup in your head:

  1. Creating a local socket, listening to it, connecting from another thread, accepting the connection, and then issuing a write of > 4KB of socket data, but not reading it. This will result in the Ancillary Function Driver for WinSock (AFD.SYS), also affectionally known as “Another F*cking Driver”, allocating the socket data in kernel-mode memory. Because the Windows network stack functions at DISPATCH_LEVEL (IRQL 2), and paging is not available, AFD will use a nonpaged pool buffer for the allocation. This is great, because until Windows 8, nonpaged pool is executable!
  2. Creating a named pipe, and issuing a write of > 4KB of data, but not reading it. This will result in the Named Pipe File System (NPFS.SYS) allocating the pipe data in a nonpaged pool buffer as well (because NPFS performs buffer management at DISPATCH_LEVEL as well).

Ultimately, #2 is a lot easier, requiring only a few lines of code, and being much less inconspicuous than using sockets. The important thing you have to know is that NPFS will prefix our buffer with its own internal header, which is called a DATA_ENTRY. Each version of NPFS has a slightly different size (XP- vs 2003+ vs Windows 8+).

I’ve found that the cleanest way to handle this, and not to worry about offsets in the final kernel payload, is to internally handle this in the user-mode buffer with the right offsets. And finally, remember that the key here is to have a buffer that’s at least the size of a page, so we can force the big pool allocator.

Here’s a little snippet that keeps all this into account and will have the desired effects:

UCHAR payLoad[PAGE_SIZE - 0x1C + 44];

//
// Fill the first page with 0x41414141, and the next page
// with INT3's (simulating our payload). On x86 Windows 7
// the size of a DATA_ENTRY is 28 bytes (0x1C).
//
RtlFillMemory(payLoad,  PAGE_SIZE - 0x1C,     0x41);
RtlFillMemory(payLoad + PAGE_SIZE - 0x1C, 44, 0xCC);

//
// Write the data into the kernel
//
res = CreatePipe(&readPipe,
                 &writePipe,
                 NULL,
                 sizeof(payLoad));
if (res == FALSE) goto Cleanup;
res = WriteFile(writePipe,
                payLoad,
                sizeof(payLoad),
                &resultLength,
                NULL);
if (res == FALSE) goto Cleanup;

//
// extra code goes here...
//

Cleanup:
CloseHandle(writePipe);
CloseHandle(readPipe);

Now all we need to know is that NPFS uses the pool tag ‘NpFr’ for the read data buffers (you can find this out by using the !pool and !poolfind commands in WinDBG). We can then change the earlier KASLR-defeating snippet to hard-code the pool tag and expected allocation size, and we can instantly find the kernel-mode address of our buffer, which will fully match our user-mode buffer.

Keep in mind that the “Paged vs. Nonpaged” flag is OR’ed into the virtual address (this is different from the structure in the kernel, which tracks free vs. allocated), so we’ll mask that out, and also make sure you align the size to the pool header alignment (it’s enforced even for big pool allocations). Here’s that snippet, for x86 Windows:

//
// Based on pooltag.txt, we're looking for the following:
// NpFr - npfs.sys - DATA_ENTRY records (r/w buffers)
//
for (entry = bigPoolInfo->AllocatedInfo;
     entry < (PSYSTEM_BIGPOOL_ENTRY)bigPoolInfo +
                                    bigPoolInfo->Count;
     entry++)
{
    if ((entry->NonPaged == 1) &&
        (entry->TagUlong == 'rFpN') &&
        (entry->SizeInBytes == ALIGN_UP(PAGE_SIZE + 44,
                                        ULONGLONG)))
    {
        printf("Kernel payload @ 0x%p\n",
               (ULONG_PTR)entry->VirtualAddress & ~1 +
               PAGE_SIZE);
        break;
    }
}

And here’s the proof in WinDBG:

Kernel Malloc

Voila! Package this into a simple “kmalloc” helper function, and now you too, can allocate executable, kernel-mode memory, at a known address! How big can these allocations get? I’ve gone up to 128MB without a problem, but this being non-paged pool, make sure you have the RAM to handle it. Here’s a link to some sample code which implements exactly this functionality.

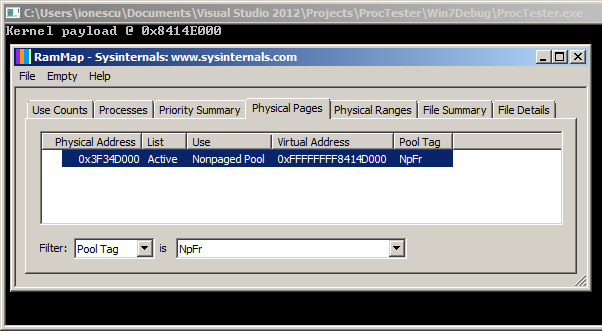
An additional benefit of this technique is that not only can you get the virtual address of your allocation, you can even get the physical address! Indeed, as part of the undocumented Superfetch API that I first discovered and implemented in my meminfo tool, which has now been supplanted by the RAMMap utility from SysInternals, the memory manager will happily return the pool tag, virtual address, and physical address of our allocation.

Here’s a screenshot of RAMMap showing another payload allocation and its corresponding physical address (note that the 0x1000 difference is since the command-line PoC biases the pointer, as you saw in the code).

rammap

Next Steps

Now, for full disclosure, there are a few additional caveats that make this technique a bit less sexy in 2015 — and why I chose to talk about it today, and not 8 years ago when I first stumbled upon it:

1) Starting with Windows 8, nonpaged pool allocations are now non-executable. This means that while this trick still lets you spray the pool, your code will require some sort of NX bypass first. So you’ve gone from bypassing SMEP to bypassing kernel-mode NX.

2) In Windows 8.1, the API to get the big pool entries and their addresses is no longer usable by low-integrity callers. This significantly reduces the usefulness in local-remote attacks, since those are usually launched through sandboxed applications (Flash, IE, Chrome, etc) and/or Metro containers.

Of course, there are some ways around this — a sandbox escape is often used in local-remote attacks anyway, so #2 can become moot. As for #1, some astute researchers have already figured out that NX was not fully deployed — for example, Session Pool allocations, are STILL executable on newer versions of Windows, but only on x86 (32-bit). I leave it as an exercise to readers to figure out how this technique can be extended to leverage that (hint: there’s a ‘Big Session Pool’).

But what about a modern, 64-bit version of Windows, say even Windows 10? Well, this technique appears to be mostly dead on such systems — or does it? Is everything truly NX in the kernel, or are there still some sneaky ways to get some executable memory, and to get its address? I’ll be sure to blog about it once Windows 14 is out the door in 2022.
PE Trick #1: A Codeless PE Binary File That Runs

Introduction

One of the annoying things of my Windows Internals/Security research is when every single component and mechanism I’ve looked at in the last six months has ultimately resulted in me finding very interesting design bugs, which I must now wait on Microsoft to fix before being able to talk further about them. As such, I have to take a smaller break from kernel-specific research (although I hope to lift the veil over at least one issue at the No Such Conference in Paris this year). And so, in the next following few blog posts, probably inspired by having spent too much time talking with my friend Ange Albertini, I’ll be going over some neat PE tricks.

Challenge

Write a portable executable (PE/EXE) file which can be spawned through a standard CreateProcess call and will result in STATUS_SUCCESS being returned as well as a valid Process Handle, but will not

  • Contain any actual x86/x64 assembly code section (i.e.: the whole PE should be read-only, no +X section)
  • Run a single instruction of what could be construed as x86 assembly code, which is part of the file itself (i.e.: random R/O data should not somehow be forced into being executed as machine code)
  • Crash or make any sort of interactive/visible notice to the user, event log entry, or other error condition.

Interesting, this was actually a real-world situation that I was asked to provide a solution for — not a mere mental exercise. The idea was being able to prove, in the court of law, that no “foreign” machine code had executed as a result of this executable file having been launched (i.e.: obviously the kernel ran some code, and the loader ran too, but all this is pre-existing Microsoft OS code). Yet, the PE file had to not only be valid, but to also return a valid process handle to the caller.

Solution

HEADER:00000000 ; IMAGE_DOS_HEADER
HEADER:00000000
HEADER:00000000 .686p
HEADER:00000000 .mmx
HEADER:00000000 .model flat
HEADER:00000000
HEADER:00000000 ; Segment type: Pure data
HEADER:00000000 HEADER segment page public 'DATA' use32
HEADER:00000000 assume cs:HEADER
HEADER:00000000 __ImageBase dw 5A4Dh ; PE magic number
HEADER:00000002 dw 0 ; Bytes on last page of file
HEADER:00000004 ; IMAGE_NT_HEADERS
HEADER:00000004 dd 4550h ; Signature
HEADER:00000008 ; IMAGE_FILE_HEADER
HEADER:00000008 dw 14Ch ; Machine
HEADER:0000000A dw 0 ; Number of sections
HEADER:0000000C dd 0 ; Time stamp
HEADER:00000010 dd 0 ; Pointer to symbol table
HEADER:00000014 dd 0 ; Number of symbols
HEADER:00000018 dw 0 ; Size of optional header
HEADER:0000001A dw 2 ; Characteristics
HEADER:0000001C ; IMAGE_OPTIONAL_HEADER
HEADER:0000001C dw 10Bh ; Magic number
HEADER:0000001E db 0 ; Major linker version
HEADER:0000001F db 0 ; Minor linker version
HEADER:00000020 dd 0 ; Size of code
HEADER:00000024 dd 0 ; Size of initialized data
HEADER:00000028 dd 0 ; Size of uninitialized data
HEADER:0000002C dd 7FBE02F8h ; Address of entry point
HEADER:00000030 dd 0 ; Base of code
HEADER:00000034 dd 0 ; Base of data
HEADER:00000038 dd 400000h ; Image base
HEADER:0000003C dd 4 ; Section alignment
HEADER:00000040 dd 4 ; File alignment
HEADER:00000044 dw 0 ; Major operating system version
HEADER:00000046 dw 0 ; Minor operating system version
HEADER:00000048 dw 0 ; Major image version
HEADER:0000004A dw 0 ; Minor image version
HEADER:0000004C dw 4 ; Major subsystem version
HEADER:0000004E dw 0 ; Minor subsystem version
HEADER:00000050 dd 0 ; Reserved 1
HEADER:00000054 dd 40h ; Size of image
HEADER:00000058 dd 0 ; Size of headers
HEADER:0000005C dd 0 ; Checksum
HEADER:00000060 dw 2 ; Subsystem
HEADER:00000062 dw 0 ; Dll characteristics
HEADER:00000064 dd 0 ; Size of stack reserve
HEADER:00000068 dd 0 ; Size of stack commit
HEADER:0000006C dd 0 ; Size of heap reserve
HEADER:00000070 dd 0 ; Size of heap commit
HEADER:00000074 dd 0 ; Loader flag
HEADER:00000078 dd 0 ; Number of data directories
HEADER:0000007C HEADER ends
HEADER:0000007C end

As per Corkami, in Windows 7 and higher, you’ll want to make sure that the PE is at least 252 bytes on x86, or 268 bytes on x64.

Here’s a 64 byte Base64 representation of a .gz file containing the 64-bit compatible (268 byte) executable:

H4sICPwJKlQCAHguZXhlAPONYmAIcGVg8GFkQANMDNxoYj+Y9tUjeA4MLECSBc5HsB1QTBk6AAB
e6Mo9DAEAAA==

Caveat

There is one non-standard machine configuration in which this code will actually still crash (but still return STATUS_SUCCESS in CreateProcess, however). This is left as an exercise to the reader.

Conclusion

The application executes and exits successfully. But as you can see, no code is present in the binary. How does it work? Do you have any other solutions which satisfy the challenge?

The Case Of The Bloated Reference Count: Handle Table Entry Changes in Windows 8.1

Introduction

As part of my daily reverse engineering and peering into Windows Internals, I started noticing a strange effect in Windows 8.1 whenever looking at the reference counts of various objects with tools such as WinDBG, Process Explorer, and Process Hacker: seemingly gigantic values on x64 Windows, and smaller, yet still incredibly large values on x86.

For the uninitiated, reference counts (internally called pointer counts), and their cousin handle counts, are the Windows kernel’s way of keeping track of open instances to a certain object (such as a file, registry key, or mutex) in order to implement automatic cleanup and garbage collection. Windows system tools such as Process Explorer or Process Hacker often have handy interfaces for looking at the objects to which a process currently has references to, by analyzing the process handle table.

Looking at Opened Handles and their Properties

In the screenshot below, you can see me looking at the first few handles of the Windows shell, Explorer.exe. Particularly, I am interested in the “DBWinMutex” mutex, at handle 0x44.

What this mutex does is gate access to Windows’ debug buffer, used by the OutputDebugString API, so it’s likely that you’ll see it used in many other processes as well. Since Explorer has at least one component using that API, it has a handle opened to it. Let’s go find out how many other components have a handle to it, by double-clicking and looking at its properties.

Pretty striking, isn’t it? While the handle count, which keeps track of actual handles to the object (implying that (Zw)OpenEvent was used to obtain the reference) is 14 and makes sense given the large number of processes that use the debug buffer to print various trace messages, the reference count, which is meant to include those handles plus any other additional internal kernel component references (which can bypass handles altogether and use the ObReferenceObject family of APIs to safely reference an object), is actually 491351! While it’s technically possible for such a large number of kernel references to exist to the object, it’s highly unlikely, and if one checks the reference counts on other objects, similarly large numbers appear. What’s going on?

Using the Windows Debugger to Dump Object Information

First, let’s make sure this isn’t a bug in Process Explorer. Such tools that peer into undocumented structures are often risk prone to subtle changes in the kernel, so I like to use the Windows Kernel Debugger (WinDBG) to validate what user-mode tools are showing. After all, the debugger dumps the raw memory of the object, which is the ground truth. As you can see below, we can use the handy !object extension to go find the object.

32767 Shades of Reference Bias

As you can see, we’re not really getting anywhere here – WinDBG shows an equally large value (458,584) although it’s not quite the same as Process Explorer’s. In fact, it’s exactly:

491351 – 458584 = 32767 (0x7FFF)

This can’t be a coincidence, can it? In fact, looking at other objects in Process Explorer, and comparing the reference count with WinDBG shows a similar pattern – not only are the numbers huge, but Process Explorer is always off by 0x7FFF. I also noticed a second pattern – the more handles that the object had, the bigger the reference count was, and always by a factor of around, or almost, 32767. In this case, dividing 458584 references by 14 handle counts gives us 32756 references-per-handle – close enough. Doing the opposite math on 491351 references gives us 14.995 handles.

Having worked on Process Explorer previously, I knew that as part of the code which handles the properties dialog and queries information on the object, the tool open its own handle to the object, temporarily creating 15 handles. Something became clear: there is now a bias in the reference count of objects, based on the number of handles. However, this bias is not exactly 32767, so something else must be going on.

Globally Searching for Opened Handles with Process Explorer

On a hunch, I decided to take a look at what would happen if I used Process Explorer’s “Find Handle or DLL” functionality, which searches all handles, system-wide, in order to find any which contain the name that the user entered. Because Windows only returns a list of PIDs and Handle Values, Process Explorer then has to attach to the process associated with the PID (since handles are local to each process) and then open the handle so that it can query its name. Let’s see what the search returned:

Fourteen processes have handles open to the DBWinMutex object. Let’s see what happened to the reference count…

The reference count went down to 491337. Which happens to be – wait for it – exactly 14 references less than what we had before. Repeating the exercise a few more times perfectly reproduces this behavior. Each time a new search is done, 14 processes are found (with 1 handle each), and the reference count goes down by 14 again.

The Per-Handle Reference Bias Revealed

At this point, we can infer the following two patterns:

  • Each time a new handle is opened to an object, the reference count goes up by 0x7FFF, or 32767, on x64 Windows. On x86 Windows, the same behavior is seen by the way, but with 0x1F instead.
  • Each time an existing handle to an object is used, the reference count goes down by 1.

The last part in this exercise was trying to understand where this data is coming from. The last bullet point above suggests that there is some sort of per-handle reference count, so I used the !handle extension in WinDBG to locate the handle entry for Explorer’s (PID 4440 as seen earlier) handle to DBWinMutex (handle 44 as seen earlier). I used flag 2 to request the object information as well. As you’ll see below, this gave me the pointer to the handle table entry, which I’ve highlighted in green. We can then use WinDBG’s symbol information to dump the entry using the dt command the _HANDLE_TABLE_ENTRY type inside the nt module.

As someone who has often dumped handle table entries in the debugger, the structure was striking to me, as it was very different from anything I had seen before. In fact, handle table entries only really stored two things before – the pointer to the object, and the granted access mask to the object. Yes, a few flags were used, but definitely nothing like we see above in Windows 8.1.

The New Handle Table Entry Format

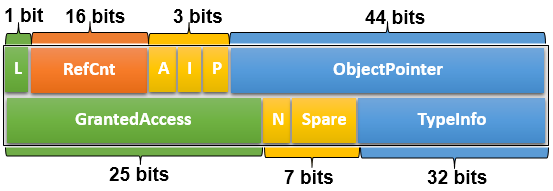
Here’s the big changes from previous versions of Windows, on x64:

  • Instead of storing the full 64-bit pointer to the object header, Windows now only stores a 44 bit pointer. The bottom four bits are inferred to be all zeroes as all 64-bit allocations, code, and stack locations are 16-byte aligned, while the top sixteen bits are inferred to be all ones, as architecturally defined by the amd64 achitecture per the rules of canonical addresses (there must now be a dozen algorithms in Windows which rely on these bits having pre-defined, unchanging values!).
  • Three of the assumed bits are re-used to store the three handle attributes (inherited, audited, protected), while a fourth is used to store the lock bit for the handle entry.
  • Finally, the remaining 16-bits are now used to store an inverted reference count which keeps track of the amount of times that a handle has been used by a process. This reference count begins at 0x7FFF and counts down to zero for each additional reference made on the handle. The reference count (i.e.: the pointer count field in the object header) is biased by the number of inverted reference counts in each handle to the process.
  • Because the access mask is only 25 bits if you ignore the generic access rights (which are always translated into specific rights), additional bits can be used for flags. One such bit is used, the others are spare.
  • This leaves an unused 32-bit value that was wasted for alignment purposes on earlier versions of Windows. In Windows 8.1, this is now used to store the TypeInfo field, which is the Object Type Index in the Object Type Index Table (nt!ObTypeIndexTable). Dereferencing this index quickly reveals the object type for this handle, without having to even look at the object header.

On x86 Windows, the structure is different, but the changes semantically similar:

  • No assumptions can be made on the top bits, so the entry continues to store a pointer to the object header, in which the bottom 3 bits are re-used to store the lock bit and 2 of the handle attributes (inherited, audited) as all x86 allocations are 8 byte aligned.
  • Because the granted access mask is only 25 bits, the remaining 7 bits can now be used to store the missing attribute flag (protected), leaving 6 bits to store the reference count. As such, the reference count starts at 0x1F instead, on x86 systems.
  • There is no additional space lost due to alignment, so there is no space to store the TypeInfo field.

Conclusion

As you can see, Windows 8.1 not only introduces a major rewrite to the handle table entry format but also makes these seemingly internal data structure changes to have a visible side effect when using the Windows Debugger or other tools to analyze reference counts on objects, something which driver developers often have to do (and even support professionals when troubleshooting leaks).

Additionally, for forensic analysts, the fact that there is now a per-handle “reference count”, which Microsoft should’ve really called an inverted access count, allows one to get a very detailed understanding of the number of times a handle has been used (and thus perhaps glean insight into unusual uses of the handle).

On a final note, this is a really good example of the type of Windows Internals analysis that one can do without doing any actual “black room” reverse engineering – I didn’t have to open IDA a single time or look at a single line of assembly code to discover and understand this functionality. By merely interacting with the system, deducing logic, and looking at state changes, the behavior became clear. If you ever note any other interesting Windows functionality or behavior that you’ve never been able to explain, feel free to leave a comment!

Protected Processes Part 3 : Windows PKI Internals (Signing Levels, Scenarios, Root Keys, EKUs & Runtime Signers)

Introduction

In this last part of our series on protected processes in Windows 8.1, we’re going to be taking a look at the cryptographic security that protects the system from the creation or promotion of arbitrary processes to protected status, as well as to how the system is extensible to provide options for 3rd party developers to create their own protected processes.

In the course of examining these new cryptographic features, we’ll also be learning about Signing Levels, a concept introduced in Windows 8. Finally, we’ll examine how the Code Integrity Library DLL (Ci.dll) is responsible for approving the creation of a protected process based on its associated signing level and digital certificate.

Signing Levels in Windows 8

Before Windows 8.1 introduced the protection level (which we described in Part 1 and Part 2), Windows 8 instituted the Signing Level, also sometimes referred to as the Signature Level. This undocumented number was a way for the system to differentiate the different types of Windows binaries, something that became a requirement for Windows RT as part of its requirement to prohibit the execution of Windows “desktop” applications. Microsoft counts among these any application that did not come from the Windows Store and/or which was not subjected to the AppContainer sandboxing technology enforced by the Modern/Metro programming model (meanwhile, the kernel often calls these “packaged” applications).

I covered Signing Levels in my Breakpoint 2012 presentation, and clrokr, one of the developers behind the Windows RT jailbreak, blogged about them as well. Understanding signing levels was critical for the RT jailbreak: Windows introduced a new variable, SeILSigningPolicy, which determined the minimum signing level allowed for non-packaged applications. On x86, this was read from the registry, and assumed to be zero, while on ARM, this was hard-coded to “8”, which as you can see from clrokr’s blog, corresponds to “Microsoft” – in effect allowing only Microsoft-signed applications to run on the RT desktop. The jailbreak, then, simply sets this value to “0”.

Another side effect of Signing Levels was that the “ProtectedProcess” bit in EPROCESS was removed — whether or not a Windows 8 process is protected for DRM purposes (such as Audiodg.exe, which handles audio decoding) was now implied from the value in the “SignatureLevel” field instead.

Signing Levels in Windows 8.1

In Windows 8.1, these levels have expanded to cover some of the needs introduced by the expansion of protected processes. The official names Microsoft uses for them are shown in Table 1 below. In addition, the SeILSigningPolicy variable is no longer initialized through the registry. Instead, it is set through the Secure Boot Signing Policy, a signed configurable policy blob which determines which binaries a Windows 8.1 computer is allowed to run. The value on 8.1 RT, however, remains the same – 8 (Microsoft), still prohibiting desktop application development.

Windows 8.1 Signing Levels

Signing LevelName
0Unchecked
1Unsigned
2Custom 0
3Custom 1
4Authenticode
5Custom 2
6Store
7Custom 3 / Antimalware
8Microsoft
9Custom 4
10Custom 5
11Dynamic Code Generation
12Windows
13Windows Protected Process Light
14Windows TCB
15Custom 6

Furthermore, unlike the Protection Level that we saw in Parts 1 and 2, which is a process-wide value most often used for determining who can do what to a process, the Signature Level is in fact subdivided into both an EXE signature level (the “SignatureLevel” field in EPROCESS) as well as a DLL signature level (the “SectionSignatureLevel” field in the EPROCESS structure). While the former is used by Code Integrity to validate the signature level of the primary module binary, the latter is used to set the minimum level at which DLLs on disk must be signed with, in order to be allowed to load in the process. Table 2, which follows, describes the internal mapping used by the kernel in order to assign a given Signature Level for each particular Protected Signer.

Protected Signers to Signing Level Mappings

Protected SignerEXE Signature LevelDLL Signature Level
PsProtectedSignerNoneUncheckedUnchecked
PsProtectedSignerAuthenticodeAuthenticodeAuthenticode
PsProtectedSignerCodeGenDynamic Code GenerationStore
PsProtectedSignerAntimalwareCustom 3 / AntimalwareCustom 3 / Antimalware
PsProtectedSignerLsaWindowsMicrosoft
PsProtectedSignerWindowsWindowsWindows
PsProtectedSignerWinTcbWindows TCBWindows TCB

Scenarios and Signers

When the Code Integrity library receives a request from the kernel to validate an image (i.e.: to perform page hash or image hash signature checks), the kernel sends both the signing level (which it determined based on its internal mapping matching Table 2 from above) as well as a bit mask called the Secure Required. This bit mask explains to Code Integrity why image checking is being done. Table 3, shown below, describes the possible values for Secure Required.

Secure Required Bit Flags

Bit ValueDescription
0x1Driver Image. Checks must be done on x64, ARM, or if linked with /INTEGRITYCHECK.
0x2Protected Image. Checks must be done in order to allow the process to run protected.
0x4Hotpatch Driver Image. Checks must be done to allow driver to hotpatch another driver.
0x08Protected Light Image. Checks must be done in order to allow the process to run PPL.
0x10Initial Process Image. Check must be done for User Mode Code Signing (UMCI) reasons.
Based on this bit mask as well as the signing level, the Code Integrity library converts this information into a Scenario. Scenarios describe the signing policy associated with a specific situation in which signature checking is being done.

The system supports a total of 18 scenarios, and their goal is three-fold: determine the minimum hash algorithm that is allowed for the signature check, and determine if only a particular, specific Signer is allowed for this scenario (a Signer is identified by the content hash of the certificate used to sign the image) and which signature level the Signer is allowed to bestow.

Table 4 below describes the standard Scenarios and their associated Security Required, Signing Level, and minimum Hash Algorithm requirements.

Scenario Descriptions and Hash Requirements

ScenarioSecure RequiredSigning LevelHash Algorithm
0N/AWindows TCBCALG_SHA_256
1Hotpatch ImageWindowsCALG_SHA_256
2N/AMicrosoftCALG_SHA1
3N/AStoreCALG_SHA1
4Protected ImageAuthenticodeCALG_SHA1
5Driver ImageN/ACALG_SHA1
6N/AAuthenticodeCALG_SHA1
7N/ADynamic Code GenerationCALG_SHA_256
8*N/AN/ACALG_SHA_256
9N/ACustom 0CALG_SHA_256
10N/ACustom 1CALG_SHA_256
11N/ACustom 2CALG_SHA_256
12N/ACustom 3CALG_SHA_256
13N/ACustom 4CALG_SHA_256
14N/ACustom 5CALG_SHA_256
15N/ACustom 6CALG_SHA_256
16N/AWindows Protected LightCALG_SHA_256
17**N/AN/ACALG_SHA_256
18N/AUnchecked or InvalidCALG_SHA1

* Used for checking the Global Revocation List (GRL)
** Used for checking ELAM drivers

From this table we can see three main types of scenarios:

  • Those designed to match to a specific signing level that is being requested (0, 1, 2, 3, 6, 9, 10, 11, 12, 13, 14, 15, 16)
  • Those designed to support a specific “legacy” scenario, such as driver loads or DRM protected processes (1, 4, 5)
  • Those designed for specific internal requirement checks of the cryptographic engine (8, 17)

As expected, with Microsoft recommending the usage of SHA256 signatures recently, this type of signature is enforced on all their internal scenarios, with SHA1 only being allowed on driver and DRM protected images, Windows Store applications, and other generic Microsoft-signed binaries (presumably for legacy support).

The scenario table described in Table 4 is what normally ships with Code Integrity on x86 and x64 systems. On ARM, SHA256 is a minimum requirement for almost all scenarios, as the linked MSDN page above explained. And finally, like many of the other cryptographic behaviors in Code Integrity that we’ve seen so far, the table is also fully customizable by a Secure Boot Signing Policy.

When such a policy is present, the table above can be rewritten for all but the legacy scenarios, and custom minimum hash algorithms can be enforced for each scenario as needed. Additionally, the level to scenario mappings are also customizable, and the policy can also specify which “Signers”, identified by their certificate content hash, can be used for which Scenario, as well as the maximum Signing Level that a Signer can bestow.

Accepted Root Keys

Let’s say that the Code Integrity library has received a request to validate the page hashes of an image destined to run with a protection level of Windows TCB, and thus presumably with Scenario 0 in the standard configuration. What prevents an unsigned binary from satisfying the scenario, or perhaps a test-signed binary, or even a perfectly validly signed binary, but from a random 3rd party company?

When Code Integrity performs its checks, it always remembers the Security Required bit mask, the Signature Level, and the Scenario. The first two are used early on to decide which Root CA authorities will be allowed to participate in the signature check — different request are subject to different accepted root keys, as per Table 5 below.

Note that in these tables, PRS refers to “Product Release Services”, the internal team within Microsoft that is responsible for managing the PKI process and HSM which ultimately signs every officially released Microsoft product.

Accepted Root Keys

Secure RequiredSigning LevelAccepted Root Keys
Protected ImageN/APRS Only
Hotpatch ImageN/ASystem and Self Signed Only
Driver ImageN/APRS Only
N/AStoreWindows and PRS Only
N/AWindowsWindows and PRS Only
N/AWindows TCBPRS Only
N/AAuthenticodePRS, Windows, Trusted Root

Additionally, Tabke 6 below describes overrides that can apply based on debug options or other policy settings which can be present in the Secure Boot Signing Policy:

Accepted Root Key Overrides

OptionEffect on Root Key Acceptance
Policy Option 0x80Enables DMD Test Root
Policy Option 0x10Enables Test Root
/TESTSIGNING in BCDEnables Test Root for Store and Windows TCB Signing Levels. ?Also enables System Root, Self Signed Root and allows an Incomplete Signing Chain for other levels.

Two final important exceptions apply to the root key selection. First, when a custom Secure Boot Signing Policy is installed, and it contains custom signers and scenarios, then absolutely all possible root keys, including incomplete chains, are allowed. This is because it will be the policy that determines which Signer/Hash, Scenario/Level mapping is valid for use, not a hard-coded list of keys.

The second exception is that certain signature levels are “runtime customizable”. We’ll talk more about these near the end of this post, but for now, keep in mind that for any runtime customizable level, all root keys are also accepted. We’ll see that this is because just like with custom signing policies, runtime customizable levels have additional policies based on the signer and other data.

As you can see, this first line of defense prohibits, for example, non PRS-signed image from ever being loaded as a driver or as a DRM-protected process. It also prevents any kind of image from ever reaching a signing level of Windows TCB (thus prohibiting the underlying protection level from ever being granted).

Of course, just looking at root keys can’t be enough — the Windows Root Key is used to sign everything from a 3rd party WHQL driver to an ELAM anti-malware process to a DRM-protected 3rd party Audio Processing Object. Additional restrictions exist in place to ensure the proper usage of keys for the appropriately matching signature level.

Modern PKI enables this through the presence of Enhanced Key Usage (EKU) extensions in a digital signature certificate, which are simply described by their unique OID (Object Identifier, a common format for X.509 certificates that describes object types).

Enhanced Key Usages (EKUs)

After validating that an image is signed with an appropriate certificate that belongs to one of the allowed root keys, the next step is to decide the signing level that the image is allowed to receive, once again keeping in mind the security required bit mask.

First of all, a few checks are made to see which root authority ultimately signed the image, and whether or not any failures are present, keeping account of debug or developer policy options that may have been enabled. These checks will always result in the Unsigned (1), Authenticode (4) or Microsoft (8) signature level to be returned, regardless of other factors.

In the success cases, the following EKUs, shown in Table 7, are used in making the first-stage determination:

EKU to Signing Level Mapping

EKU OID ValueEKU OID NameGranted Signing Level
1.3.6.1.4.311.76.3.1Windows StoreStore *
1.3.6.1.4.311.76.5.1Dynamic Code GeneratorDynamic Code Generation
1.3.6.1.4.311.76.8.1Microsoft PublisherMicrosoft
1.3.6.1.4.311.10.3.5Windows Hardware Driver VerificationMicrosoft
1.3.6.1.4.311.10.3.6Windows System Component VerificationWindows
1.3.6.1.4.311.10.3.20Windows Kits ComponentMicrosoft **
1.3.6.1.4.311.10.3.23Windows TCB ComponentWindows TCB
1.3.6.1.4.311.10.3.25Windows Third Party Application ComponentAuthenticode
1.3.6.1.4.311.10.3.26Windows Software Extension VerificationMicrosoft

* Configurable by Secure Boot Signing Policy
** Only if Secure Boot Signing Policy Issued by Windows Kits Publisher

Next, the resulting signature level is compared with the initial desired signature level. If the level fails to dominate the desired level, a final check is made to see if the signing level is runtime customizable, and if so, this case is handled separately as we’ll see near the end of this post.

Finally, if the resulting signature level is appropriate given the requested level, a check is made to see if the Security Required includes bits 2 (Protected Image) and/or 8 (Protected Light Image). If the latter is present, and if the Windows signature level (12) is requested, two additional EKUs are checked for their presence — at least one must be in the certificate:

  • 1.3.6.1.4.1.311.10.3.22, Protected Process Light Verification
  • 1.3.6.1.4.1.311.10.3.22, Protected Process Verification

In the former case, i.e.: a Security Required bit mask indicating a Protected Image, then if the Windows TCB signature level (14) was requested, only the latter EKU is checked.

System Components

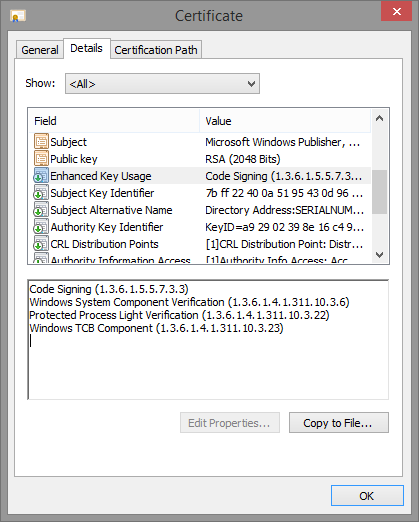
You can right-click on any PE file in Windows Explorer which has an embedded certificate and click on the “Digital Signatures” tab in the “Properties” window that you select from the context menu. By double-clicking on the certificate entry, and then clicking on “View Certificate”, you can scroll down to the “Enhanced Key Usages” line and see which EKUs are present in the certificate.

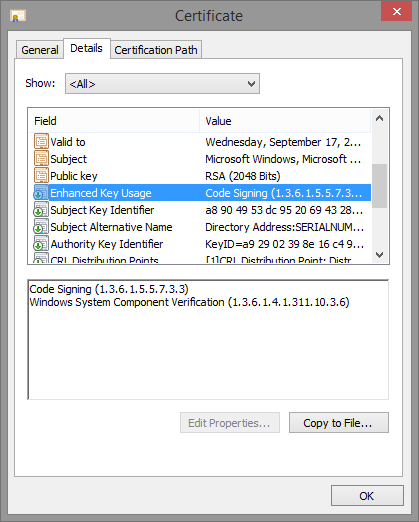
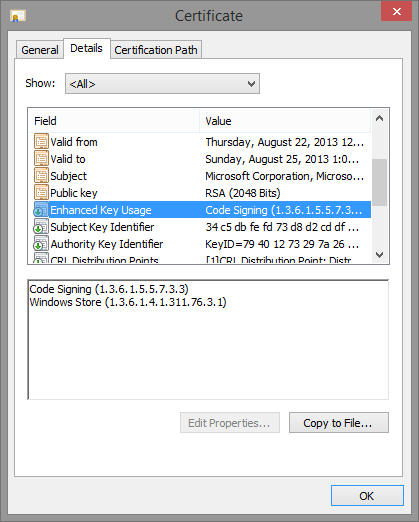
Here’s some screenshots of a few system binaries, which should now reveal familiar EKUs based on what we’ve seen so far.

First of all, here’s Audiodg.exe. All it has is the “Windows” EKU.

audiodg

Next up, here’s Maps.exe, which has the “Store” EKU:

Maps

And finally, Smss.exe, which has both the “Windows” and “Windows TCB” EKU, as well as the “Windows Process Light Verification” EKU.

smss

Runtime Signers 

We’ve mentioned a few cases where the system checks if a signature level is runtime customizable, and if so, proceeds to additional checks. As of Windows 8.1, in the absence of a Secure Boot Signing Policy, only level 7 fits this bill, which corresponds to “Custom 3 / Antimalware” from our first table. If a policy is present, then all the signature levels that have “Custom” in them unsurprisingly also become customizable, as well as the “Windows Protected Process Light” (13) level.

Once a level is determined to be customizable, the Code Integrity library checks if the signing level matches that of any of the registered runtime signers. If there’s a match, the next step is to authenticate the certificate information chain with the policy specified in the runtime signer registration data. This information can include an array of EKUs, which must be present in order to pass the test, as well as the contents hash of at least one signer, of the appropriate hash length and hashing algorithm.

If all policy elements pass the test, then the requested signature level will be granted, bypassing any other default system EKU or root key checks.

How does the system register such runtime signers? The Code Integrity library contains two API calls, SeRegisterSigningInformation and SeUnregisterSigningInformation through which runtime signers can be registered and deregistered. These calls are made by the kernel by SeRegisterElamCertResources which is done either when an Early-Launch Anti Malware (ELAM) driver has loaded (subject to the rules surrounding obtaining an ELAM certificate), or, more interestingly, at runtime when instructed so by a user-mode caller.

That’s right — it is indeed possible through calling the NtSetSystemInformation API, if using the SystemRegisterElamCertificateInformation information class, to pass the full path to a non-loaded ELAM driver binary. By using SeValidateFileAsImageType, the kernel will call into the Code Integrity library to check if the image is signed, using Scenario 17, which you’ll recall from Table 3 above is the ELAM scenario. If user-mode did not pass in a a valid ELAM driver, the request will simply fail.

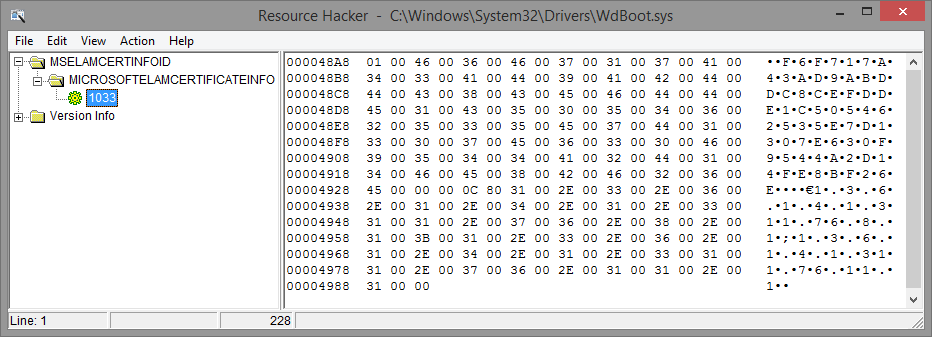
Once SeRegisterElamCertResources is called in either of these cases, it calls SepParseElamCertResources on the MICROSOFTELAMCERTIFICATEINFO section in order to parse an MSELAMCERTINFOID resource. Here is, for example, a screenshot of the resource data matching this name in Microsoft’s Windows Defender ELAM driver (Wdboot.sys):

ElamCert

This data is formatted according to the following rules below, which can be used in an .rc file when building your own ELAM driver. The sample data from the Windows Defender ELAM driver is also shown alongside in bold for easier comprehension.

MicrosoftElamCertificateInfo  MSElamCertInfoID
{
    <# of Entries, Max 3>,  -> 1
    L”Content Hash n\0”,    -> f6f717a43ad9abddc8cefdde1c505462535e7d1307e630f9544a2d14fe8bf26e
    <Hash Algorithm n>,     -> 0x800C (CALG_SHA_256)
    L”EKU1n;EKU2n;EKU3n\0”, -> 1.3.6.1.4.1.311.76.8.1;1.3.6.1.4.1.311.76.11.1
    … up to 2 more blocks …
}

This data is then packaged up into the runtime signer blob that is created by CiRegisterSigningInformation API and will be used for comparisons when the signing level matches — note that the kernel always passes in “7” as the signature level for the signer, since the kernel API is explicitly designed for ELAM purposes.

On the other hand, the internal CiRegisterSigningInformation API can be used for arbitrary signing levels, as long as the current policy allows it and the levels are runtime customizable. Also note that the limitation on up to 3 EKUs and 3 Signers is also enforced by the kernel and not by the Code Integrity library.

Running as Anti-Malware Protected Process Light

In the previous posts we explained some of the protections offered to PPLs and the different signers and levels available. In this post, we started by seeing how the presence of EKUs and particular root authority keys causes the system to allow or deny a certain binary from loading with the requested signature level (and thus protection level), as well as to how DLLs can be prohibited to load in such processes unless they too match a minimum signing level.

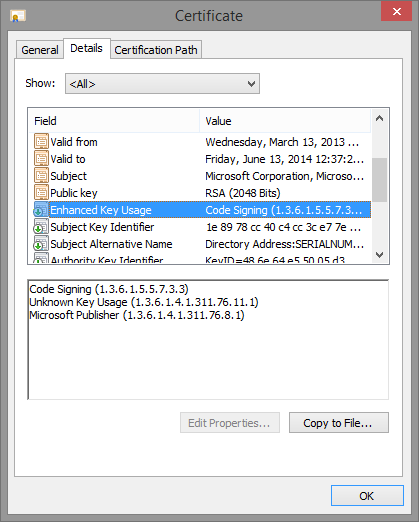
This should explain why a process like Smss or Csrss is allowed to run with a given protection level, but it didn’t quite explain why MsMpEng.exe or NisSrv.exe were allowed to run as PPLs, because their certificate EKUs, shown below, don’t match any specially handled level:

msmpeng

However, by taking a look at last section on runtime signers, as well as using the CertUtil utility to dump the content hash of the certificate used to sign the Windows Defender binaries you’ll note a distinct match between the information present in the resource section of the driver, and the information in the certificate.  See below for both the signature hash and the EKU presence:

elamhash

Because of the ELAM driver, this specific hash and EKU are registered as a runtime signer, and when the service launches, recall that by using the Protected Service functionality we saw in the previous post, the Windefend service requests a Win32 protection level of 3 — or an NT protection level of 0x31.  In turn, this translates to Signing Level 7 — because this level is runtime customizable, a the runtime signer check is then performed, and the hash and EKU is matched.

As we mentioned above, the SystemRegisterElamCertificateInformation information class can be used to request parsing of an ELAM driver’s resource section in order to register a runtime signer. It turns out that this undocumented information class is exposed through the new InstallELAMCertificateInfo API in Windows 8.1, which any 3rd party can legitimately call in order to tap into this behavior, as long as the driver is ELAM signed.

You don’t actually need to have any code in the ELAM driver, just enough of a valid PE image such that the kernel-mode loader can parse the .rsrc section and recover the MicrosoftElamCertificateInfo resource section.

Furthermore, recall that for runtime signers, all the usual root key and EKU checks are gone, instead relying on the policy that was registered. In other words, the system allows you to function as your own 3rd party CA, and issue certificates with custom content hashes for different signers. Or better yet, it is possible to attach custom EKUs to one’s binaries, in order to separate other binaries your organization may be signing.

Analysis

We have covered the details of these new cryptographic features in great detail.  Now I’d like to point out a few observations about the shortcomings and potential issues inherent to these new features.

As great and extensible as the new PPL system (and its accompanying PKI infrastructure) is, it is not without its own risks. For one thing, any company with an ELAM certificate can now create buggy user-mode processes (remember folks, these are AV companies we’re talking about…) that not only you can’t debug, but you also can’t terminate from user-mode. Although yes, on platforms without SecureBoot, this would be possible by simply using a kernel debugger or custom drivers, imagine less tech-savvy users stuck without being able to use Task Manager.

Additionally, a great deal of reliance seems to have been put on EKUs, which were relatively unknown in the past and mostly only used to define a certificate as being for “SSL” vs “Code Signing”. One can only hope that the major CAs are smart enough to have filters in place to avoid arbitrary EKUs being associated with 3rd party Authenticode certificates. Otherwise, as long as a signature level accepts a non-PRS root key, the infrastructure could easilyy be fooled by an EKU that a CA has allowed into a certificate.

Finally, as with all PKI implementations, this one is not without its own share of bugs. I have independently discovered means to bypass some of the guarantees being made around PPLs, and to illegitimately create an Antimalware process, as I posted in this picture.  I obviously don’t have an ELAM certificate (and the system is not in test-signing mode), so this is potentially a problem. I’ve reported the issue to Microsoft and am waiting more information/feedback before talking about this issue further, in case it is a legitimate bug that needs to be fixed.

Conclusion and Future Work

In this final post on protected processes, we delved deeply into the PKI that is located within the Code Integrity library in Windows 8.1, and we saw how it provides cryptographic boundaries around protected processes, PPLs, and signature levels reserved for particular usages.

At the same time, we talked about how custom signing policies, delivered through Secure Boot, can customize this functionality, and saw up to 6 “Custom” signing levels that can be defined through such a policy. Finally, we looked at how some of these signing levels, namely the Antimalware level by default, can be extended through runtime signers that can be registered either pre- or post-boot through special resource sections in ELAM drivers, thus leading to custom 3rd party PPLs.

In the near future, I intend to contribute patches to Process Hacker in order to add a new column to the process tree view which would show the process protection level in its native NT form, as this data is available through the NtQueryInformationProcess API call in Windows 8.1. The tooltip for this data would then show the underlying Signer and Level, based on the kernel headers I pasted in the earlier blog posts.

Last but not least, the term “Secure Boot Signing Policy” appears numerous times without a full explanation as to what this is, how to register one, and what policies such a construct can contain. It only seems fair to dedicate the next post to this topic – stay tuned!

Credits

The contents of this blog series could not have been made possible without the help and contributions of:

  • lilhoser
  • myriachan
  • msuiche

The Evolution of Protected Processes Part 2: Exploit/Jailbreak Mitigations, Unkillable Processes and Protected Services

Introduction

In this continuing series on the improvements of the protected process mechanism in Windows, we’ll move on past the single use case of LSASS protection and pass-the-hash mitigation through the Protected Process Light (PPL) feature, and into generalized system-wide use cases for PPLs.

In this part, we’ll see how Windows uses PPLs to guard critical system processes against modification and how this has prevented the Windows 8 RT jailbreak from working on 8.1. We’ll also take a look at how services can now be configured to run as a PPL (including service hosts), and how the PPL concept brings yet another twist to the unkillable process argument and semantics.

System Protected Processes

To start the analysis, let’s begin with a simple WinDBG script (you should collapse it into one line) to dump the current PID, name, and protection level of all running processes:

lkd> !for_each_process "
r? @$t0 = (nt!_EPROCESS*) @#Process;
.if @@(@$t0->Protection.Level) 
{
.printf /D \"%08x <b>[%70msu]</b> level: <b>%02x</b>\\n\",
    @@(@$t0->UniqueProcessId),
    @@(&@$t0->SeAuditProcessCreationInfo.ImageFileName->Name),
    @@(@$t0->Protection.Level)
}
"

The output on my rather clean Windows 8.1 32-bit VM, with LSA protection enabled as per the last post, looks something like below. I’ve added the actual string representation of the protection level for clarity:

script2

As a reminder, the protection level is a bit mask composed of the Protected Signer and the Protection Type:

PS_PROTECTED_SIGNER
PsProtectedSignerNone = 0n0
PsProtectedSignerAuthenticode = 0n1
PsProtectedSignerCodeGen = 0n2
PsProtectedSignerAntimalware = 0n3
PsProtectedSignerLsa = 0n4
PsProtectedSignerWindows = 0n5
PsProtectedSignerWinTcb = 0n6
PsProtectedSignerMax = 0n7
PS_PROTECTED_TYPE
PsProtectedTypeNone = 0n0
PsProtectedTypeProtectedLight = 0n1
PsProtectedTypeProtected = 0n2
PsProtectedTypeMax = 0n3

This output shows that the System process (the unnamed process), as has been the case since Vista, continues to be a full-fledged protected process, alongside the Software Piracy Protection Service (Sppsvc.exe).

The System process is protected because of its involvement in Digitial Rights Management (DRM) and because it might contain sensitive handles and user-mode data that a local Administrator could have accessed in previous versions of Windows (such as XP). It stands to reason that Sppsvc.exe is protected due to similar DRM-like reasons, and we’ll shortly see how the Service Control Manager (SCM) knew to launch it with the right protection level.

The last protected process we see is Audiodg.exe, which also heralds from the Vista days. Note that because Audiodg.exe can load non-Windows, 3rd party “System Audio Processing Objects” (sAPOs), it only uses the Authenticode Signer, allowing it to load the DLLs associated with the various sAPOs.

We also see a number of “WinTcb” PPLs – TCB here referring to “Trusted Computing Base”. For those familiar with Windows security and tokens, this is not unlike the SeTcbPrivilege (Act as part of the Operating System) that certain highly privileged tokens can have. We can think of these processes as essentially the user-mode root chain of trust provided by Windows 8.1. We’ve already seen that SMSS is responsible for launching LSASS with the right protection level, so it would make sense to also protect the creator. Very shortly, we’ll revisit what actual “protection” is really provided by the different levels.

Finally, we see the protected LSASS process as expected, followed by two “Antimalware” PPLs – the topic of which will be the only focus of Part 3 of this series – and one “Windows” PPL associated with a service host. Just like the SPP service, we’ll cover this one in the “Protected Services” section below.

Jailbreak and Exploit Mitigation

Note that it’s interesting that Csrss.exe was blessed with a protection level as well. It isn’t responsible for launching any special protected processes and doesn’t have any interesting data in memory like LSASS or the System process do. It has, however, gained a very nefarious reputation in recent years as being the source of multiple Windows exploits – many of which actually require running inside its confines for the exploit to function. This is due to the fact that a number of highly privileged specialized APIs exist in Win32k.sys and are meant only to be called by Csrss (as well as the fact that on 32-bit, Csrss has the NULL page mapped, and it also handles much of VDM support).

Because the Win32k.sys developers did not expect local code injection attacks to be an issue (they require Administrator rights, after all), many of these APIs didn’t even have SEH, or had other assumptions and bugs. Perhaps most famously, one of these, discovered by j00ru, and still unpatched, has been used as the sole basis of the Windows 8 RT jailbreak. In Windows 8.1 RT, this jailbreak is “fixed”, by virtue that code can no longer be injected into Csrss.exe for the attack. Similar Win32k.sys exploits that relied on Csrss.exe are also mitigated in this fashion.

Protected Access Rights

Six years ago in my Vista-focused protected process post, I enumerated the documented access rights which were not being granted to protected processes. In Windows 8.1, this list has changed to a dynamic table of elements of the type below:

RTL_PROTECTED_ACCESS
+0x000 DominateMask        : Uint4B
+0x004 DeniedProcessAccess : Uint4B
+0x008 DeniedThreadAccess  : Uint4B

PAGE:821AD398 ; _RTL_PROTECTED_ACCESS RtlProtectedAccess[]
PAGE:821AD398 <0,   0, 0>                [None]
PAGE:821AD398 <2,   0FC7FEh, 0FE3FDh>    [Authenticode]
PAGE:821AD398 <4,   0FC7FEh, 0FE3FDh>    [CodeGen]
PAGE:821AD398 <8,   0FC7FFh*, 0FE3FFh*>  [Antimalware]
PAGE:821AD398 <10h, 0FC7FFh*, 0FE3FFh*>  [Lsa]
PAGE:821AD398 <3Eh, 0FC7FEh, 0FE3FDh>    [Windows]
PAGE:821AD398 <7Eh, 0FC7FFh*, 0FE3FFh*>  [WinTcb]

Access to protected processes (and their threads) is gated by the PspProcessOpen (for process opens) and PspThreadOpen (for thread opens) object manager callback routines, which perform two checks.

The first, done by calling PspCheckForInvalidAccessByProtection (which in turn calls RtlTestProtectedAccess and RtlValidProtectionLevel), uses the DominateMask field in the structure above to determine if the caller should be subjected to access restrictions (based on the caller’s protection type and protected signer). If the check fails, a second check is performed by comparing the desired access mask with either the “DeniedProcessAccess” or “DeniedThreadAccess” field in the RtlProtectedAccess table. As in the last post, clicking on any of the function names will reveal their implementation in C.

Based on the denied access rights above, we can see that when the source process does not “dominate” the target protected process, only the 0x3801 (~0xFC7FE) access mask is allowed, corresponding to PROCESS_QUERY_LIMITED_INFORMATION, PROCESS_SUSPEND_RESUME, PROCESS_TERMINATE, and PROCESS_SET_LIMITED_INFORMATION (the latter of which is a new Windows 8.1 addition).

On the thread side, THREAD_SET_LIMITED_INFORMATION, THREAD_QUERY_LIMITED_INFORMATION, THREAD_SUSPEND_RESUME, and THREAD_RESUME are the rights normally given, the latter being another new Windows 8.1 access bit.

Pay attention to the output above, however, and you’ll note that, this is not always the case!

Unkillable Processes

In fact, processes with a Protected Signer that belongs to either Antimalware, Lsa, or WinTcb only grant 0x3800 (~0xFC7FF) – in other words prohibiting the PROCESS_TERMINATE right. And for the same group that prohibits PROCESS_TERMINATE, we can also see that THREAD_SUSPEND_RESUME is also prohibited.

This is now Microsoft’s 4th system mechanism that attempts to prevent critical system process termination. If you’ll recall, Windows Server 2003 introduced the concept of “critical processes”, which Task Manager would refuse to kill (and cause a bugcheck if killed with other tools), while Windows 2000 had introduced hard-coded paths in Task Manager to prevent their termination.

Both of these approaches had flaws: malware on Windows 2000 would often call itself “Csrss.exe” to avoid user-initiated termination, while calling RtlSetProcessIsCritical on Vista allowed malware to crash the machine when killed by AV (and also prevent user-initiated termination through Task Manager). Oh, and LSASS was never a critical process – but if you killed it, SMSS would notice and take down the machine. Meanwhile, AV companies were left at the mercy of process-killing malware, until Vista SP1 added object manager filtering, which allowed removing the PROCESS_TERMINATE right that could be granted to a handle.

It would seem like preventing PROCESS_TERMINATE to LSASS, TCB processes, and anti-virus processes is probably the mechanism that makes the most sense – unlike all other approaches which relied on obfuscated API calls or hard-coded paths, the process protection level is a cryptographic approach that cannot be faked (barring a CA/PKI failure).

Launching Protected Services

As SMSS is created by the System process, and it, in turn, creates LSASS, the SCM, and CSRSS, it makes sense for all of these processes to inherit some sort of protection level based on the implicit process creation logic in each of them. But how did my machine know to launch the SPP service protected? And why did I have one lone PPL service host? It turns out that in Windows 8.1, the Service Control Manager now has the capability of supporting services that need to run with a specific protection level, as well as performing similar work as the kernel when it comes to defending against access to them.

In Windows 8.1, when the SCM reads the configuration for each service, it eventually calls ScReadLaunchProtected which reads the “LaunchProtected” value in the service key. As you can see below, my “AppXSvc” service, for example, has this set to the value “2”.

registry

You’ll see the “sppsvc” service with this value set to “1”, and you’ll see “Windefend” and “WdNisSvc” at “3”. All of these match the new definitions in the Winsvc.h header:

//
// Service LaunchProtected types supported
//
#define SERVICE_LAUNCH_PROTECTED_NONE                    0
#define SERVICE_LAUNCH_PROTECTED_WINDOWS                 1
#define SERVICE_LAUNCH_PROTECTED_WINDOWS_LIGHT           2
#define SERVICE_LAUNCH_PROTECTED_ANTIMALWARE_LIGHT       3

The SCM saves the value in the SERVICE_RECORD structure that is filled out by ScAddConfigInfoServiceRecord, and when the service is finally started by ScLogonAndStartImage, it is converted to a protection level by using the g_ScProtectionMap array of tagScProtectionMap structures. WINDOWS becomes 0x52, WINDOWS_LIGHT  becomes 0x51, and ANTIMALWARE_LIGHT becomes 0x31 – the same values shown at the very beginning of the post.

tagScProtectionMap
+0x000 ScmProtectionLevel   : Uint4B
+0x004 Win32ProtectionLevel : Uint4B
+0x008 NtProtectionLevel    : Uint4B

.data:00441988 ; tagScProtectionMap g_ScProtectionMap[]
.data:00441988 <0, 0, 0>    [None]
.data:00441988 <1, 1, 52h>  [Windows Protected]
.data:00441988 <2, 2, 51h>  [Windows Light]
.data:00441988 <3, 3, 31h>  [Antimalware Light]

This now explains why NisSrv.exe (WdNisSvc), MsMpEng.exe (Windefend) were running as “Antimalware”, a Protected Signer we haven’t talked about so far, but which will be the sole focus of Part 3 of this series.

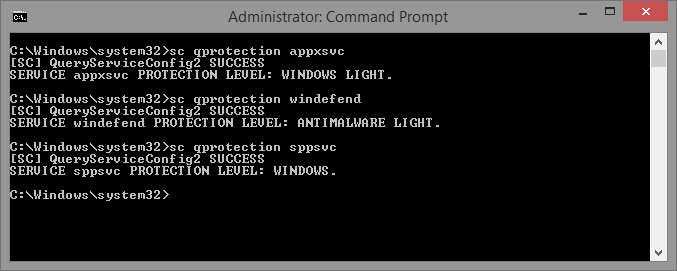
In addition, the command-line Sc.exe utility has also been updated, with a new argument “qprotection”, as seen in the screenshot below:

qprotection

Protected SCM Operations

When analyzing the security around protected services, an interesting conundrum arises: when modifying a service in any way, or even killing it, applications don’t typically act on the process itself, but rather communicate by using the SCM API, such as by using ControlService or StopService. In turn, responding to these remote commands, the SCM itself acts on its subjugate services.

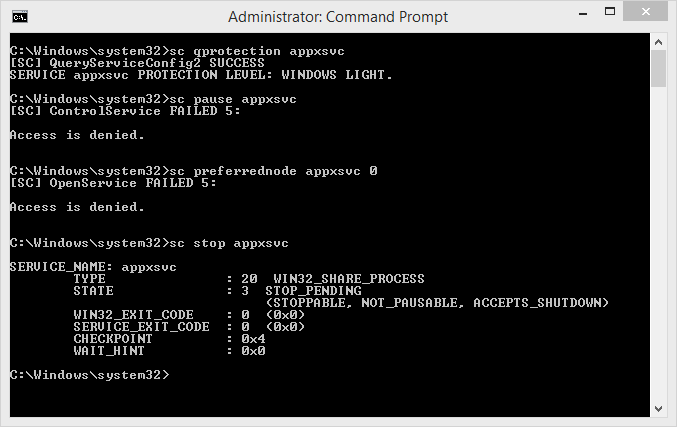
Because the SCM runs with the “WinTcb” Protected Signer, it “dominates” all other protected processes (as we saw in RtlTestProtectedAccess), and the access checks would be bypassed. In other words, a user with only SCM privileges would use the APIs to affect the services, even if they were running with a protection level. However, this is not the case, as you can see in my attempt below to pause the AppX service, to change its configuration, and to stop it – only the latter was successful.

appxsvc

This protection is afforded by new behavior in the Service Control Manager that guards the RDeleteService, RChangeServiceConfigW, RChangeServiceConfig2W, RSetServiceObjectSecurity, and RControlService remote function calls (RPC server stubs). All of these stubs ultimately call ScCheckServiceProtectedProcess which performs the equivalent of the PspProcessOpen access check we saw the kernel do.

As you can see in the C representation of ScCheckServiceProtectedProcess that I’ve linked to, the SCM will gate access to protected services to anyone but the TrustedInstaller service SID. Other callers will get their protection level queried, and be subjected to the same RtlTestProtectedAccess API we saw earlier. Only callers that dominate the service’s protection level will be allowed to perform the corresponding SCM APIs – with the interesting exception around the handling of the SERVICE_CONTROL_STOP opcode in the RControlService case.

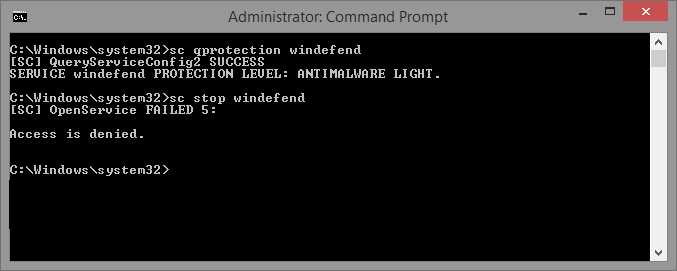
As the code shows, this opcode is allowed for Windows and Windows Light services, but not for Antimalware Light services – mimicking, in a way, the protection that the kernel affords to such processes. Here’s a screenshot of my attempt to stop Windows Defender:

windefend

Conclusion

In this post, we’ve seen how PPL’s usefulness extend beyond merely protecting LSASS against injection and credential theft.  The protected process mechanism in Windows 8.1 also takes on a number of other roles, such as guarding other key processes against modification or termination, preventing the Windows RT jailbreak, and ultimately obsoleting the “critical process” flag introduced in older Windows versions (as a side effect, it is no longer possible to kill Smss.exe with Task Manager in order to crash a machine!). We’ve also seen how the Service Control Manager also has knowledge of protected processes and allows “protected services” to run, guarding access to them just as the kernel would.

Finally, and perhaps most interestingly to some readers, we’ve also seen how Microsoft is able to protect its antivirus solution (Windows Defender) with the protected process functionality as well, including even preventing the termination of its process and/or the stopping of its service. Following the EU lawsuits and DOJ-settlement, it was obviously impossible for Microsoft to withhold this capability from 3rd parties.

In the next post in this series, we’ll focus exclusively on how a developer can write an Antimalware PPL application, launch it, and receive the same level of protection as Windows Defender.  The post will also explore mechanisms that exist (if any) to prevent such a developer from doing so for malicious purposes.

The Evolution of Protected Processes Part 1: Pass-the-Hash Mitigations in Windows 8.1

Introduction

It was more than six years ago that I first posted on the concept of protected processes, making my opinion of this poorly thought-out DRM scheme clear in the title alone: “Why Protected Processes Are A Bad Idea”. It appears that Microsoft took a long, hard look at the mechanism (granted, an impenetrable user-mode process can have interesting security benefits — if we can get DRM out of the picture), creating a new class of process yet again: the Protected Process Light, sometimes abbreviated PPL in the kernel.

Unlike its “heavy” brother, the protected process light actually serves as a type of security boundary, bringing in three useful mitigations and security enhancements to the Windows platform. Over the next three or four blog posts, we’ll see how each of these enhancements is implemented, starting this week with Pass-the-Hash (PTH) Mitigation.

We’ll talk about LSASS’ role in the Windows security model, followed by the technical details behind the new PPL model. And since it’s hard to cover any new security advancement without delving in at least a few other inter-related internals areas, we’ll also talk a little bit about Secure Boot and protected variables. Perhaps most importantly, we’ll also see how to actually enable the PtH mitigation, as it is currently disabled by default on non-RT Windows versions.

The LSASS Process

In Windows, local user accounts are hashed using a well-known algorithm (NTLM) and stored in a database called the SAM (Security Accounts Manager), which is in itself a registry hive file. Just like with other operating systems, a variety of offline, and online attacks exist in order to obtain, reset, or otherwise reuse the hashes that are stored in the SAM, going from the usual “Password Reset” boot emergency disks, to malicious privilege escalation. Additionally, a variety of other cryptographic data is also stored in the SECURITY database, yet another registry hive file. This data includes information such as secrets, saved plain-text passwords, and more.

A process called the Local Security Authority (LSASS) manages the run-time state of this information, and is ultimately responsible for all logon operations (including remote logon over Active Directory). Therefore, in order to obtain access to this data, two primary mechanisms are used:

1) File-based attacks: the SAM/SECURITY hives are accessed, either offline, or online through tricks such as using Volume Shadow Copies, and the hashes + secrets extracted. This mechanism has disadvantages in that the storage formats can change, detailed registry knowledge is needed, and LSASS will often obfuscate much of the data (such as plain-text cached passwords).

2) Process-based attacks: since the hash and secret data from #1 above is neatly loaded by LSASS in readable form (and accessible thanks to easy-to-use query APIs), it is often much more preferable to simply inject code into the LSASS process itself, which is then used to dump hashes or secrets, as well as to create tokens based on those hashes. Additionally, researchers such as Gentil Kiwi have even discovered that LSASS contains plain-text passwords using reversible symmetric cryptography (with the key stored in the LSASS process itself). Tools now exist today to not only pass-the-hash, but to also pass-the-pass. In a default Windows 8 installation, both the local user account password, as well as the Microsoft Live Services password, is available in a plaintext-retrievable way.

Obviously, both this file and the process are protected such that only the SYSTEM account can access them. But once running as Administrator, this is a simple hurdle — and since most users still run as Administrators (albeit with UAC, but that’s not a security boundary), exploits only have to escape whatever local sandbox they’re running in, get admin rights, get a system token, and inject into LSASS. And of course, in a shared computer environment, another admin on the machine can get the passwords of all the users.

What’s changed in Windows 8.1? Run Mimikatz or other pass-the-hash attacks and they still work out-of-the-box. But on a Windows 8.1 RT system (supposing one can compile for ARM), they won’t — in fact, even attempting to attach a debugger to the LSASS process will fail, regardless of user-mode permissions.

The title of this blog post gives it away: in Windows 8.1 RT, LSASS is now a protected process light. And with Registry Editor and the right key/value pair, your Windows 8.1 installation (non-RT) can take advantage of this too.

Protected Process Light Internals

Before taking a look at how to enable the mitigation, let’s see what makes a PPL tick. Unlike the simple “ProtectedProcess” bit in EPROCESS that I documented in Vista, a Windows 8.1 EPROCESS structure now has a “Protection” field of the following type:

_PS_PROTECTION
  +0x000 Level            : UChar
  +0x000 Type             : Pos 0, 3 Bits
  +0x000 Audit            : Pos 3, 1 Bit
  +0x000 Signer           : Pos 4, 4 Bits

Where type can be one of the following:

_PS_PROTECTED_TYPE
  PsProtectedTypeNone = 0n0
  PsProtectedTypeProtectedLight = 0n1
  PsProtectedTypeProtected = 0n2
  PsProtectedTypeMax = 0n3

and Signer can be one of these (excited about some of these other values? future blog posts will uncover more on signers and PPLs):

_PS_PROTECTED_SIGNER
  PsProtectedSignerNone = 0n0
  PsProtectedSignerAuthenticode = 0n1
  PsProtectedSignerCodeGen = 0n2
  PsProtectedSignerAntimalware = 0n3
  PsProtectedSignerLsa = 0n4
  PsProtectedSignerWindows = 0n5
  PsProtectedSignerWinTcb = 0n6
  PsProtectedSignerMax = 0n7

Let’s do some quick math and see if the LSASS process on my hardened Windows 8.1 system matches:

lkd> !process 0 0 lsass.exe
PROCESS ffffe000049ab900
lkd> ?? ((nt!_EPROCESS*)0xffffe000049ab900)->Protection.Level
unsigned char 0x41'

Because the bits are essentially nibbles, it’s easy to read 0x41 as Lsa (0x4) + PPL (0x1).

Once a process is in the PPL state, all the protections in my previous blog post are in effect — the system protects both types of protected processes in the same way, preventing any handle open for all but a few limited rights. Additionally, the memory manager will prevent loading of DLLs that are not signed appropriately, using the Code Integrity improvements in Windows 8 that I covered in my talk at BreakPoint last year — something I plan to revisit in this blog at a later time.

Finally, although I didn’t mention this back in the Vista days, the application compatibility database is also disabled for these processes — an interesting attack vector that is blocked thanks to this.

Enabling the Pass-the-Hash Mitigation

Now that we know about this improvement to the security architecture, how can one take advantage of it on a non-RT Windows 8.1 computer ? By looking at the updated flow of Wininit.exe, the process in charge for launching LSASS, one can see that the ExecSystemProcesses routine now calls GetLsaProtectionLevel which does a registry key read of HKLM\SYSTEM\CurrentControlSet\Control\Lsa for the value RunAsPPL. Before reading the registry however, it also calls ReadLsaConfigEnvironmentVariable — the importance of which we’ll see in a bit.

Either way, as long as one of these two things is set (the environment variable or the registry key), ExecSystemProcesses will call StartSystemProcess with the CREATE_PROTECTED_PROCESS flag. In turn, the routine will utilize the new Vista Process/Thread Attribute List functionality to add attribute 0x2000B — documented as the new Windows 8.1 “Protection Level Attribute“. As you can expect, the level is set to 4, which matches the “LSA Signer” enumeration value above. And just like that, LSASS is now a PPL, and protected against even an admin (or even SYSTEM) attacker. And no, not even SE_DEBUG_PRIVILEGE will get you through. Clicking on any of the linked function names will reveal Hex-Rays output to match this flow.

As a side note, is this all you need to launch as process as protected light — a protection level in a new attribute? Astute readers have probably already dumped the EPROCESS for Wininit.exe by now and noticed that, it too, is a PPL process (albeit, with a different Level!). The security model isn’t stupid — a PPL can only be launched by another PPL (or a PP, which is even more protected), and there’s a hierarchy in the levels as well, which we’ll see in a later post. Obviously, this means that Smss.exe (Wininit’s parent) must also be a PPL, and evidently the kernel has been running as a Protected Process since Vista. You could call this a user-mode protected chain of trust. These processes aren’t the only PPLs — we’ll see a lot more in a future post, and their purpose and configurability.

Should you run off and set that registry key? Yes and no. Once LSASS runs as a PPL, this will break any 3rd party software that might be attempting to inject or modify LSASS state. And sadly, at work, I’ve seen a number of these. Additionally, LSASS has a number of extensibility points, some used as ASEPs by attackers, others used legitimately to provide enhanced security or cryptographic services. Without the right signature and EKU (which right now means a WHQL signature with Microsoft as the signer — not just any Authenticode garbage!), those DLLs, plugins, and extensions will stop working. In certain IT scenarios, this can be a catastrophic compatibility problem, no doubt why Microsoft has chosen to keep this disabled for now.

But on a home computer, where you know you don’t have specialized software, and you firmly believe that AV (and others) should leave your LSASS alone? I’d say go for it. A number of helpful event log entries in the Security log will warn you of any DLLs that failed to load in case you’re curious.

Enhanced LSASS Mitigation With Secure Boot

Leaving the endless debate and controversy around Secure Boot aside, running Windows 8.1 on an UEFI-compatible machine with Secure Boot turned on will add an additional layer of security. Set the registry key as indicated above, reboot, watch LSASS run as a PPL, and now try deleting the registry key — then reboot again. LSASS will still run as a PPL. In fact, you can even re-install Windows 8.1, and LSASS will still run as a PPL. This is because Microsoft realized — if the attacker runs as Admin/SYSTEM and can inject into LSASS, but a registry key prevents this — why wouldn’t the Admin/SYSTEM attacker simply delete the key? Outside of active-key-monitoring shenanigans (which some parts of the kernel do employ, mostly licensing), not much. And definitely an offline attacker will have no problem editing the hive directly (unless BitLocker is also active).

This changes with Secure Boot however, as Windows has the ability to use the standard UEFI system variable runtime routines and set a value directly in the firmware store using SetFirmwareEnvironmentVariableEx API (and its kernel equivalents such as the NtSetSystemEnvironmentVariableEx and ExSetFirmwareEnvironmentVariable routines). To be fair, this is standard UEFI behavior; what Secure Boot brings to the table is the Namespace GUID that Windows can use — which if you were paying attention you saw in the ReadLsaConfigEnviromentVariable snippet earlier.

This GUID, {77FA9ABD-0359-4D32-60BD-28F4E78F784B}, is the “Protected Store” that Windows can use to store certain system properties it wants to protect. In this case, it stores a variable named Kernel_Lsa_Ppl_Config that is associated with the RunAsPPL value in the registry (to be 100% accurate, “it” here refers to Winload.efi, which upon loading the registry executes the OslFwProtectSecConfigVars routine) . As soon as this variable is set, the registry values no longer matter — PPL is enabled for LSASS.

What prevents a user from simply deleting this variable, or setting it to zero? Witness the following snippet in the NtSetSystemEnvironmentVariableEx system call, which executes for user-mode callers:

i = 0;
while (VendorGuid[i] == ExpSecureBootVendorGuid[i])
{
    ++i;
    if (i == 4)
    {
        if (!_wcsnicmp(CapturedVarName, L"Kernel_", 7))
        {
            ExFreePoolWithTag(CapturedVarName, 0);
            return STATUS_ACCESS_DENIED;
        }
        break;
    }
}

The intent is clear — any variables stored in the Secure Boot GUID, that start with Kernel_, are inaccessible from userspace — meaning that no Windows application can attempt to reset the protection. In fact, the only way to reset the protection is to boot into a special UEFI application written by Microsoft, which will wipe the environment variable based on the user’s input. An impressive security boundary, to say the least.

Conclusion

At the end of the day, what does running as PPL really mean for your system? Based on the limited access rights that protected processes (and PPLs) provide, a process, regardless of its token, can no longer open a handle for injection and/or modification permissions toward the LSASS process. Since this is critical for injecting the DLLs and/or threads that process-based PtH tools use, their use is thwarted. Additionally, attempts to load DLLs into LSASS through other means (such as AppInit_DLLs or LSA extensions) are also blocked, since the required digital signatures are missing. It’s important to mention that file-based hash attacks are not affected by these enhancements — at the end of the day, if someone has local console access to your unlocked, non-encrypted machine, it’s not your machine anymore.

With Windows 8.1, Protected Processes have evolved — taking on additional capabilities and now working to enhance security and protect users, instead of doing the bidding of the MPAA. One such new capability is the Pass-the-Hash mitigation and general hardening of the LSASS process — but there are a lot more. It’s one of the first of many general security and cryptographic  enhancements in Windows 8.1 which provide additional boundaries around Microsoft’s code — separating it from other people’s code. But just like Apple’s entitlement system, it’s not a fully walled garden. Further posts will explore not only additional uses of PPLs by Windows’ own binaries, but also (supported) options available for 3rd parties.


KASLR Bypass Mitigations in Windows 8.1

Introduction

As some of you may know, back in June of 2013, I gave a talk at Recon, a security conference in Montreal, about KASLR Information Bypasses/Leaks in the Windows NT kernel, entitled “I got 99 problems but a kernel pointer ain’t one”. The point of the presentation was both to collect and catalog the many ways in which kernel pointers could be leaked to a local userspace attacker (some of which were known, others not so much), as well as raise awareness to the inadequate protection, and sometimes baffling leaking of, such data.

After sharing my slides and presentation with some colleagues from Microsoft, I was told to “expect some changes in Windows 8.1”. I was initially skeptical, because it seemed that local KASLR bypasses were not at the top of the security team’s list — having been left behind to accumulate for years (a much different state than Apple’s OS X kernel, which tries to take a very strong stance against leaking pointers). As Spender likes to point out, there will always be KASLR bugs. But in Windows, there were documented APIs to serve them on a platter for you.

Restricted Callers

Our investigation begins with an aptly named new Windows 8.1 kernel function:

BOOLEAN
ExIsRestrictedCaller (
    _In_ KPROCESSOR_MODE PreviousMode
    )
{
    PTOKEN Token;
    NTSTATUS Status;
    BOOLEAN IsRestricted;
    ULONG IntegrityLevel;
    PAGED_CODE();

    //
    // Kernel callers are never restricted
    //
    if (PreviousMode == KernelMode)
    {
        return FALSE;
    }

    //
    // Grab the primary token of the current process
    //
    Token = PsReferencePrimaryToken(PsGetCurrentProcess());
    NT_ASSERT(Token != NULL);

    //
    // Get its integrity level
    //
    Status = SeQueryInformationToken(Token,
                                     TokenIntegrityLevel,
                                     &IntegrityLevel);
    ObDereferenceObject(Token);

    //
    // If the integrity level is below medium, or cannot be
    // queried, the caller is restricted.
    //
    if (!NT_SUCCESS(Status) ||
        IntegrityLevel < SECURITY_MANDATORY_MEDIUM_RID)
    {
        IsRestricted = TRUE;
    }
    else
    {
        IsRestricted = FALSE;
    }

    //
    // Return the caller's restriction state
    //
    return IsRestricted;
}

This now introduces a new security term in the Windows kernel lingo — a “restricted caller”, is a caller whose integrity level is below Medium. For those unfamiliar with the concept of integrity levels, this includes most applications running in a sandbox, such as Protected Mode IE, Chrome, Adobe Reader and parts of Office. Additionally, in Windows 8 and higher, it includes all Modern/Metro/TIFKAM/MoSH/Immersive/Store applications.

So, what is it exactly that these restricted callers cannot do?

System-wide Information Mitigations

First of all, STATUS_ACCESS_DENIED is now returned when calling NtQuerySystemInformation, with the following classes:

SystemModuleInformation — Part of my (and many others) presentation, this disables the EnumDeviceDrivers API and hides the load address of kernel drivers (finally!).

SystemModuleInformationEx — A new information class that was recently added in Vista and leaked as much as the one above.

SystemLocksInformation — Part of my presentation (and also found by j00ru), this leaked the address of ERESOURCE locks in the system.

SystemStackTraceInformation — Indirectly mentioned in the ETW/Performance section of my presentation, this leaked kernel stack addresses, but only if the right global flags were set.

SystemHandleInformation — Part of my presentation, and well known beforehand, this was NT’s KASLR-fail posterboy: leaking the kernel address of every object on the system that had at least one handle open (i.e.: pretty much all of them).

SystemExtendedHandleInformation — Another new Vista information class, which was added for 64-bit support, and leaked as much as above.

SystemObjectInformation — Part of my presentation, if the right global flags were set, this dumped the address of object types and objects on the system, even if no handles were open.

SystemBigPoolInformation — Part of my presentation, this dumped the address of all pool (kernel heap) allocations over 4KB (so-called “big” allocations).

SystemSessionBigPoolInformation — The session-specific little brother of the above, perfect for those win32k.sys exploits.

Thread Information Mitigations

But that’s not all! Using the well-known SystemProcessInformation information class, which famously dumps the entrypoint addresses of system threads (pretty much giving you a function pointer into almost all loaded drivers), as well as the kernel stack base and stack limit of all the threads on the system (used by j00ru in his GS-stack-cookie-guessing attacks, since the cookie is partly generated with this information), now introduces some additional checks.

First of all, there are now three information classes related to this data.

SystemProcessInformation, which is well-understood.

SystemExtendedProcessinformation, which was documented by j00ru and wj32. This returns the SYSTEM_EXTENDED_THREAD_ INFORMATION structure containing the stack base, limit, and Win32 start address.

SystemFullProcessInformation, which is new to Windows 8.1. This returns the SYSTEM_PROCESS_INFORMATION_EXTENSION below:

+0x000 DiskCounters : _PROCESS_DISK_COUNTERS (the new Windows 8 I/O counters at the disk level, copied from EPROCESS)
+0x028 ContextSwitches : Uint8B (Copied from KPROCESS)
+0x030 Flags : Uint4B (See below)
+0x030 HasStrongId : Pos 0, 1 Bit (in other words, strongly named -- AppContainer)
+0x030 Spare : Pos 1, 31 Bits (unused)
+0x034 UserSidOffset : Uint4B (The offset, hardcoded to 0x38, of the primary user SID)

(By the way, I hear Microsoft is taking suggestions on the upcoming 4th information class in Windows 9. Current leader is SystemFullExtendedProcessInformation.)

It’s unfortunate that Microsoft continues to keep these APIs undocumented — the documented Win32 equivalents require up to 12 separate API calls, all of which return the same data 12 times, with the Win32 interface only picking one or two fields each time.

Back to our discussion about KASLR, the behavior of this information class is to also apply the restricted caller check. If the caller is restricted, then the stack limit, stack base, start address, and Win32 start address fields in the thread structures will all be zeroed out. Additionally, to use the new “full” information class, the caller must be part of the Administrators group, or have the Diagnostic Policy Service SID in its token. Interestingly, in these cases the restricted caller check is not done — which makes sense after all, as a Service or Admin process should not be running below medium integrity.

Process Information Mitigations

The checks for restricted callers do not stop here however. A few more interesting cases are protected, such as in NtQueryInformationProcess, in which ProcessHandleTracing is disabled for such callers. I must admit this is something I missed in my KASLR analysis (and no obvious hits appear on Google) — this is an Object Manager feature (ironically, one which I often use) related to !obtrace and global flags, which enables seeing a full stack trace and reference count analysis of every object that a process accesses. Obviously, enabling this feature on one own’s process would leak the kernel pointers of all objects, as well as stack traces of kernel code and drivers that are in the path of the access (or running in the context of the process and performing some object access, such as during an IRP).

Another obvious “d’oh!” moment was when seeing the check performed when setting up a Profile Object. Profile Objects are a little-talked about feature of NT, which primarily power the “kernrate” utility that is now rather deprecated (but still useful for analyzing drivers that are not ETW-friendly). This feature allows the caller to setup “buckets” — regions of memory — in which every time the processor is caught with its instruction pointer/program counter cause a trace record to be recorded. In a way similar to some of the cache/TLB prediction attacks shown recently, in which the processor’s trace buffer is queried for address hits, the same could be setup using an NT profile object, which would reveal kernel addresses. In Windows 8.1, attempts to setup buckets above the userspace barrier will result in failure if the caller is restricted.

Last but not least, the ProcessWorkingSetWatch and ProcessWorkingSetWatchEx classes of NtQueryInformationProcess are also now protected. I didn’t talk about these two at Recon, and again I’m not aware of any other public research on these, but they’ve always been my favorite — especially because PSAPI, documented on MSDN, exposes Win32 friendly versions of these (see GetWsChanges). Basically, once you’ve turned WS Watch on your process, you are given the address of every hard fault, as well as the instruction pointer/program counter at the time of the fault — making it a great way to extract both kernel data and code addresses. Instead of going through the trouble of pruning kernel accesses from the working set watch log, the interface is now simply completely disabled for restricted callers.

Conclusion

Well, there you have it folks! Although a number of undocumented interfaces and mechanisms still exist to query protected KASLR pointers, the attack surface has been greatly decreased — eliminating almost all non-privileged API calls, requiring at least Medium IL to use them (thus barring any Windows Store Apps from using them). This was great work done by the kernel security team at Microsoft, and continues to showcase the new lengths at which Windows is willing to go to maintain a heightened security posture. It’s only one of the many other exciting security changes in Windows 8.1

New Security Assertions in “Windows 8”

Anyone reversing “Windows 8” will now find a non-familiar piece of code, whenever a list insertion operation is performed on a LIST_ENTRY:

.text:00401B65                 mov     edx, [eax]
.text:00401B67                 mov     ecx, [eax+4]
.text:00401B6A                 cmp     [edx+4], eax
.text:00401B6D                 jnz     SecurityAssertion
.text:00401B73                 cmp     [ecx], eax
.text:00401B75                 jnz     SecurityAssertion
....
.text:00401C55 SecurityAssertion:               
.text:00401C55
.text:00401C55                 push    3
.text:00401C57                 pop     ecx
.text:00401C58                 int     29h

Or, seen from Hex-Rays:

if ( ListEntry->Flink->Blink != ListEntry ||
     Blink->Flink != ListEntry )
{
  __asm { int     29h   } // Note that the "push 3" is lost
}

Dumping the IDT reveals just what exactly “INT 29h” is:

lkd> !idt 29

Dumping IDT:

29: 80d5409c nt!_KiRaiseSecurityCheckFailure

Which would indicate that Win8 now has a new kind of “ASSERT” statement that is present in retail builds, designed for checking again certain common security issues, such as corrupted/dangling list pointers.

Thankfully, Microsoft was nice enough to document where this is coming from, and I’ve even been told they want to encourage its use externally. Starting in “Windows 8”, if you leave NO_KERNEL_LIST_ENTRY_CHECKS undefined, the new LIST_ENTRY macros will add a line RtlpCheckListEntry(Entry); to verify the lists between operations. This expands to:

FORCEINLINE
VOID
RtlpCheckListEntry(
    _In_ PLIST_ENTRY Entry
    )
{
    if ((((Entry->Flink)->Blink) != Entry) ||
        (((Entry->Blink)->Flink) != Entry))
    {
        FatalListEntryError(
            (PVOID)(Entry),
            (PVOID)((Entry->Flink)->Blink),
            (PVOID)((Entry->Blink)->Flink));
    }
}

So what is FatalListEntryError?

FORCEINLINE
VOID
FatalListEntryError(
    _In_ PVOID p1,
    _In_ PVOID p2,
    _In_ PVOID p3
    )
{
    UNREFERENCED_PARAMETER(p1);
    UNREFERENCED_PARAMETER(p2);
    UNREFERENCED_PARAMETER(p3);

    RtlFailFast(FAST_FAIL_CORRUPT_LIST_ENTRY);
}

At last, we can see where the INT 29H (push 3) seems to be stemming from. In fact, RtlFastFail is then defined as:

//++
//VOID
//RtlFailFast (
//    _In_ ULONG Code
//    );
//
// Routine Description:
//
//    This routine brings down the caller immediately in the
//    event that critical corruption has been detected.
//    No exception handlers are invoked.
//
//    The routine may be used in libraries shared with user
//    mode and kernel mode.  In user mode, the process is
//    terminated, whereas in kernel mode, a
//    KERNEL_SECURITY_CHECK_FAILURE bug check is raised.
//
// Arguments
//
//    Code - Supplies the reason code describing what type
//           of corruption was detected.
//
// Return Value:
//
//     None.  There is no return from this routine.
//
//--
DECLSPEC_NORETURN
FORCEINLINE
VOID
RtlFailFast(
    _In_ ULONG Code
    )
{
    __fastfail(Code);
}

And finally, to complete the picture:

//
// Fast fail failure codes.
//
#define FAST_FAIL_RANGE_CHECK_FAILURE         0
#define FAST_FAIL_VTGUARD_CHECK_FAILURE       1
#define FAST_FAIL_STACK_COOKIE_CHECK_FAILURE  2
#define FAST_FAIL_CORRUPT_LIST_ENTRY          3
#define FAST_FAIL_INCORRECT_STACK             4
#define FAST_FAIL_INVALID_ARG                 5
#define FAST_FAIL_GS_COOKIE_INIT              6
#define FAST_FAIL_FATAL_APP_EXIT              7

#if _MSC_VER >= 1610
DECLSPEC_NORETURN
VOID
__fastfail(
    _In_ unsigned int Code
    )
#pragma intrinsic(__fastfail)
#endif

So there you have it, the new __fastfail intrinsic generates an INT 29H, at least on x86, and the preceding 8 security failures are registered by Windows — I assume driver developers and user application developers could define their own internal security codes as well, preferably starting with a high enough ID not to interfere with future codes Microsoft may choose to add.

The bugcheck, by the way, is defined as:

//
// MessageId: KERNEL_SECURITY_CHECK_FAILURE
//
// MessageText:
//
// A kernel component has corrupted a critical data structure.
// The corruption could potentially allow a malicious user to
// gain control of this machine.
//
#define KERNEL_SECURITY_CHECK_FAILURE ((ULONG)0x00000139L)

This is a great mechanism that should make security issues much more “visible” to users, even if it means taking the system down. Hopefully the new and improved blue screen of death — the Sad Face Of Sorrow (SFOS) — will give users more indication as to why their system had to be taken down, as the current implementation lacks the details needed to differentiate between a crash, and a security failure such as this.

Windows Internals 5th Edition, at last!

I am very pleased to announce that the 5th Edition of the Windows Internals book series is finally shipping for the past couple of weeks, and hard copies are now arriving in the hands of most customers! As my last blog post indicates, I took a hiatus from most of my typical work in the security and reverse engineering field and focused all of my energy into the book, outside of other commitments such as the Windows internals classes I teach for David Solomon Expert Seminars, so I thought it helpful to give my own perspective on the book itself, and on my work and the experience of working alongside the two legends of Windows internals knowledge. With that in mind, if you haven’t done so already, I’d invite you to read over Mark’s blog post on the book, as well as take a look at the short interview that David and Mark did on Channel 9 — it covers a lot of information on the latest release that I might not have covered in this post.

When we first set out to work on the 5th Edition, we decided early on to make three underlying changes to the existing content (and by extension, any new content as well). The first was to remove all references to previous versions other than the ones targeted by this edition (Windows Vista SP1 and Server 2008, specifically). We had realized that covering what would now be 5 different versions of the kernel (5.0 through 6.0 SP1) would generate too much redundant text, confusing explanations and questionably useful comparisons (such as let’s say, the evolution of how many buckets a given kernel component uses to store string hashes — driven probably only by the increase in average computer specifications across releases, and not some deeper mystery in the kernel). Windows mechanisms weren’t the only thing trimmed down to cover today’s reality however — references to old tools, unsupported resource kits, etc., were also removed.

When working on this edition, this was a significant challenge, because while it is relatively easy to get lots of information on major new Vista changes and improvements, it’s much harder to track down the little details that may have been valid at one time, but not anymore, and to rid the book of any archaic references, algorithms or values. Additionally, the second decision was to try minimizing giving out the values of certain variables and tuning parameters that the kernel uses. For one part, this creates the unfortunate scenario of developers copying down those values and then later depending on them in their software, which is a bad idea that only leads to more crashes for customers. For the other, it also makes it hard for us, as authors, to have to track down the exact values every single time Windows is updated — additionally, if the values changed significantly, people might expect explanations for these changes, when sometimes they are just as simple as “performance testing showed this to be a better number in today’s computers”. Because the variable name, its usage and the scale of its value are still referenced however, this still gives the reader the required understanding and, if someone really wants the value, they can use the same tools as the authors to obtain it (such as using the Windows Debugging Tools with the appropriate symbols).

As you can see, an important part of this update wasn’t even related to adding new information on Vista and Server 2008, but rather to bring the book up to even higher quality and technical standards, a lofty goal considering the already highly polished previous editions. Our editor and everyone else at Microsoft Press, as well as the dozens of reviewers (actual developers working on the features we describe!) were a big help in this area, so they deserve a very large thank you.

Of course, that’s only a small amount of the work required to create a new edition, so the bulk of the work went into creating new content that would cover the many changes and improvements that the 6.0 series of kernels added to the system, which, as you undoubtedly know, is nothing to sneeze at. However, before even discussing new content for the latest Windows release, we decided that certain older and still existing technologies and components of Windows merited some coverage in this release, especially given that many other older components had now been removed. Some of these components and mechanisms include:

  • The image loader in Ntdll.dll (the functions starting with Ldr)
  • The user-mode debugging framework (the Dbgk kernel functions and their DbgUi counterparts in Ntdll.dll)
  • 64-bit system call table and compaction
  • Kernel Patch Protection (Patchguard), introduced in 64-bit Windows Server 2003, so technically not a new Vista change
  • Hotpatch (patching at runtime) technology, also introduced in Server 2003
  • Enhanced description of the object manager component
  • Coverage of the pushlock synchronization primitive, added in XP and improved in Server 2003
  • Easier to read and updated scheduling section to cover only multiprocessor scheduling (introduced in Windows Server 2003, the older XP uniprocessor scheduler is now gone since Vista only ships multiprocessor binaries)
  • Enhancements for Non-Uniform Memory Architecture (NUMA), also introduced in Server 2003, and further improved each release
  • The crash analysis section has benefited from some more expert input thanks to seasoned reviewers, as well as certain enhanced troubleshooting scenarios (such as a stack trash)
  • The memory manager section has a new section on stacks and virtual address descriptors (VADs)
  • The crash dump analysis section now accurately describes crash dump file generation, which was improved in Server 2003
  • The Common Log File System (CLFS), introduced in Server 2003 R2, is now described in depth, as it has evolved from an optional component for servers into an essential part of the system, providing the underlying logging for the transactional registry (TxR) and file system (TxF).
  • EFI and exFAT technologies also have received better and more up to date information, as they evolved independently since the last edition

There have been smaller changes throughout the book, and you can imagine that a third pair of eyes has probably definitely helped at redefining certain terms, clarifying certain explanations, and added additional input to existing content.

Finally, we’re left with all the new content that was added specifically for this edition to cover the multiple changes in Vista and Server 2008 — I won’t list them all (because you should buy the book and discover it on your own!), but here’s a list of some of my favorite new sections and changes (this list may be long, but the total number of changes is actually more than double!)

  • User-mode locking mechanisms (run-once initialization, condition variables, and slim reader-writer (SRW) locks)
  • ALPC, advanced local procedure call
  • Hypervisor (Hyper-V)
  • Kernel Transaction Manager (KTM) as a section, as well as coverage of the built-in transactional registry (TxR) and transactional NTFS (TxF) in their respective sections
  • Code Integrity (and the Kernel Mode Code Signing policy)
  • Kernel Patch Protection, covering the latest Patchguard 3.0 features and details
  • WDI, the Windows Diagnostic Infrastructure
  • Completely revamped process and thread startup flow to cover the improvements to support protected processes and re-factor the process mechanisms, thanks to the hard work put in by Arun Kishan who owns the scheduler and process management code, which hadn’t been overhauled in a long while
  • Changes performed to the scheduler to better handle NUMA and SMP machines
  • The new worker factory kernel component which handles the user-mode and .NET thread pool
  • The re-architected storage stack (from the StorPort class driver to the volume and partition managers, as well as the new dynamic volume management and virtual disk service drivers)
  • In-depth coverage of UAC (User Account Control) and how it makes running as standard user more convenient for users, as well as information on related technologies such as integrity levels (ILs) and user interface privilege isolation (UIPI)
  • Another large section on the Windows Driver Foundation (WDF), including both KMDF (the Kernel Mode Driver Framework) and UMDF (its user-mode counterpart)
  • Updates on hardware no-execute (data execution prevention, or DEP) support, including the many flags and workarounds that are implemented
  • Complete coverage on BitLocker and TPM support — in my opinion one of the most   technical and complete descriptions of this feature and its implementation
  • Coverage of the new heap manager improvements in Vista, thanks to Adrian Marinescu once again
  • More efficient VACB (Virtual Address Control Block) array management in the cache manager
  • Completely new boot architecture, including support for UEFI/EFI, and the refactored boot process using Bootmgr and Winload (and Winresume)
  • Updates on the new error handling mechanism in Windows (WER), both for user-mode crashes and kernel-mode crashes (blue screen of death)
  • Performance: ReadyBoot and ReadyBoost are described in their appropriate sections
  • Tools: WDK, Reliability and Performance Monitor, updates to driver verifier and its Vista options and improvements, updated and new Sysinternals tools, as well as my own Winsider Seminars and Solutions tools.

One of the two chapters that I feel deserve more than just a bullet include the memory manager chapter, which covers one of the components that receives the most continuous attention and optimization even from one build to the next, thanks to the heavy work Landy Wang, its owner, puts in. These include the new dynamic virtual address space layout in kernel-mode, as well as the ASLR technology in user mode, the new NUMA optimizations, page fault clustering and other working set and PFN database optimizations and improvements, and last but not least, an entire section dedicated to the new memory prioritization and performance enhancing technology that is SuperFetch. So many people don’t understand what SuperFetch does, including myself when I first set out to document this feature, that I feel this section alone is worth getting the new edition — this is information you won’t find anywhere else at this level of accuracy (and a large part of that is thanks to the SuperFetch developers that spent entire days over the phone and lunch with me to make sure we nailed this).

The last chapter that deserves a mention is the networking chapter. I almost left this chapter as last during the book revision, thinking that there were very few things worth mention and that really needed updating. This was a mistake on my part, largely due to my inexperience with this one part of Windows (and technically, not a part of the kernel itself). I soon discovered that I was dead wrong, and that networking technologies in Vista had received among the most improvements, changes and new features, as well as a major deprecation of older technologies and services.

This chapter probably got the most updates, and almost every page has been changed, from the new user-level APIs, to the redesigned TCP/IP stack, the kernel-level deprecation of TDI and introduction of WSK (WinSock Kernel), the new NDIS 6.0, the new Windows Filtering Platform (WFP) and more. All the top services are now described, such as BITS (the Background Intelligent Transfer Service), the location and topology services such as Network Location Awareness (NLA) and Link-Layer Topology Discovery (LLTD), the quality of service services (the new policy-based QoS and qWAVE, or Quality Windows Audio Video Experience, come to mind) and let’s not forget the new peer to peer service infrastructure, as well as the Peer Name Resolution Protocol (Pnrp). More minor changes include updates to the Distributed File System (DFS) technologies, the binding infrastructure and deprecation of older networking technologies such as NetBEUI and ATM.

If you weren’t sure what’s new in this edition and if it’s really worth buying even if you own the 4th Edition, I hope this convinces you otherwise — it’s a significant and worthwhile update, and goes beyond just covering Vista. As Dave and Mark mentioned in their video, it’s also an unbeatable reference and tool for your understanding of Windows 7, since it builds upon the Vista foundation and, in most ways, works identically. And for those things that did change, you can bet we’ll have a 6th Edition out to cover the latest OS, and it’ll be a lot quicker out the door too.

Finally, on a more personal note, I’d like to publicly state that working with Dave and Mark was as much a delight as it was an honor. I have worked with, and for, many other people in the past, and could not have hoped for a smoother and more productive cooperation and work relationship than this one. As a neophyte to writing a book (especially of this magnitude) and keeping track of the dozens of things that needed to get done (from screenshots, to reviews, to writing content, to writing tools), I was probably not the most organized and timely co-author out there, but Mark and Dave understood this and made this a learning experience as well as a unique professional opportunity. I would like to thank them for bringing me on board the project in the first place, staying the course with me, and being there at every turn with suggestions, advice and help, from cross-referencing through sources to setting up meetings with Microsoft developers. I cannot wait to get started on the 6th Edition.

Co-Authoring Windows Internals 5th Edition

I’ve been a bit slow updating the blog, and so today, I want to take the time to explain what’s been keeping me busy by shareing some exciting news. As this post’s title suggests, I am indeed co-authoring Windows Internals 5th Edition, the latest update to Mark Russinovich and David Solomon‘s Windows Internals 4th Edition book.

The book will mark a return to the previous format of the series — unlike the last edition which covered all supported Windows NT operating systems (2000, XP, 2003), this edition will only cover the Vista and Server 2008 operating systems. This is a great change, because it means less time is explaining minute differences between the 4 different algorithms used in a lookup in each version, and more time is spent talking about what really matters — the behavior and design decisions of the OS.

I’m happy to say this new edition will have a least 250 pages of new information, not only updating various chapters with new Vista/Server 2008 changes, but also adding entirely new sections which previous editions had never touched on, such as the user mode loader in Ntdll.dll, the user mode debugging framework, and the hypervisor. It isn’t only the internals information that will benefit from the update; as a matter of fact, all references to tools, resources and books have also been updated, including up-to-date information on the latest Sysinternals tools, as well as exciting, helpful new experiments that demonstrate the behaviors explained in the text. For those of you who have read Mark’s TechNet Magazine “Inside Vista Kernel Changes” series and its Server 2008 counterpart (for those who haven’t, I strongly suggest you do!), you’ll be glad to know that the book includes all that information and expands on it as well.

The book work is still ongoing, but planned to end soon, after which it should go to print in October and be on shelves in January 2009. My book work is about to reach its one-year anniversary, and I must say that working with Mark and David has been a pleasurable learning experience, as well as a great chance to continue my reverse engineering work and hone my skills. What made ReactOS fun was being able to share my discoveries with the world as code — the book work has allowed me to share that information as text, part of the best internals book available, to a much wider audience. I’m thankful for that, and I can’t wait for everyone to have a chance to read it!

Look for the book hitting your nearest bookstore just after New Year’s. As a sneak peak, here’s a high-quality copy of the book’s cover while you wait.

Book Cover